Embarking on a Deadpool amigurumi project is a vibrant dive into the world of one of Marvel’s most irreverent and beloved characters. This crocheted rendition of the “Merc with a Mouth” brings a unique blend of whimsy and sass to the art of amigurumi. With his trademark red and black suit, complete with utility belt and twin katanas, each Deadpool amigurumi captures the essence of the anti-hero in a form that’s both huggable and mischievously charming. The contrast of his cheeky character with the typically gentle craft of crochet creates a delightful paradox that fans of Deadpool are sure to appreciate.
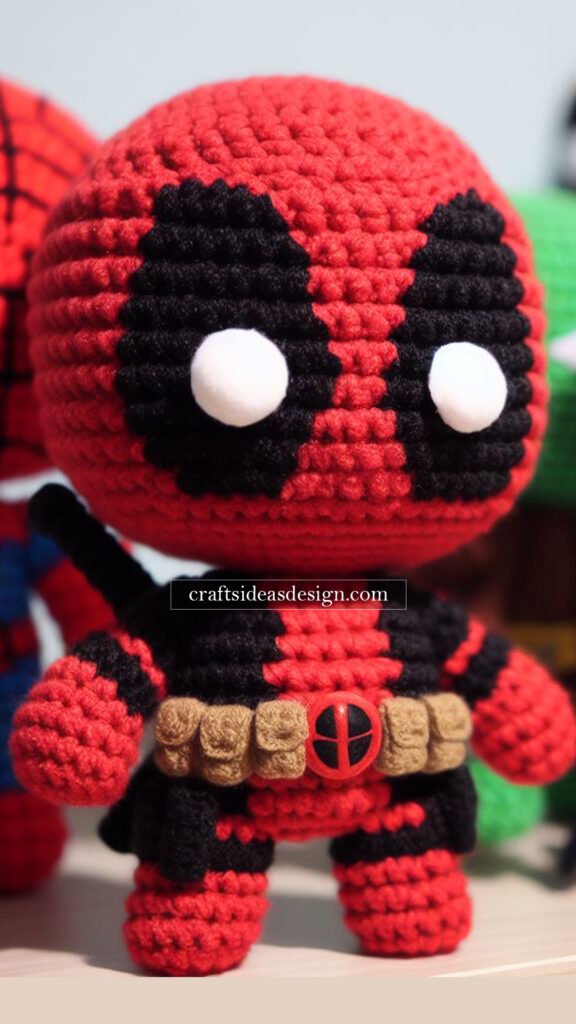
Crafting Deadpool in yarn involves an exciting exploration of color and detail. His suit’s distinct black patterns, the utility pouches around his waist, and even his masked face with those expressive white eyes must be carefully replicated to bring out his unique superhero persona. The challenge lies in capturing both the sleekness of his attire and the playful attitude he embodies. As you stitch together his form, you’re not just creating a figure; you’re weaving Deadpool’s bold and brash spirit into every loop and knot.
For those ready to take on the task of creating this unconventional hero, the Deadpool amigurumi pattern offers a step-by-step guide. The pattern is designed to assist crafters in bringing to life Deadpool’s iconic look, from his nimble boots to his smirking mask. Whether it’s a gift for a Deadpool aficionado, a quirky addition to a superhero collection, or just a fun project to challenge your crocheting skills, this pattern is your ticket to a crafting adventure with a twist. Below, the Deadpool amigurumi pattern awaits, ready to leap off your crochet hook in a burst of daring and humor.
Materials:
- Yarn: Medium weight (#4) in red, black, beige, and brown
- Crochet hook: 3.5 mm or size needed to achieve tight stitches
- Stitch markers
- Fiberfill stuffing
- White, black, and red felt
- Fabric glue
- Yarn needle
- Safety eyes (around 9mm) or black buttons
- Two black pipe cleaners or stiff black felt for the swords
Stitches & Techniques:
- Magic ring (mr)
- Single crochet (sc)
- Increase (inc) – Make 2 sc in the same stitch
- Invisible decrease (dec) – Decrease using the front loops only
- Slip stitch (sl st)
- Half double crochet (hdc)
- Back loops only (BLO)
- Front loops only (FLO)
- Changing colors in amigurumi (cc) – Complete the last yarn over of the stitch before the color change with the new color
Head (in rounds):
- With black yarn, mr with 6 sc (6 sts)
- [Inc] x 6 (12 sts)
- [Sc, inc] x 6 (18 sts)
- [2 sc, inc] x 6 (24 sts)
- [3 sc, inc] x 6 (30 sts)
- [4 sc, inc] x 6 (36 sts) 7-9. Sc in each st around (36 sts)
- [5 sc, inc] x 6 (42 sts) 11-13. Sc in each st around (42 sts)
- [6 sc, inc] x 6 (48 sts) 15-17. Sc in each st around (48 sts)
- [7 sc, inc] x 6 (54 sts) 19-21. Sc in each st around (54 sts)
- Switch to red yarn using the cc technique. 22-35. Sc in each st around (54 sts)
- Begin to stuff head firmly and continue stuffing as you go.
- [7 sc, dec] x 6 (48 sts)
- Sc in each st around (48 sts)
- [6 sc, dec] x 6 (42 sts)
- Sc in each st around (42 sts)
- [5 sc, dec] x 6 (36 sts)
- Sc in each st around (36 sts)
- [4 sc, dec] x 6 (30 sts)
- [3 sc, dec] x 6 (24 sts)
- [2 sc, dec] x 6 (18 sts)
- Finish stuffing the head.
- [Sc, dec] x 6 (12 sts)
- [Dec] x 6 (6 sts)
- Close the opening and weave in the end.
Body (in rounds):
- With red yarn, mr with 6 sc (6 sts)
- [Inc] x 6 (12 sts)
- [Sc, inc] x 6 (18 sts)
- [2 sc, inc] x 6 (24 sts)
- [3 sc, inc] x 6 (30 sts) 6-8. Sc in each st around (30 sts)
- Switch to black yarn using cc technique. 9-15. Sc in each st around (30 sts)
- Start stuffing the body and continue as you go.
- [3 sc, dec] x 6 (24 sts)
- Sc in each st around (24 sts)
- [2 sc, dec] x 6 (18 sts)
- Sc in each st around (18 sts)
- [Sc, dec] x 6 (12 sts)
- Finish stuffing the body.
- [Dec] x 6 (6 sts)
- Close the opening and leave a long tail for sewing.
Arms (make 2):
- With black yarn, mr with 6 sc (6 sts)
- [Inc] x 6 (12 sts) 3-5. Sc in each st around (12 sts)
- Switch to red yarn using cc technique. 6-10. Sc in each st around (12 sts)
- Stuff the arms lightly.
- [Dec] x 6 (6 sts)
- Close the opening slightly but do not fasten off. Leave a long tail for sewing.
Legs (make 2):
- With black yarn, mr with 6 sc (6 sts)
- [Inc] x 6 (12 sts) 3-5. Sc in each st around (12 sts)
- Stuff the legs lightly.
- [Dec] x 6 (6 sts)
- Close the opening slightly but do not fasten off. Leave a long tail for sewing.
Utility Belt:
- With brown yarn, ch enough chains to wrap around the body comfortably (~30-35 ch, depending on tension).
- Starting in the second chain from the hook, hdc in each chain across, turn.
- Sc in each st across.
- Fasten off and leave a long tail for sewing.
Assembly:
- Sew the head to the body aligning the color changes carefully.
- Sew the arms to each side of the body, just below the neck.
- Attach the legs to the bottom of the body.
- Wrap the utility belt around the body and sew it in place, making sure to align the belt buckle (which is a small red felt circle) in the center front.
Swords:
- Cut two pieces of pipe cleaners or stiff felt to the desired sword length.
- With black yarn, wrap around the pipe cleaner to form the handle.
- Secure the ends and sew or glue the swords onto the back of the amigurumi figure, crossed.
Details:
- Cut out eye shapes from white felt and pupils from black felt, glue them onto the face.
- Use the yarn needle and black yarn to embroider the mask’s details around the eyes if necessary.
- Optionally, embroider a small mouth with black yarn.
Remember, this pattern requires constant size checking and adjustments. Each part should be proportionate to the others, and color changes should be seamless.