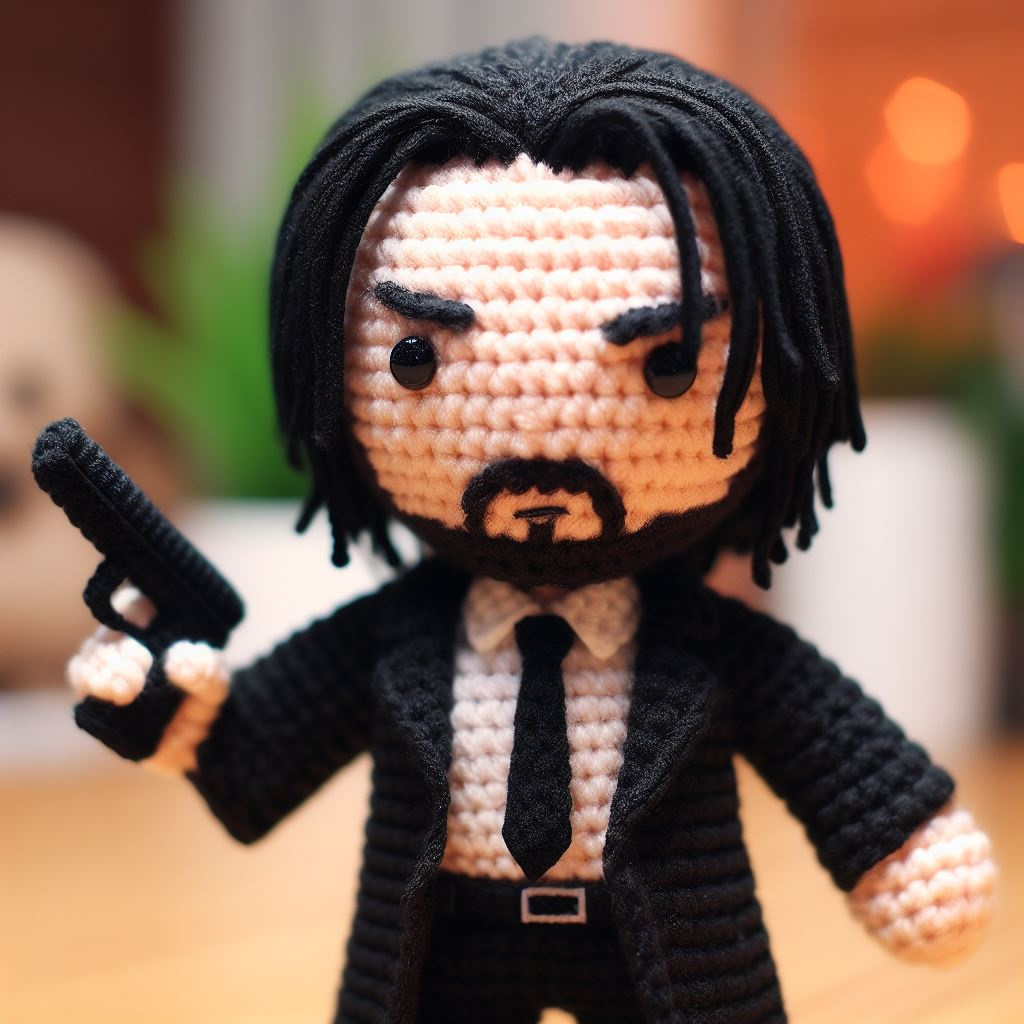
Embarking on a John Wick amigurumi project is like bringing a miniaturized version of the legendary assassin to life with the warmth and charm of crochet. This project offers a unique blend of action-packed character and the delicate art of amigurumi, making it an intriguing challenge for crafters and fans of the film series alike. The John Wick amigurumi, with his signature suit, stern expression, and perhaps even a tiny crocheted version of his faithful dog, captures the essence of the iconic character in a whimsical, yet respectful homage.
The process of creating a John Wick amigurumi involves careful attention to his distinctive features – the tailored suit, the well-groomed hairstyle, and the intense gaze that Keanu Reeves brought to the screen. The challenge is in the details, like crafting the miniature suit with its sleek jacket and pants, and perhaps adding a tiny tie or a mock weapon to bring his character to life. As you stitch together the pieces, you’re not just crocheting a figure; you’re creating a symbol of the character’s resilience and determination.
For those ready to take on the task of crafting this unlikely hero, the John Wick amigurumi pattern provides detailed instructions to guide you through each step. The pattern ensures that the end product is a respectful and adorable representation of the ‘Baba Yaga’ himself. Whether you’re a die-hard fan of the John Wick series, a lover of unique amigurumi projects, or simply looking for a new challenge, this pattern is your entry into a world where soft yarn meets cinematic toughness. Below, the pattern for your very own John Wick amigurumi awaits, ready to be brought to life through your creativity and skill.
Materials Required:
- Beige yarn (medium weight) for the skin
- Black yarn (medium weight) for the hair, beard, suit, and shoes
- White yarn (medium weight) for the shirt
- A small piece of stiff black felt (for the gun)
- Crochet hook (appropriate for medium weight yarn, e.g., 3.5mm)
- Fiberfill stuffing
- Yarn needle
- Stitch markers
- Safety eyes (around 6mm) or black yarn for the eyes
- Black embroidery floss (for the details on the gun, suit, and facial features)
Common Abbreviations and Terms:
- ch – chain
- sc – single crochet
- hdc – half double crochet
- dc – double crochet
- tr – treble crochet
- sl st – slip stitch
- inc – increase (two sc in one stitch)
- dec – decrease (sc two stitches together)
- […] xN – repeat the instructions in brackets N times
- (…) total – indicates the total number of stitches at the end of the round
- BLO – back loop only
- FLO – front loop only
- FO – fasten off
- sts – stitches
Head (Beige Yarn):
- Create a magic ring, 6 sc in ring (6 sts)
- Inc in each st around (12 sts)
- [Sc, inc] x6 (18 sts)
- [2 sc, inc] x6 (24 sts)
- [3 sc, inc] x6 (30 sts) 6-12. Sc around (30 sts for each round)
- [3 sc, dec] x6 (24 sts)
- [2 sc, dec] x6 (18 sts). Begin stuffing.
- [Sc, dec] x6 (12 sts)
- Dec around (6 sts). FO, leaving a long tail for sewing.
Body (Black Yarn for Suit, White for Shirt):
- Start with white yarn. Create a magic ring, 6 sc in ring (6 sts)
- Inc in each st around (12 sts)
- [Sc, inc] x6 (18 sts)
- In BLO, sc around (18 sts). This forms the shirt’s bottom edge. 5-7. Change to black yarn. Sc around (18 sts for each round)
- [2 sc, inc] x6 (24 sts). This widens for the shoulders. 9-13. Sc around (24 sts for each round)
- [2 sc, dec] x6 (18 sts). Begin to stuff. 15-16. Sc around (18 sts for each round). Finish stuffing. FO, leaving a long tail for sewing.
Arms (Beige and Black Yarn, make 2):
- Start with beige yarn. Create a magic ring, 6 sc in ring (6 sts) 2-5. Sc around (6 sts for each round)
- Switch to black yarn for the suit. [Sc, inc] x3 (9 sts) 7-11. Sc around (9 sts for each round). FO, leaving a long tail for sewing.
Legs (Black Yarn for Shoes, Grey for Pants, make 2):
- With black yarn, create a magic ring, 6 sc in ring (6 sts)
- Inc in each st around (12 sts)
- Sc around (12 sts)
- Switch to grey yarn for the pants. [Sc, inc] x6 (18 sts) 5-9. Sc around (18 sts for each round). FO, leaving a long tail for sewing.
Suit Jacket (Black Yarn):
- Chain a length that wraps around the torso of the amigurumi, join to form a ring.
- Work up in rows to create the front panels and back of the jacket, with chain spaces for the armholes.
- Add lapels by folding the front edges and stitching in place.
Tie (Black Yarn):
- Chain a small length and work a few rows of sc for the knot.
- Make a longer chain and work in sc, tapering to create the tail of the tie. Sew to the shirt.
Hair (Black Yarn):
- Chain a length that fits around the head for the hair base.
- Work in rows to cover the head, then shape the front for the hairline and fringe.
- Attach individual strands or small chains to the hair base for the dangling hair effect.
Gun (Black Felt and Embroidery Floss):
- Cut out a gun shape from stiff black felt.
- Add details with black embroidery floss. Attach to one of the arms.
Assembly:
- Sew the head to the body.
- Attach the arms, ensuring they align with the jacket’s armholes.
- Sew the legs to the bottom of the body.
- Dress the amigurumi with the jacket, sewing any open edges or adding buttons for decoration.
- Place the hair on the head, sewing it securely.
- Attach the safety eyes between rounds 10 and 11 of the head, about 8 stitches apart, or embroider them with black yarn.
- Embroider the mouth and beard.
- Place the gun in the amigurumi’s hand and sew or glue it in place.
The final character should have a striking resemblance to the amigurumi in the image, with carefully crafted attire and a tough, no-nonsense expression. Adjust the pattern as needed for sizing and proportion.