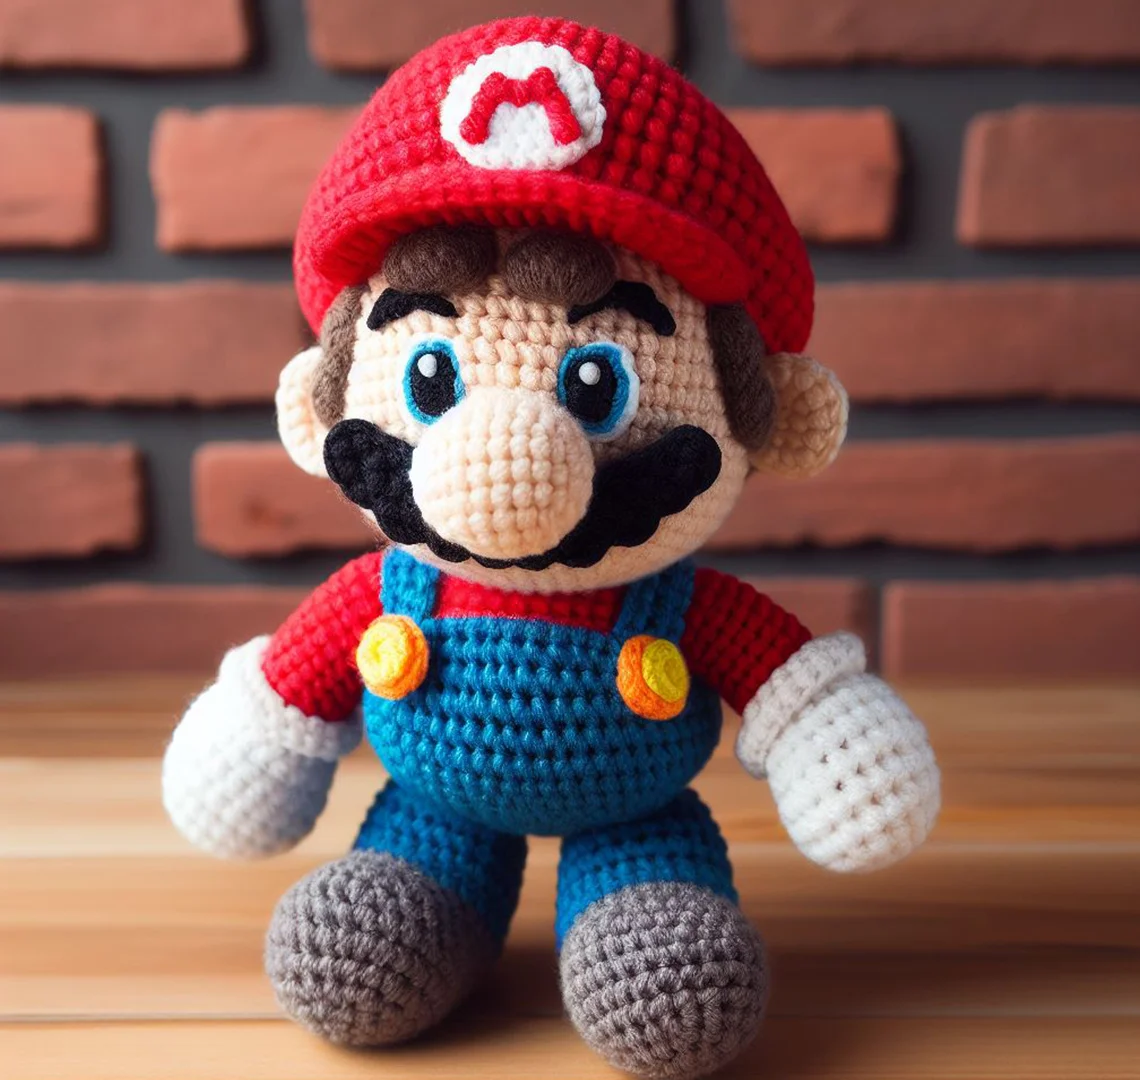
Embarking on a Mario amigurumi project is like jumping into your very own crafting level of the classic Nintendo game. The iconic Italian plumber, with his red cap, blue overalls, and mustachioed smile, is instantly recognizable to fans worldwide. Creating a crochet version of Mario is not just about making a toy; it’s about bringing a piece of gaming history into the three-dimensional world. With careful attention to detail, his amigurumi captures the bright colors and cheerful essence that have made him the beloved mascot of the Super Mario franchise.
The process of crocheting Mario involves translating his cartoonish features into yarn. Crafters will enjoy replicating his signature outfit, from the buttoned overalls to the M-emblazoned cap, all while imbuing the project with the character’s adventurous spirit. Stitches will trace out his round nose, his broad smile, and the plump shape of his figure, mirroring the buoyant personality that has helped him remain a central figure in the gaming community for decades.
For those eager to tackle this nostalgic project, the Mario amigurumi pattern provides clear instructions for each aspect of the hero’s design. It will guide you through creating his classic jump pose or standing posture, and even his gloved hands, ensuring every detail is accounted for—from his boots to the tips of his mustache. This pattern is perfect for gamers, collectors, and crochet enthusiasts looking to create a huggable version of the world’s most famous plumber. Below, the Mario amigurumi pattern is ready for you to start your crafting adventure, coin blocks and super mushrooms not included!
Materials:
- Red, blue, flesh, brown, white, and yellow yarn (medium weight)
- Crochet hook size 3.5 mm
- Safety eyes (8mm)
- Black embroidery thread
- Fiberfill stuffing
- Yarn needle
- Stitch marker
Abbreviations:
- ch: chain
- sc: single crochet
- hdc: half double crochet
- dc: double crochet
- inc: increase (2 sc in one st)
- dec: invisible decrease (decrease using the front loops only)
- sl st: slip stitch
- BLO: back loop only
- FLO: front loop only
- Rnd: round
- st(s): stitch(es)
Head (Flesh Yarn):
- Rnd 1: 6 sc in magic ring (6 sts)
- Rnd 2: Inc in each st around (12 sts)
- Rnd 3: [Sc, inc] * 6 (18 sts)
- Rnd 4: [Sc 2, inc] * 6 (24 sts)
- Rnd 5: [Sc 3, inc] * 6 (30 sts)
- Rnd 6: [Sc 4, inc] * 6 (36 sts)
- Rnd 7-13: Sc around (36 sts)
- Insert safety eyes between Rnd 12 and 13, about 5 sts apart.
- Rnd 14: [Sc 4, dec] * 6 (30 sts)
- Rnd 15: [Sc 3, dec] * 6 (24 sts)
- Rnd 16: [Sc 2, dec] * 6 (18 sts)
- Start stuffing the head.
- Rnd 17: [Sc, dec] * 6 (12 sts)
- Rnd 18: Dec around (6 sts)
- Finish stuffing the head firmly and close the opening. Weave in ends.
Body (Blue and Red Yarn):
- With blue yarn, Rnd 1: 6 sc in magic ring (6 sts)
- Rnd 2: Inc in each st around (12 sts)
- Rnd 3: [Sc, inc] * 6 (18 sts)
- Rnd 4: [Sc 2, inc] * 6 (24 sts)
- Rnd 5: [Sc 3, inc] * 6 (30 sts)
- Rnd 6-8: Sc around (30 sts)
- Change to red yarn, Rnd 9-15: Sc around (30 sts)
- Rnd 16: [Sc 3, dec] * 6 (24 sts)
- Rnd 17: Sc around (24 sts)
- Finish stuffing the body.
- Rnd 18: [Sc 2, dec] * 6 (18 sts)
- Rnd 19: [Sc, dec] * 6 (12 sts)
- Fasten off, leaving a tail for attaching the head.
Hat (Red Yarn):
- Rnd 1: 6 sc in magic ring (6 sts)
- Rnd 2: Inc in each st around (12 sts)
- Rnd 3: [Sc, inc] * 6 (18 sts)
- Rnd 4: [Sc 2, inc] * 6 (24 sts)
- Rnd 5: [Sc 3, inc] * 6 (30 sts)
- Rnd 6: [Sc 4, inc] * 6 (36 sts)
- Rnd 7: [Sc 5, inc] * 6 (42 sts)
- Rnd 8-10: Sc around (42 sts)
- Rnd 11: In BLO, sc around (42 sts)
- Rnd 12: [Sc 5, dec] * 6 (36 sts)
- Rnd 13: Sc around (36 sts)
- Fasten off, leaving a long tail for sewing to the head.
Arms (Flesh and Red Yarn):
- With flesh yarn, Rnd 1: 6 sc in magic ring (6 sts)
- Rnd 2: [Sc, inc] * 3 (9 sts)
- Rnd 3-4: Sc around (9 sts)
- Change to red yarn, Rnd 5-14: Sc around (9 sts)
- Stuff lightly and flatten the opening, crochet across to close.
- Fasten off, leaving a long tail for sewing.
Legs and Feet (Blue and Brown Yarn):
- With brown yarn, Rnd 1: 6 sc in magic ring (6 sts)
- Rnd 2: Inc in each st around (12 sts)
- Rnd 3: [Sc, inc] * 6 (18 sts)
- Rnd 4: In BLO, sc around (18 sts)
- Rnd 5-7: Sc around (18 sts)
- Change to blue yarn, Rnd 8-16: Sc around (18 sts)
- Stuff the feet and legs firmly.
- Flatten the top of the leg, and sc across to close.
- Fasten off, leaving a long tail for sewing.
Mustache (Black Yarn):
- Chain 16, starting from the second ch from hook, hdc in next, dc in next 2, tr in next, dc in next 2, hdc in next 2, dc in next 2, tr in next, dc in next 2, hdc in last.
- Fasten off, leaving a long tail for sewing.
Nose (Flesh Yarn):
- Rnd 1: 6 sc in magic ring (6 sts)
- Rnd 2: Inc in each st around (12 sts)
- Rnd 3-4: Sc around (12 sts)
- Fasten off, leaving a long tail for sewing.
Ears (Make 2, Flesh Yarn):
- Rnd 1: 6 sc in magic ring (6 sts)
- Rnd 2: Inc in each st around (12 sts)
- Rnd 3: [Sc, inc] * 6 (18 sts)
- Rnd 4-5: Sc around (18 sts)
- Fasten off, leaving a tail for sewing.
Assembly:
- Sew the head onto the body.
- Attach the hat on top of the head.
- Sew the arms to the sides of the body.
- Attach the legs to the bottom of the body.
- Sew the mustache and then the nose right above it.
- Embroider the eyes using black embroidery thread or attach the safety eyes if preferred.
- Sew the ears to each side of the head, in line with the eyes.
- Add any additional details such as buttons with yellow yarn and a small “M” logo on the hat with white yarn.
Details:
- Mario’s overalls are detailed with two yellow buttons at the front; you can crochet small circles and sew them on.
- To create the “M” emblem on his hat, embroider or crochet a small white circle and then add an “M” with red yarn.
By following this pattern carefully and adjusting where needed, you can create a detailed and professional-looking Mario Amigurumi.