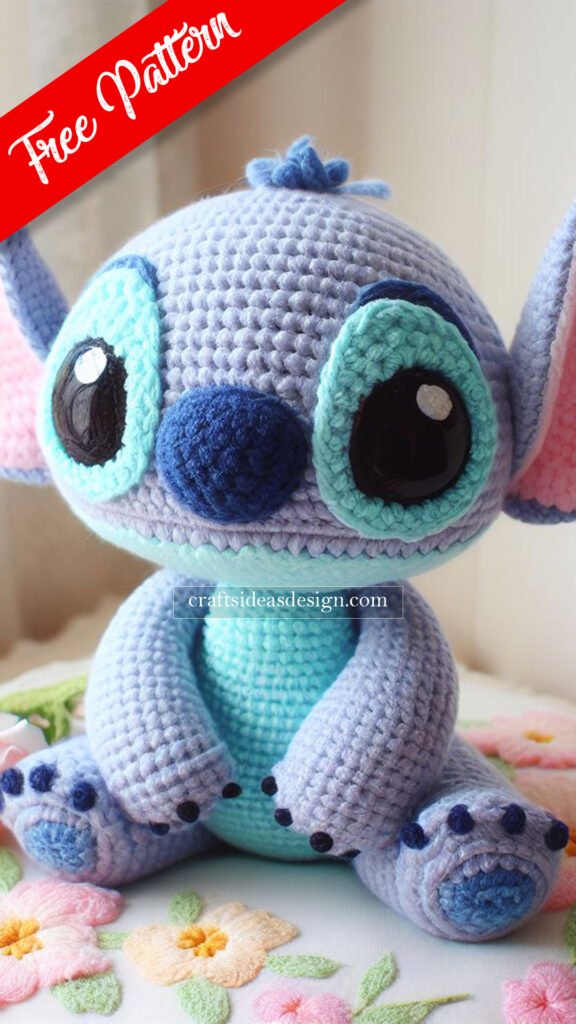
In the crafty crevices of the amigurumi world, the Stitch amigurumi stands out as an adorable representation of the beloved blue alien from Disney’s “Lilo & Stitch.” With his mischievous eyes and trademark ears, this crochet Stitch brings a wave of nostalgia and the spirit of ‘ohana to crafters and Disney enthusiasts alike. The vibrant blue yarn used to create his body, coupled with the careful crafting of his expressive face and tiny claws, allows this extraterrestrial character to come to life in the most heartwarming of ways.
Crafting a Stitch amigurumi is not just about following a pattern; it’s about encapsulating the essence of Stitch’s character — his rambunctious personality and his journey from intergalactic fugitive to a beloved family member. The challenge lies in perfecting his unique features: the V-shaped nose, the large floppy ears that can stand upright or drape down, and the wide, innocent eyes that belie his chaotic nature. The experience of creating Stitch is both an artistic endeavor and a playful act of affection, as each maker stitches a bit of love and whimsy into the fabric of their creation.
For those eager to capture the charm of this lovable alien in yarn form, the Stitch amigurumi pattern is the perfect starting point. Designed to be user-friendly, it guides you through each step of the process — from crocheting the main body to adding the finishing touches that make Stitch unmistakable. The pattern ensures that you can recreate the magical bond that Stitch forms with his adoptive human family, making it a wonderful project to keep for yourself or to gift to someone special who cherishes the meaning of ‘ohana. The crochet pattern for this delightful Disney character is available just below, ready for you to embark on a crafting journey to a little Hawaiian paradise.
Materials:
- Light blue, dark blue, pink, black, and white medium weight yarn
- Crochet hook size 3.0 mm (closer to a D in US sizes for tighter stitches)
- Fiberfill stuffing
- Yarn needle
- Safety eyes (about 15 mm in diameter) or buttons for eyes
- Black embroidery floss for mouth and nose
- Small amount of light purple yarn for back markings
Abbreviations:
- MR: Magic Ring
- sc: Single Crochet
- inc: Increase (2 sc in one stitch)
- dec: Decrease (sc together)
- st(s): Stitch(es)
- sl st: Slip Stitch
- FO: Fasten Off
- hdc: Half Double Crochet
- dc: Double Crochet
- BLO: Back Loop Only
- FLO: Front Loop Only
Head (Light Blue Yarn):
- MR, 6 sc in ring (6 sts)
- Inc in each st around (12 sts)
- (Sc in next st, inc) x6 (18 sts)
- (Sc in next 2 sts, inc) x6 (24 sts)
- (Sc in next 3 sts, inc) x6 (30 sts)
- (Sc in next 4 sts, inc) x6 (36 sts)
- (Sc in next 5 sts, inc) x6 (42 sts) 8-14. Sc in each st around (42 sts)
- (Sc in next 6 sts, inc) x6 (48 sts) 16-22. Sc in each st around (48 sts)
- (Sc in next 7 sts, inc) x6 (54 sts) 24-30. Sc in each st around (54 sts) Insert safety eyes between rounds 26 and 27, about 13 sts apart.
- (Sc in next 7 sts, dec) x6 (48 sts)
- (Sc in next 6 sts, dec) x6 (42 sts)
- (Sc in next 5 sts, dec) x6 (36 sts)
- (Sc in next 4 sts, dec) x6 (30 sts)
- (Sc in next 3 sts, dec) x6 (24 sts)
- (Sc in next 2 sts, dec) x6 (18 sts) Continue stuffing, FO leaving a long tail for sewing.
Ears (Make 2, Light Blue and Pink Yarn):
- Using light blue yarn, MR, 6 sc in ring (6 sts)
- Inc in each st around (12 sts)
- (Sc in next st, inc) x6 (18 sts)
- (Sc in next 2 sts, inc) x6 (24 sts) 5-6. Sc in each st around (24 sts)
- (Sc in next 2 sts, dec) x6 (18 sts)
- (Sc in next st, dec) x6 (12 sts)
- Sc in each st around (12 sts) Change to pink yarn, and sc in each st around (12 sts) for 1-2 rounds for the inner ear detail. FO, leaving a long tail for sewing.
Body (Light Blue Yarn):
- MR, 6 sc in ring (6 sts)
- Inc in each st around (12 sts)
- (Sc in next st, inc) x6 (18 sts)
- (Sc in next 2 sts, inc) x6 (24 sts)
- (Sc in next 3 sts, inc) x6 (30 sts) 6-11. Sc in each st around (30 sts)
- (Sc in next 4 sts, inc) x6 (36 sts) 13-18. Sc in each st around (36 sts)
- (Sc in next 5 sts, inc) x6 (42 sts) 20-25. Sc in each st around (42 sts)
- (Sc in next 5 sts, dec) x6 (36 sts)
- Sc in each st around (36 sts)
- (Sc in next 4 sts, dec) x6 (30 sts) 29-30. Sc in each st around (30 sts)
- (Sc in next 3 sts, dec) x6 (24 sts) 32-33. Sc in each st around (24 sts) FO, leaving a long tail for sewing. Stuff the body.
Arms (Make 2, Light Blue and Dark Blue Yarn):
- With dark blue yarn, MR, 6 sc in ring (6 sts)
- Inc in each st around (12 sts) 3-4. Sc in each st around (12 sts) Change to light blue yarn. 5-14. Sc in each st around (12 sts) FO, leaving a long tail for sewing. Stuff the arms lightly.
Legs and Feet (Make 2, Light Blue and Dark Blue Yarn):
- With dark blue yarn, MR, 6 sc in ring (6 sts)
- Inc in each st around (12 sts)
- (Sc in next st, inc) x6 (18 sts) 4-5. Sc in each st around (18 sts) Change to light blue yarn. 6-15. Sc in each st around (18 sts) FO, leaving a long tail for sewing. Stuff the legs.
Tail (Dark Blue Yarn):
- MR, 6 sc in ring (6 sts)
- Inc in each st around (12 sts) 3-10. Sc in each st around (12 sts) FO, leaving a long tail for sewing.
Facial Details:
- Nose: With black yarn, embroider a small oval or use a small piece of felt.
- Mouth: With black embroidery floss, create a simple line or a smiling expression.
- Eyes: If using yarn instead of safety eyes, create large oval shapes with black yarn, add a circle of white for the shine, and sew them onto the face.
Assembly:
- Sew the ears to the top sides of the head.
- Attach the head to the body.
- Sew the arms to the sides of the body at shoulder level.
- Attach the legs to the bottom of the body.
- Sew the tail to the back of the body.
- Embroider or attach the facial details.
Finishing:
- Weave in all loose ends with a yarn needle.
This pattern includes more specific details for features such as the nose, arms with fingers, and facial expressions, aiming to replicate the image more closely. The end result should be a faithful recreation of the amigurumi Stitch depicted in the image, assuming careful attention is paid to the shaping and placement of each component.