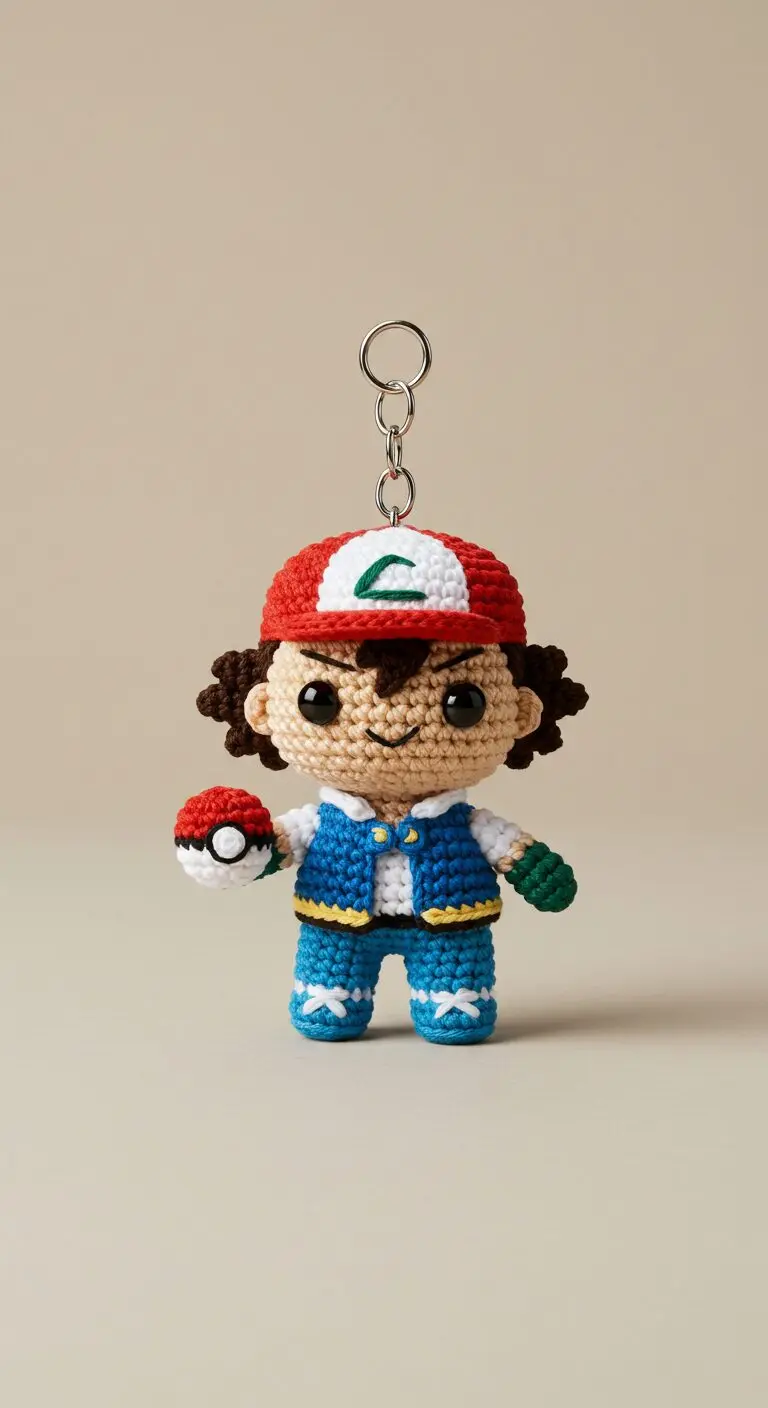
Discover the charm of this meticulously crafted Ash Ketchum crochet keychain, a perfect accessory for any Pokémon enthusiast. This delightful creation captures the iconic trainer’s adventurous spirit in an adorable amigurumi style. It’s an ideal way to show off your love for the beloved series. Carry a piece of the Pokémon world with you wherever you go, ensuring your keys are easily identifiable. This tiny trainer is ready to join your adventures.
Handcrafted Ash Ketchum Crochet Keychain: A Collector’s Delight
Beyond its functional appeal as a keychain, this detailed Ash Ketchum crochet piece stands out as a unique collector’s item. Each stitch reflects the dedication to bringing this fan-favorite character to life in yarn. Its compact size makes it versatile, perfect for attaching to bags, backpacks, or simply displaying on a shelf. This charming rendition of Ash, complete with his signature cap and a tiny Poké Ball, is sure to spark joy and nostalgia for trainers of all ages.
Here is a detailed, professional crochet pattern to create an Ash Ketchum amigurumi keychain, replicating the object in the image provided.

---

**Ash Ketchum Amigurumi Keychain Pattern**

**Skill Level:** Intermediate
**Finished Size:** Approximately 4.5 inches (11.5 cm) tall, excluding the keychain.

**Materials:**
*   **Yarn:** Sport or DK weight cotton yarn (or similar) in the following colors:
    *   **Skin Tone:** (e.g., beige, light peach)
    *   **Dark Brown:** (for hair)
    *   **Red:** (for hat, Poké Ball)
    *   **White:** (for hat brim, shirt, Poké Ball, shoe laces, glove cuffs)
    *   **Green:** (for hat symbol, gloves)
    *   **Blue:** (for vest, pants, shoes)
    *   **Yellow:** (for vest trim)
    *   **Black:** (small amount for Poké Ball details, facial embroidery)
    *   **Gold/Bright Yellow:** (small amount for vest button, optional)
*   **Crochet Hook:** 2.5mm or 3.0mm (choose based on your yarn and tension to achieve tight stitches with no gaps)
*   **Safety Eyes:** 6mm or 8mm black
*   **Polyester Fiberfill:** For stuffing
*   **Yarn Needle:** For sewing and embroidery
*   **Stitch Markers:** To mark the beginning of rounds
*   **Scissors**
*   **Keychain Hardware:** Metal ring and chain

**Abbreviations (US Crochet Terms):**
*   **MR:** Magic Ring
*   **ch:** Chain
*   **sc:** Single Crochet
*   **inc:** Increase (2 sc in one stitch)
*   **dec:** Decrease (sc two stitches together)
*   **sl st:** Slip Stitch
*   **FO:** Fasten Off
*   **( ) xN:** Repeat instructions in parentheses N number of times
*   **[N]:** Total number of stitches in the round

**Notes:**
*   Work in continuous rounds unless otherwise stated. Use a stitch marker to keep track of the first stitch of each round.
*   Stuff firmly as you go to ensure a good shape.
*   Gauge is not critical, but consistent tension is important.
*   Color changes should be done on the last pull-through of the stitch before the new color.

---

**Instructions:**

**Head (Skin Tone Yarn)**
R1: MR, 6 sc [6]
R2: (inc) x6 [12]
R3: (sc, inc) x6 [18]
R4: (2 sc, inc) x6 [24]
R5: (3 sc, inc) x6 [30]
R6: (4 sc, inc) x6 [36]
R7-R13: sc around (7 rounds) [36]
*Insert safety eyes between R10 and R11, about 6-7 stitches apart. Ensure they are centered on the front.*
R14: (4 sc, dec) x6 [30]
R15: (3 sc, dec) x6 [24]
*Begin stuffing firmly, shaping the head.*
R16: (2 sc, dec) x6 [18]
R17: (sc, dec) x6 [12]
R18: (dec) x6 [6]
FO, leave a long tail. Weave the tail through the remaining 6 stitches and pull tight to close the hole. Weave in the end.

**Hair (Dark Brown Yarn)**
*   **Hair Cap:**
    R1: MR, 6 sc [6]
    R2: (inc) x6 [12]
    R3: (sc, inc) x6 [18]
    R4: (2 sc, inc) x6 [24]
    R5: (3 sc, inc) x6 [30]
    R6: (4 sc, inc) x6 [36]
    R7-R10: sc around (4 rounds) [36]
    FO, leave a long tail for sewing.
*   **Hair Spikes (Make 4):**
    R1: MR, 4 sc [4]
    R2: (sc, inc) x2 [6]
    R3: sc around [6]
    R4: (dec) x3 [3]
    FO, leave a long tail for sewing. Lightly stuff the spikes.

**Hat (Red, White, Green Yarn)**
*   **Hat Top (Red):**
    R1: MR, 6 sc [6]
    R2: (inc) x6 [12]
    R3: (sc, inc) x6 [18]
    R4: (2 sc, inc) x6 [24]
    R5: (3 sc, inc) x6 [30]
    R6: (4 sc, inc) x6 [36]
    R7-R11: sc around (5 rounds) [36]
    FO, leave a long tail.
*   **Hat Brim (White):**
    Ch 15.
    Row 1: sc in 2nd ch from hook, sc in next 13 ch [14]
    Row 2: ch 1, turn, sc across [14]
    Row 3: ch 1, turn, dec, sc in next 10 sc, dec [12]
    Row 4: ch 1, turn, sc across [12]
    FO, leave a long tail for sewing.
*   **Hat Symbol (Green):**
    Ch 7. Sl st in 2nd ch from hook, sc in next 2 ch, hdc in next ch, dc in next 2 ch.
    FO, leave a long tail for sewing. This will form a curved 'L' shape.

**Body (White, Blue Yarn)**
*   Start with White yarn.
    R1: MR, 6 sc [6]
    R2: (inc) x6 [12]
    R3: (sc, inc) x6 [18]
    R4: (2 sc, inc) x6 [24]
    R5: (3 sc, inc) x6 [30]
    R6-R8: sc around (3 rounds) [30]
    *Change to Blue yarn (for the vest).*
    R9-R12: sc around (4 rounds) [30]
    R13: (3 sc, dec) x6 [24]
    *Begin stuffing firmly, shaping the body.*
    R14: (2 sc, dec) x6 [18]
    R15: (sc, dec) x6 [12]
    FO, leave a long tail for sewing to the head.

**Arms (Make 2 - Skin Tone, White, Green Yarn)**
*   Start with Skin Tone yarn.
    R1: MR, 6 sc [6]
    R2-R3: sc around (2 rounds) [6]
    *Change to White yarn (for shirt cuff).*
    R4: sc around [6]
    *Change to Green yarn (for gloves).*
    R5-R6: sc around (2 rounds) [6]
    FO, leave a long tail for sewing. Do not stuff.

**Legs (Make 2 - Blue Yarn)**
*   Start with Blue yarn.
    R1: MR, 6 sc [6]
    R2: (sc, inc) x3 [9]
    R3-R9: sc around (7 rounds) [9]
    *This creates the leg and shoe. If you want separate shoe color, change color at R9.*
    R10: (sc, dec) x3 [6]
    FO, leave a long tail for sewing. Stuff firmly.

**Poké Ball (Red, White, Black Yarn)**
*   **Red Half:**
    R1: MR, 6 sc [6]
    R2: (inc) x6 [12]
    R3: (sc, inc) x6 [18]
    R4: sc around [18]
    FO, leave a long tail.
*   **White Half:**
    R1: MR, 6 sc [6]
    R2: (inc) x6 [12]
    R3: (sc, inc) x6 [18]
    R4: sc around [18]
    DO NOT FO, continue with white yarn.
*   **Join Halves:**
    Place the red and white halves together, wrong sides facing (or right sides facing for a cleaner external seam).
    R5: sc through both layers around, stuffing firmly to form a sphere. [18]
    *Change to Black yarn.*
    R6: sc around [18]
    FO, leave a long tail.
*   **Poké Ball Center:**
    *   **White Circle:** MR, 6 sc, sl st to join. FO, leave a tail for sewing.
    *   **Black Dot:** Using black yarn, embroider a small French knot or a few straight stitches in the center of the white circle.
    *   Sew the white circle onto the black stripe on one side of the Poké Ball.

---

**Finishing and Assembly:**

1.  **Head & Body:** Sew the bottom of the body (R15) to the opening of the head (R18). Ensure the head sits upright on the body.
2.  **Hair:** Sew the Dark Brown hair cap onto the head, positioning the front edge slightly above the eyes. Then, sew the 4 hair spikes onto the front and sides of the hair cap to create Ash's distinctive spiky hairstyle.
3.  **Hat:**
    *   Sew the White hat brim to the front edge of the Red hat top.
    *   Sew the Green hat symbol onto the center of the White brim.
    *   Sew the completed hat onto Ash's head, slightly tilted and covering the top portion of his hair.
4.  **Arms:** Sew the arms to the sides of the body, just below the "shoulder" area (R5-R6 of the body), with the white shirt cuff visible.
5.  **Legs:** Sew the two legs to the bottom of the body (R15), spaced evenly apart.
6.  **Vest Details:**
    *   Using Yellow yarn, embroider a trim around the opening of the blue vest. This typically follows the edge from the neck down to the bottom of the vest.
    *   Using Gold/Bright Yellow yarn, embroider a small button on the front of the blue vest (around R10-R11 of the body).
7.  **Facial Details:**
    *   Using Black yarn, embroider two small, angled "V" shapes above the safety eyes for Ash's eyebrows.
    *   Embroider a small, slightly curved line below the eyes for the mouth.
8.  **Poké Ball:** Sew the finished Poké Ball into the hand of one arm.
9.  **Shoe Laces:** Using White yarn, embroider an 'X' shape on the front of each shoe for the laces.
10. **Keychain Attachment:** Attach the keychain ring and chain securely to the very top center of Ash's hat. You can sew through the hat and head several times with a sturdy thread or a small piece of yarn to reinforce the attachment point.

Your Ash Ketchum keychain is now ready to accompany you on your Pokémon journey!