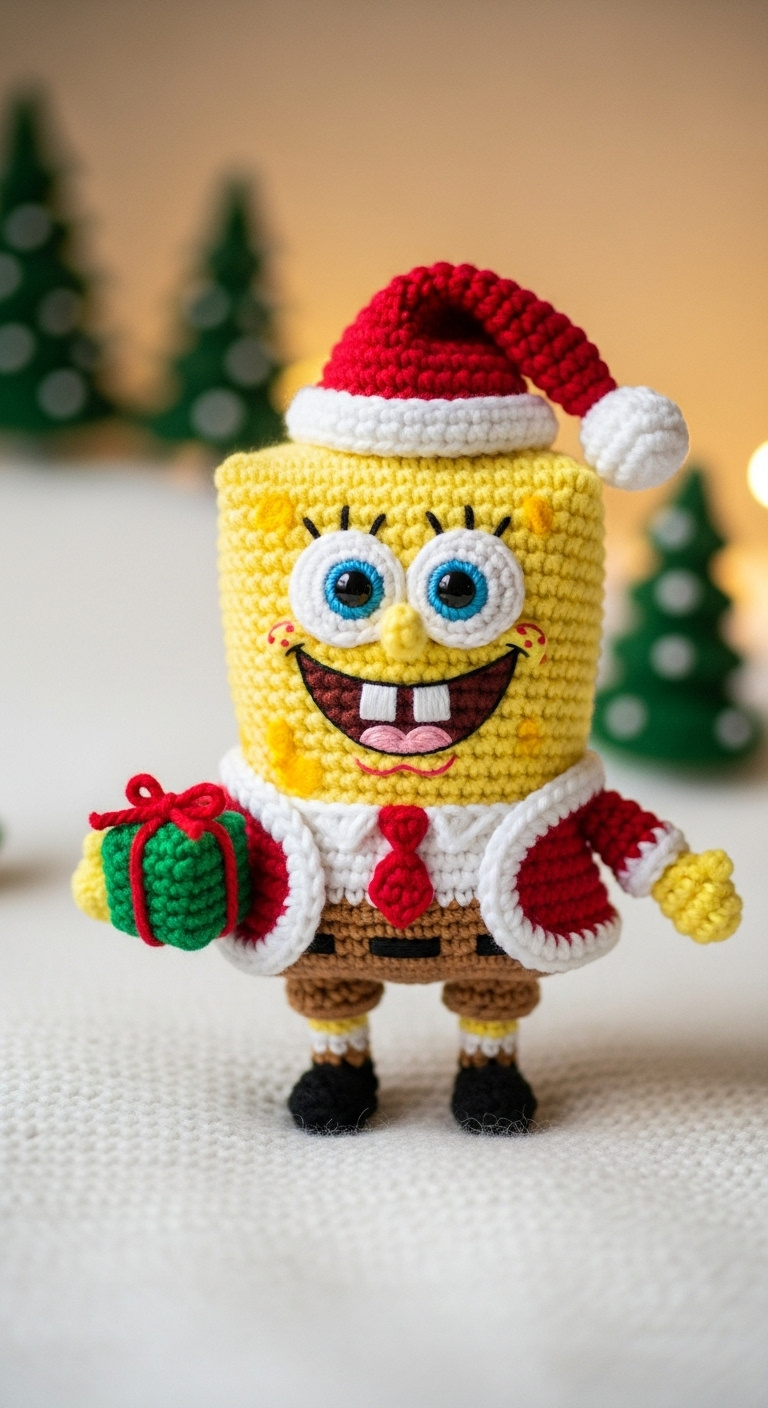
Discover the joy of this adorable Christmas Spongebob crochet, a perfect blend of a beloved character and holiday cheer. This meticulously crafted amigurumi figure showcases Spongebob in a delightful Santa hat and festive outfit, holding a tiny wrapped gift. It’s a testament to the creativity and skill involved in handmade crafts, bringing a unique touch to holiday decor. Such a charming piece can brighten any space, spreading smiles with its vibrant colors and festive spirit.
The Enduring Charm of Christmas Spongebob Crochet Dolls
Whether as a unique gift or a whimsical addition to your holiday decorations, this Christmas Spongebob crochet doll truly stands out. Its cheerful demeanor, combined with the classic Christmas attire, makes it an instant favorite for fans of all ages. Handmade items like this offer a personal touch, celebrating both popular culture and traditional crafting. Embrace the festive season with this delightful Spongebob creation, adding a playful spark to your home.
Crochet Pattern: Christmas Spongebob Amigurumi
Bring a festive touch to Bikini Bottom with this adorable amigurumi pattern for Spongebob Squarepants dressed in his Santa best! This pattern creates a cheerful Spongebob holding a tiny gift, perfect for holiday decor or a unique present.
Materials
- Worsted weight yarn (DK may also work, adjust hook size):
- Yellow (for body/head)
- Brown (for pants, legs)
- White (for eyes, shirt collar, hat brim, jacket trim, gift ribbon, teeth)
- Red (for hat, jacket, tie, tongue, cheeks, gift ribbon)
- Blue (for eyes)
- Black (for pupils, eyelashes, shoes, mouth outline)
- Darker Yellow/Orange (for sponge spots, optional)
- Green (for gift box)
- Crochet hook (2.5mm or 3.0mm recommended, or size to achieve tight stitches)
- Safety eyes (optional, if not crocheting eyes)
- Tapestry needle (for sewing and embroidery)
- Fiberfill stuffing
- Stitch markers
- Scissors
Abbreviations
- MR: Magic Ring
- ch: chain
- sc: single crochet
- inc: increase (2 sc in next st)
- dec: decrease (sc2tog – single crochet two stitches together)
- sl st: slip stitch
- fo: fasten off
- st(s): stitch(es)
- […]: repeat instructions in brackets
- (…): number of stitches at the end of the round/row
Instructions
Notes: Work in continuous rounds unless otherwise specified. Use a stitch marker to mark the beginning of each round. Stuff firmly as you go.
Body (Spongebob’s main block – Yellow & Brown Yarn)
Start with Brown yarn.
R1: Ch 17. Sc in 2nd ch from hook, sc in next 14 ch, 3 sc in last ch. Continue on other side of ch: sc in next 14 ch, 2 sc in last ch. (34)
R2: [Sc in next 15, inc, sc in next 16, inc] around. (36)
R3-R8: Sc in each st around. (36) – This forms the pants section.
Change to Yellow yarn.
R9-R40: Sc in each st around. (36) – This forms the main yellow body/head.
Fasten off, leave a long tail. Stuff the body firmly, shaping it into a square. Using the tail, weave through the front loops of the remaining 36 sts and pull tight to close the top. Secure and weave in end.
Optional: With darker yellow/orange yarn and a tapestry needle, embroider small, random circles onto the yellow body to represent Spongebob’s sponge pores.
Eyes (Make 2)
*White Yarn*
R1: 6 sc in MR. (6)
R2: [Inc] x6. (12)
R3: [Sc, inc] x6. (18)
Sl st to join, fo, leave long tail for sewing.
*Blue Yarn (Iris)*
R1: 6 sc in MR. (6)
R2: [Inc] x6. (12)
Sl st to join, fo, leave tail for sewing onto white.
*Black Yarn (Pupil)*
R1: 6 sc in MR. (6)
Sl st to join, fo, leave tail for sewing onto blue.
*Assembly:* Sew the black pupil onto the blue iris. Sew the blue iris onto the white sclera. Embroider a small white dot on the pupil for shine. Embroider 3 short black eyelashes on the top outer edge of each eye.
Mouth & Cheeks (Embroidery)
Using black yarn, embroider a wide, cheerful smile onto the lower part of the yellow body. With white yarn, embroider two small square teeth on the top part of the mouth and one slightly off-center square tooth on the bottom. Using red yarn, embroider a small, slightly curved tongue inside the mouth. With red yarn, embroider two small red dots on either side of the smile for cheeks.
Arms (Make 2 – Yellow Yarn)
R1: 6 sc in MR. (6)
R2-R12: Sc in each st around. (6)
Stuff lightly. Fasten off, leave a long tail for sewing.
Legs (Make 2)
*Black Yarn (Shoes)*
R1: 6 sc in MR. (6)
R2: [Inc] x6. (12)
R3: Sc in each st around. (12)
R4: [Dec] x6. (6)
*Change to White Yarn*
R5: Sc in each st around. (6)
*Change to Brown Yarn*
R6-R12: Sc in each st around. (6)
Stuff lightly. Fasten off, leave a long tail for sewing. Using yellow yarn, embroider a small horizontal stripe around R5 of the white section for a sock detail.
Shirt Collar (White Yarn)
R1: Ch 16. Sc in 2nd ch from hook, sc in next 14 ch. (15)
Fasten off, leave tail for sewing.
Tie (Red Yarn)
R1: Ch 3. Sc in 2nd ch from hook, sc in next ch. (2)
R2: Ch 1, turn, inc, inc. (4)
R3: Ch 1, turn, sc in each st. (4)
R4: Ch 1, turn, dec, dec. (2)
Fasten off, leave tail for sewing. Pinch and sew the top part to form a knot shape.
Santa Hat (Red & White Yarn)
*Red Yarn*
R1: 6 sc in MR. (6)
R2: Sc in each st around. (6)
R3: [Sc, inc] x3. (9)
R4: Sc in each st around. (9)
R5: [2 sc, inc] x3. (12)
R6: Sc in each st around. (12)
R7: [3 sc, inc] x3. (15)
R8: Sc in each st around. (15)
R9: [4 sc, inc] x3. (18)
R10: Sc in each st around. (18)
R11: [5 sc, inc] x3. (21)
R12: Sc in each st around. (21)
R13: [6 sc, inc] x3. (24)
R14: Sc in each st around. (24)
*Change to White Yarn*
R15-R16: Sc in each st around. (24)
Sl st to join, fo, weave in ends.
*Pompom (White Yarn):* Make a small pompom and attach it to the tip of the hat. Alternatively, crochet a small sphere (e.g., 6 sc in MR, inc, dec, close) and attach.
Santa Jacket (Red & White Yarn)
*Back Panel (Red Yarn)*
R1: Ch 16. Sc in 2nd ch from hook, sc in next 14 ch. (15)
R2-R5: Ch 1, turn, sc in each st across. (15)
Fo.
*Front Panels (Make 2 – Red Yarn)*
R1: Ch 8. Sc in 2nd ch from hook, sc in next 6 ch. (7)
R2-R5: Ch 1, turn, sc in each st across. (7)
Fo.
*Sleeves (Make 2 – Red Yarn)*
R1: 6 sc in MR. (6)
R2-R4: Sc in each st around. (6)
Fo, leave tail for sewing.
*Assembly:* Sew the shoulder seams of the front panels to the back panel. Sew the sleeves into the armholes (sides of the panels). Using white yarn, attach to the bottom edge of the jacket and sc along the bottom, up one front opening, around the neck (if desired, or just continue to the other front opening), and down the other front opening to create the white trim. Also, sc a round of white yarn around each sleeve cuff.
Gift Box (Green Yarn)
R1: Ch 8. Sc in 2nd ch from hook, sc in next 6 ch, 3 sc in last ch. Working on other side of ch: sc in next 6 ch, 2 sc in last ch. (18)
R2-R7: Sc in each st around. (18)
Stuff lightly. Fasten off, leave a long tail. Weave the tail through the remaining front loops and pull tight to close the opening, shaping it into a cube. Using red yarn, embroider a ribbon around the gift box, tied with a bow on top.
Assembly
- Sew the eyes onto the yellow body, centered above the mouth.
- Sew the arms to the sides of the yellow body, around R25-R28 of the yellow section.
- Sew the legs to the bottom of the brown pants section, evenly spaced.
- Wrap and sew the white shirt collar around the upper part of the brown pants section, just below the yellow body.
- Sew the red tie to the center front of the collar.
- Place the Santa hat on Spongebob’s head, slightly tilted, and secure with a few stitches.
- Dress Spongebob in his Santa jacket, positioning it openly to show his tie and shirt collar. Secure with a few stitches if desired.
- Sew the gift box into one of Spongebob’s hands.
- Weave in and trim all remaining yarn ends.
Your Christmas Spongebob Amigurumi is now complete!