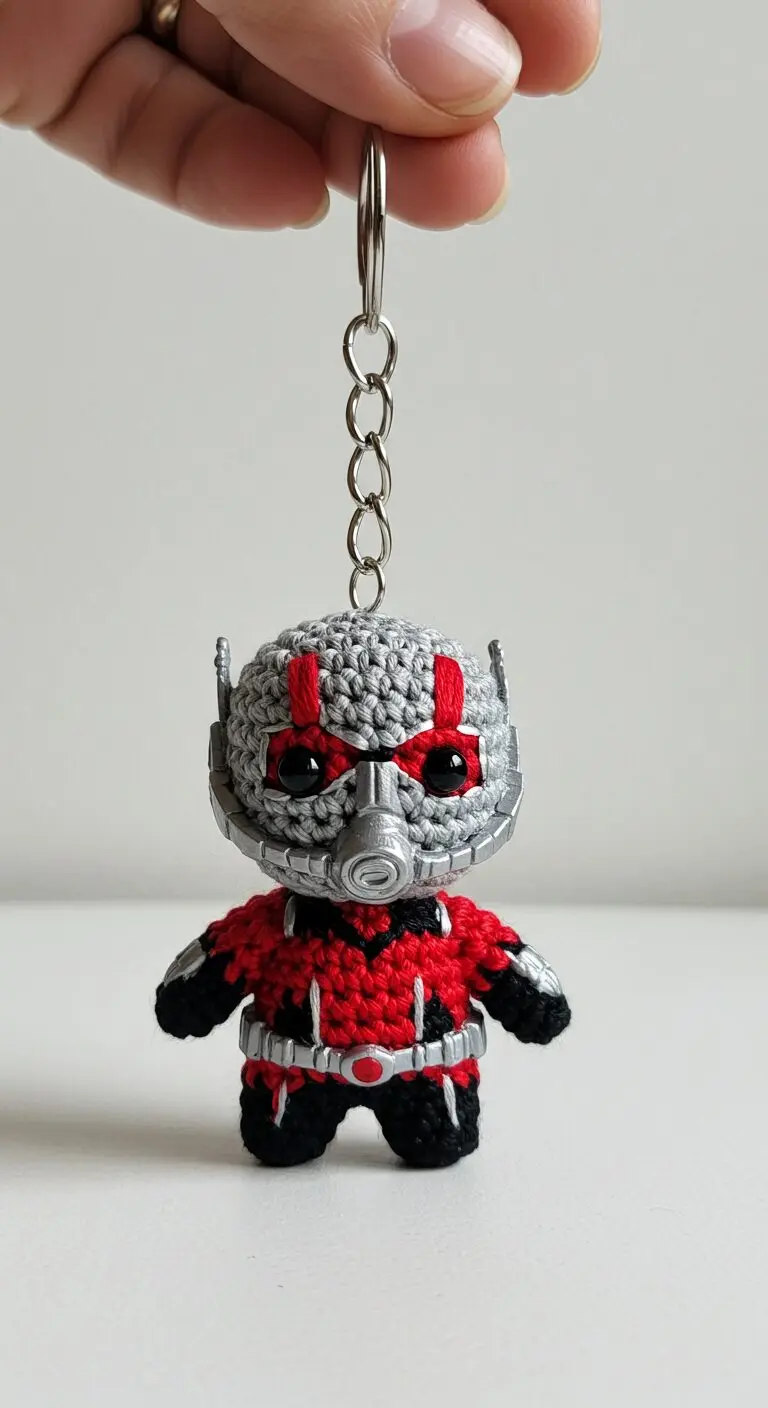
Discover the charm of this Crochet Ant-Man keychain, a delightful accessory for any Marvel fan. This intricately crocheted piece captures the iconic look of the superhero in an adorable, miniature form. It’s not just a practical item for keeping your keys organized, but also a fantastic way to showcase your love for the Ant-Man character. Ideal for attaching to bags, backpacks, or simply as a desk display, this unique keychain adds a touch of superhero flair to your everyday.
Crafting Your Own Ant-Man Keychain: A Unique Amigurumi Project
The detailed craftsmanship of this Ant-Man amigurumi showcases the artistry involved in creating such small, intricate figures. From the signature red and black suit to the distinctive silver helmet, every element is carefully rendered. This type of crochet collectible appeals to both avid collectors and those looking for a special, handcrafted gift. A well-made Ant-Man keychain like this is more than just merchandise; it’s a testament to creative passion and fandom.
Here is a detailed, professional crochet pattern (amigurumi style) to replicate the Ant-Man keychain shown in the image.

**Ant-Man Amigurumi Keychain Pattern**

This pattern creates a cute, miniature Ant-Man inspired by the Marvel character, perfect for a keychain. The distinctive silver helmet and belt details in the reference image are made from craft foam or a similar non-crocheted material. This pattern will provide clear instructions for the crocheted parts and specific guidance for creating and attaching these non-crocheted elements to achieve an accurate replica.

**Skill Level:** Intermediate

**Finished Size:** Approximately 4-5 inches tall (excluding keychain hardware).

**Materials:**
*   **Yarn:** DK or Light Worsted Weight (e.g., cotton or acrylic blend suitable for amigurumi)
    *   Grey (main head color) - approx. 15-20g
    *   Red (main body color, mask details) - approx. 20-25g
    *   Black (suit details, legs, arm cuffs) - approx. 10-15g
*   **Crochet Hook:** 2.5mm or 3.0mm (or size needed to achieve a tight gauge with your chosen yarn to prevent stuffing from showing)
*   **Safety Eyes:** 6mm black
*   **Stuffing:** Polyester fiberfill
*   **Tapestry Needle**
*   **Scissors**
*   **Stitch Marker**
*   **For Non-Crocheted Details (Helmet & Belt - *Crucial for image accuracy*):**
    *   Silver craft foam (2mm-3mm thick), thin plastic sheet, or polymer clay (small amounts)
    *   Red craft foam (small piece) or polymer clay (for belt buckle center)
    *   Silver acrylic paint (if using plain craft foam/plastic)
    *   Red acrylic paint (for belt buckle detail if needed)
    *   Strong craft glue (e.g., E6000, super glue, or hot glue gun with low temp setting)
    *   Precision craft knife or sharp scissors
*   **Keychain Hardware:** Silver keychain ring and chain (approximately 1.5 - 2 inches long)

**Abbreviations:**
*   MR: Magic Ring
*   ch: chain
*   sc: single crochet
*   inc: increase (2 sc in the next stitch)
*   dec: decrease (single crochet 2 together, use invisible decrease for a cleaner look)
*   sl st: slip stitch
*   FO: Fasten off
*   ( ): Repeat instructions in parentheses for the specified number of times
*   [ ]: Total number of stitches at the end of the round
*   CC: Color Change (work the last yarn over of the previous stitch with the new color)

**Notes:**
*   Work in continuous rounds unless otherwise specified.
*   Use a stitch marker to keep track of the beginning of each round.
*   Stuff firmly as you go, especially for the head and body, but not so much that the stitches stretch and stuffing shows.
*   When making color changes, ensure the unused yarn is carried neatly or cut and reattached to minimize bulk.

---

**Pattern:**

**HEAD (Start with Grey yarn)**
*   R1: MR 6 sc [6]
*   R2: 6 inc [12]
*   R3: (1 sc, inc) x 6 [18]
*   R4: (2 sc, inc) x 6 [24]
*   R5: (3 sc, inc) x 6 [30]
*   R6: (4 sc, inc) x 6 [36]
*   R7-R12: sc in each st around (6 rounds) [36]
    *   *Place Safety Eyes:* Insert 6mm black safety eyes between R9 and R10, approximately 7-8 stitches apart. Ensure even spacing and center them for the face. Secure the washers firmly.
*   R13: (4 sc, dec) x 6 [30]
*   R14: (3 sc, dec) x 6 [24]
*   R15: (2 sc, dec) x 6 [18]
    *   Start stuffing the head firmly. Ensure it's evenly shaped.
*   R16: (1 sc, dec) x 6 [12]
*   R17: 6 dec [6]
*   FO, leaving a long tail for sewing. Weave the tail through the front loop of the remaining 6 stitches and pull tight to close the opening. Secure and weave in the end.

**BODY (Start with Red yarn)**
*   R1: MR 6 sc [6]
*   R2: 6 inc [12]
*   R3: (1 sc, inc) x 6 [18]
*   R4: (2 sc, inc) x 6 [24]
*   R5-R7: sc in each st around (3 rounds) [24]
*   R8: (3 sc, dec) x 6 [18]
*   R9: sc in each st around [18]
*   R10: (CC Black: 1 sc, CC Red: 2 sc) x 6 [18] (This creates the vertical black lines on the suit. Carry Red yarn along the inside.)
*   R11: sc in each st around (all Red) [18]
    *   Start stuffing the body firmly.
*   FO, leaving a long tail for sewing.

**ARMS (Make 2 - Start with Red yarn)**
*   R1: MR 5 sc [5]
*   R2-R3: sc in each st around (2 rounds) [5]
*   R4: CC Black: sc in each st around [5]
*   R5: sc in each st around [5]
    *   Stuff very lightly, or just the very tip.
*   FO, leaving a long tail for sewing. Flatten the opening.

**LEGS (Make 2 - Start with Black yarn)**
*   R1: MR 6 sc [6]
*   R2-R3: sc in each st around (2 rounds) [6]
*   R4: CC Red: sc in each st around [6] (This creates the red thigh detail)
*   R5: sc in each st around [6]
    *   Stuff very lightly, or just the very tip.
*   FO, leaving a long tail for sewing. Flatten the opening.

---

**Assembly:**

1.  **Attach Head to Body:** Using the long tail from the body, sew the body to the bottom of the head. Ensure the body is centered and securely attached, pulling stitches tight for a firm neck.
2.  **Attach Arms:** Position the arms on either side of the body, just below the neck. Sew them securely in place.
3.  **Attach Legs:** Position the legs on the underside of the body, at the front. Sew them securely. Ensure they are evenly spaced and positioned correctly so the figure can hang or stand.

**Crocheted Detail - Red Mask Lines:**
*   With Red yarn and a tapestry needle, embroider two distinct vertical lines on the grey head, starting just above each safety eye and extending upwards for about 2-3 rounds. Create a slight curve inwards at the top to mimic the helmet's design. Refer to the original image for precise placement.

**Non-Crocheted Details (Highly Recommended for Accuracy):**

*   **Helmet Pieces:** (Refer to the original image for exact shapes and proportions)
    1.  **Mouthpiece:** Cut a small, elongated oval or rectangular shape from silver craft foam/plastic. Add small circular or oval indents/details on the front to resemble a respirator. Paint silver if your material is not already silver.
    2.  **Side/Ear Pieces with Antennae:** Cut two small, slightly curved silver pieces to fit along the side of the head, above the jawline. Cut two tiny "L" shapes or thin rectangles for the antennae and glue them onto the top of the side pieces.
    3.  **Top Eye Ridge (Optional):** You can also cut a thin, curved silver strip to sit just above the safety eyes, connecting the top of the red embroidered lines, if you want more helmet detail.
    *   **Attachment:** Use strong craft glue to carefully attach the silver mouthpiece below and between the safety eyes. Then, attach the side/ear pieces with antennae. Allow glue to dry completely before handling.

*   **Belt:**
    1.  Cut a thin strip of silver craft foam/plastic that will wrap around the waist of the crocheted body (around R9-R10 of the body). Ensure it's long enough to slightly overlap.
    2.  Cut a small red circle from red craft foam.
    3.  Glue the red circle precisely onto the center of the silver belt strip.
    4.  Wrap the belt around the body and glue the ends together at the back to secure it. Let it dry completely.

*   **Silver Arm Details (Optional, but adds to accuracy):**
    1.  Cut two very small, slightly curved silver shapes (like half-ovals or short, curved rectangles) from craft foam.
    2.  Glue these onto the upper arm/shoulder area of the red arms to mimic the silver arm accents visible in the image.

*   **Keychain Attachment:**
    1.  Thread the keychain ring and chain through the top center of the head. You might need to use a tapestry needle or small pliers to help guide the ring through the stitches for a secure hold. Ensure it's firmly attached and centered.

---

**Finishing:**
Weave in any remaining yarn ends securely. Double-check all glued pieces are firmly attached.

Your Ant-Man Amigurumi Keychain is now complete! Enjoy your tiny superhero!