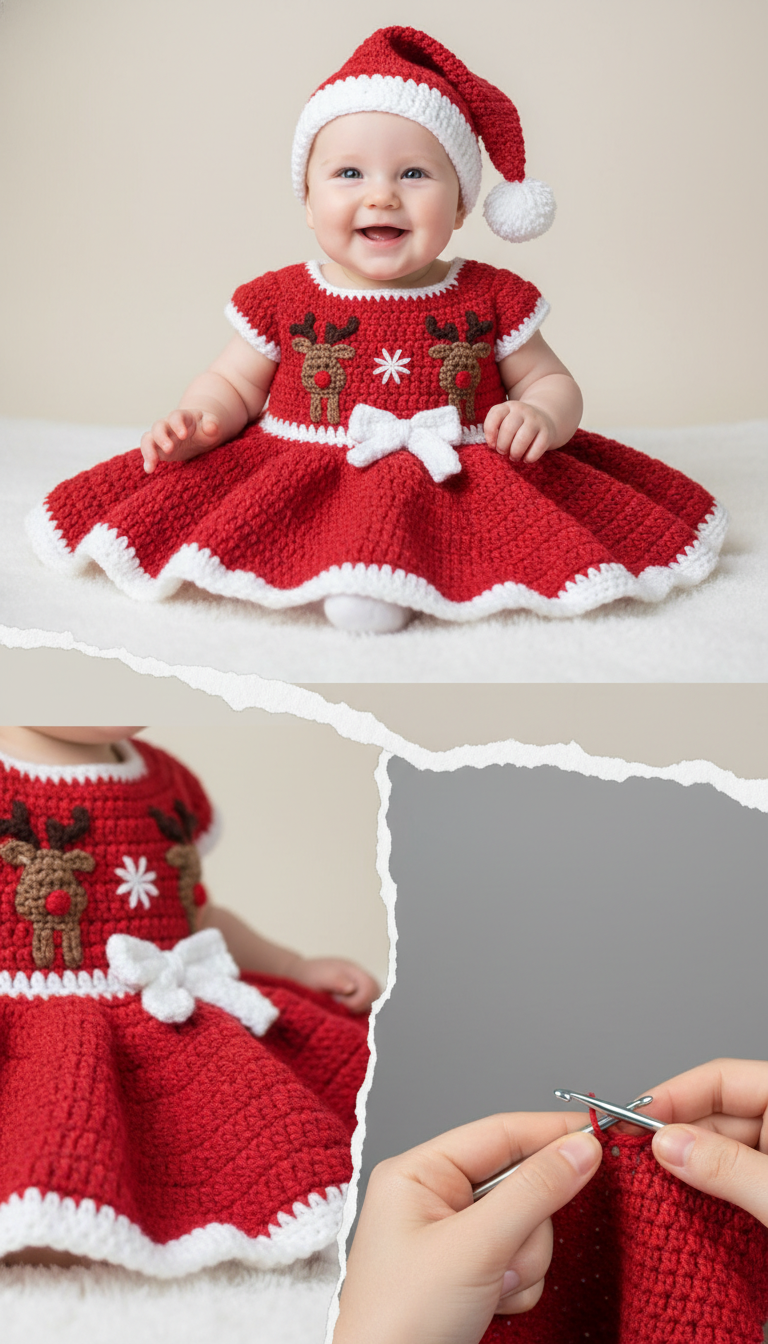
Get ready for the most enchanting holiday photos with our adorable Crochet Baby Santa Dress and Hat Pattern! This festive outfit, complete with charming reindeer and snowflake appliques, is perfect for your little one’s first Christmas. Create a handmade keepsake that will be cherished for years to come and capture those magical festive moments.
Craft Timeless Christmas Memories with Handmade Charm
There’s nothing quite like a handmade gift to add a personal touch to the holiday season. This delightful Santa dress and hat set isn’t just an outfit; it’s a labor of love, a cherished memory in the making. Imagine the joy of dressing your baby in this unique creation, making every photo session and family gathering extra special.
Crochet Pattern: Adorable Crochet Baby Santa Dress & Hat Pattern: Perfect for Christmas Photoshoots
Materials
- Red Worsted Weight Yarn (approx. 200g)
- White Worsted Weight Yarn (approx. 100g)
- Brown Worsted Weight Yarn (small amount for reindeer)
- Light Brown Worsted Weight Yarn (small amount for antlers)
- Small amount of Black Worsted Weight Yarn (for eyes)
- Crochet Hook: 4.0mm (G/6)
- Yarn Needle
- Scissors
- Stitch Markers
- Pompom Maker (for hat)
Abbreviations
- CH: Chain
- SL ST: Slip Stitch
- SC: Single Crochet
- HDC: Half Double Crochet
- DC: Double Crochet
- INC: Increase (2 HDC in same stitch)
- DEC: Decrease (HDC2tog)
- FO: Finish Off
- MR: Magic Ring
Instructions
Gauge: 16 HDC and 12 rows = 4 inches (10 cm). Adjust hook size if necessary.
Dress (0-3 Months Approx.)
Bodice Front (Red Yarn):
- Row 1: CH 36, HDC in 2nd CH from hook and across. (35 HDC)
- Rows 2-10: CH 1, turn, HDC in each stitch across. (35 HDC)
- Armhole Shaping:
- Row 11: CH 1, turn, SL ST in first 3 stitches, HDC in next 29 stitches, leave last 3 stitches unworked. (29 HDC)
- Row 12: CH 1, turn, SL ST in first 2 stitches, HDC in next 25 stitches, leave last 2 stitches unworked. (25 HDC)
- Neckline Shaping:
- Row 13: CH 1, turn, HDC in first 7 stitches, CH 11 (skip 11 stitches for neck opening), HDC in last 7 stitches. (14 HDC + 11 CH)
- Row 14: CH 1, turn, HDC in 7 stitches, HDC in 11 CH, HDC in 7 stitches. (25 HDC)
- Rows 15-16: CH 1, turn, HDC in each stitch across. (25 HDC) FO.
Bodice Back (Red Yarn):
- Follow instructions for Bodice Front Rows 1-12. (25 HDC at end of Row 12)
- Rows 13-16: CH 1, turn, HDC in each stitch across. (25 HDC) FO, leaving a long tail for seaming.
Assembly of Bodice:
- Place front and back bodice pieces right sides together.
- Sew shoulder seams using a yarn needle or SL ST.
- Sew side seams, leaving openings for armholes.
Sleeves (Red Yarn):
- Attach red yarn to the bottom of an armhole.
- Round 1: CH 1, HDC evenly around the armhole opening (approx. 24-28 HDC, adjust as needed for fit). Join with SL ST to first HDC.
- Round 2: CH 1, HDC in each stitch around. Join with SL ST. FO.
- Repeat for the second sleeve.
Skirt (Red Yarn):
- Attach red yarn to the bottom edge of the bodice, where you left the waist unseamed.
- Round 1: CH 1, HDC evenly around the entire bottom edge of the bodice (approx. 70 HDC). Join with SL ST.
- Round 2: CH 1, HDC in each stitch around. Join with SL ST.
- Round 3: CH 1, (HDC in next 3 stitches, INC) repeat around. Join with SL ST.
- Rounds 4-6: CH 1, HDC in each stitch around. Join with SL ST.
- Round 7: CH 1, (HDC in next 4 stitches, INC) repeat around. Join with SL ST.
- Continue in this pattern, increasing by one HDC between increases every 3-4 rounds, until the skirt reaches desired length (approx. 8-10 inches from waist). Ensure the last round is an HDC round without increases. FO.
White Edging for Dress (White Yarn):
- Attach white yarn to the back of the neckline. SC evenly around the entire neckline. SL ST to join. FO.
- Attach white yarn to the bottom of each sleeve. SC evenly around each sleeve edge. SL ST to join. FO.
- Attach white yarn to the bottom hem of the skirt. SC evenly around the entire hem. SL ST to join. FO.
Santa Hat (0-3 Months Approx.)
Hat Body (Red Yarn):
- Round 1: In MR, CH 2, 10 HDC. Join with SL ST to first HDC. (10 HDC)
- Round 2: CH 2, INC in each stitch around. Join with SL ST. (20 HDC)
- Round 3: CH 2, (HDC in next stitch, INC) repeat around. Join with SL ST. (30 HDC)
- Round 4: CH 2, (HDC in next 2 stitches, INC) repeat around. Join with SL ST. (40 HDC)
- Round 5: CH 2, (HDC in next 3 stitches, INC) repeat around. Join with SL ST. (50 HDC)
- Rounds 6-10: CH 2, HDC in each stitch around. Join with SL ST. (50 HDC)
- Round 11: CH 2, (HDC in next 8 stitches, DEC) repeat around. Join with SL ST. (45 HDC)
- Round 12-14: CH 2, HDC in each stitch around. Join with SL ST.
- Round 15: CH 2, (HDC in next 7 stitches, DEC) repeat around. Join with SL ST. (40 HDC)
- Rounds 16-18: CH 2, HDC in each stitch around. Join with SL ST.
- Continue decreasing evenly every 3 rounds and working straight in between, until you have approx. 20 HDC. Work straight for a few more rounds to create the point. FO, leaving a long tail for shaping the point if desired, or simply close with a yarn needle.
Hat Brim (White Yarn):
- Attach white yarn to the bottom edge of the hat.
- Round 1: CH 1, SC in each stitch around. Join with SL ST.
- Round 2: CH 1, SC in each stitch around. Join with SL ST. FO.
Pompom (White Yarn):
- Make a small white pompom (approx. 1.5-2 inches diameter) using your pompom maker or by hand.
- Securely attach the pompom to the tip of the hat.
Reindeer Appliques (Make 2):
- Head (Brown Yarn): CH 5. HDC in 2nd CH from hook, HDC in next 2 CH, 5 HDC in last CH. Continue on other side of CH: HDC in next 2 CH, 2 HDC in last CH. Join with SL ST to first HDC. (12 HDC) FO.
- Antlers (Light Brown Yarn): CH 4. SL ST in 2nd CH from hook, CH 3, SL ST in 2nd CH from hook, SL ST in next CH. SL ST in 3rd CH of initial CH 4. FO. (This forms a small branched antler). Make two for each reindeer.
- Assembly: Sew antlers to the top of the brown head. Embroider a small red circle for the nose and two black French knots for the eyes using a yarn needle.
Snowflake Applique (Make 1):
- (White Yarn): In MR, CH 1, (SC, CH 3) repeat 6 times. Join with SL ST to first SC. FO. (This creates a simple 6-point star/snowflake shape).
Bow Applique (Make 1):
- (White Yarn): CH 16.
- Rows 1-5: CH 1, turn, SC in each stitch across. (15 SC) FO.
- Cinch the center of the rectangle tightly with a short piece of white yarn to form a bow shape.
Finishing:
- Weave in all loose ends on the dress and hat.
- Sew the two reindeer appliques onto the front of the dress bodice, spaced evenly.
- Sew the snowflake applique onto the center of the dress bodice, slightly below the reindeer.
- Sew the white bow applique onto the waistline, centered below the snowflake.