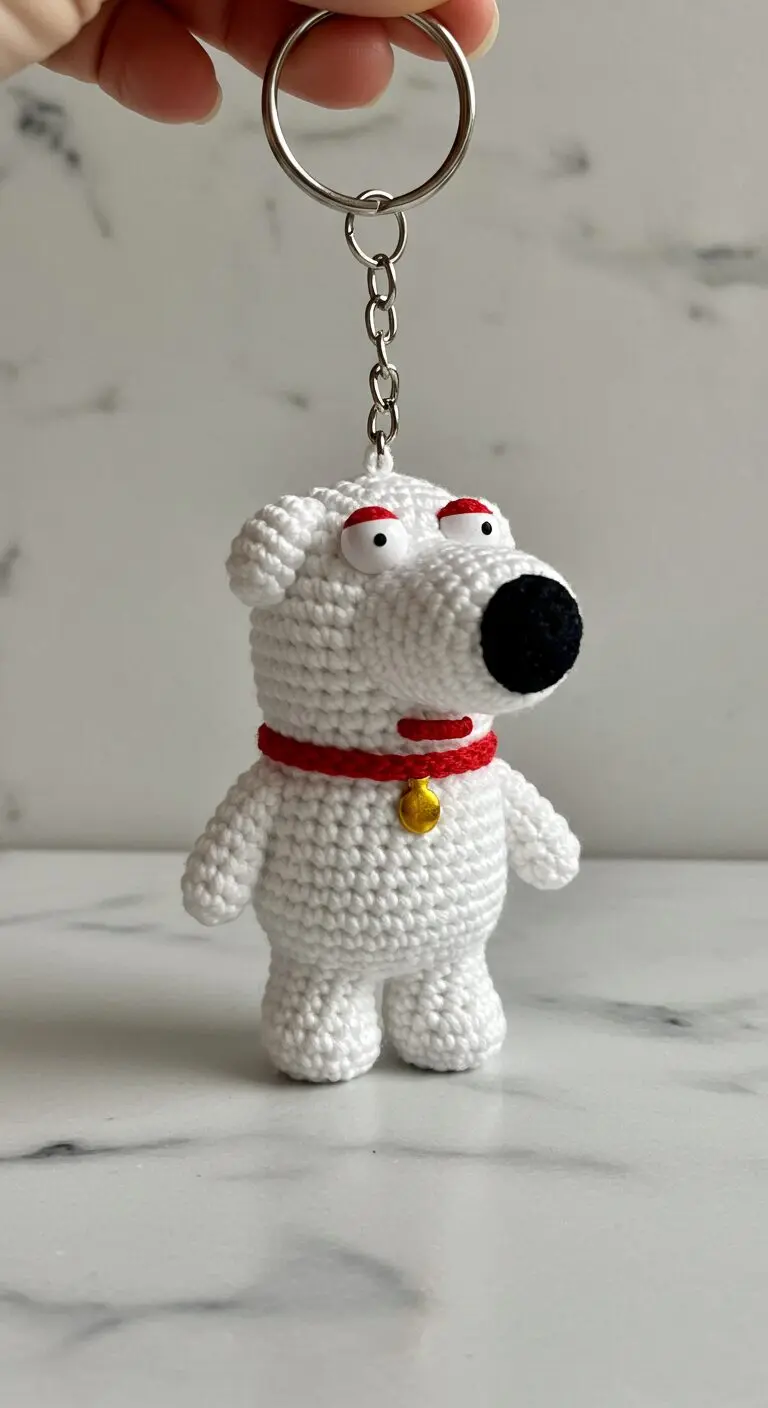
Discover the charm of this unique crochet Brian Griffin keychain, a perfect accessory for any fan of Family Guy. This meticulously handcrafted item brings the beloved animated character to life in an adorable, tactile form. It serves as an excellent way to personalize your keys, backpack, or purse. Show off your fandom with this eye-catching and distinctive keychain. Every detail captures Brian’s iconic look, making it instantly recognizable.
Why Every Family Guy Fan Needs a Crochet Brian Griffin Keychain
Beyond its aesthetic appeal, this crochet Brian Griffin keychain makes an ideal gift for birthdays, holidays, or just to surprise a fellow Family Guy enthusiast. Its durable yet soft construction ensures it can withstand daily use while maintaining its charming appearance. Collectors will also appreciate this unique piece, adding a special touch to their memorabilia. Carry a piece of Quahog wherever you go with this delightful and practical accessory.
Here is a detailed crochet pattern for an amigurumi Brian Griffin keychain, designed to replicate the object in your image.

---

**Amigurumi Brian Griffin Keychain Crochet Pattern**

This pattern will guide you to create a charming mini Brian Griffin, perfect for a keychain or a small desk companion. He features his signature white fur, red collar, and wide-eyed expression.

**Skill Level:** Intermediate

**Finished Size:** Approximately 4.5 - 5 inches (11-13 cm) tall (excluding keyring) when using recommended yarn and hook size.

**Gauge:** Not critical for this project, but work tightly to prevent stuffing from showing through. A good gauge would be 5 single crochet stitches and 5 rows = 1 inch (2.5 cm).

---

**Materials:**

*   **Yarn:** DK (Light Worsted / 8 ply) weight yarn
    *   White (approx. 30g)
    *   Red (small amount)
    *   Black (small amount)
    *   Pink (tiny amount)
    *   Yellow or Gold (tiny amount for collar tag)
*   **Crochet Hook:** 2.5mm or 3.0mm (depending on your tension and desired tightness)
*   **Safety Eyes:** 8mm, Black (with white background if available, or you can draw pupils on white safety eyes)
*   **Stuffing:** Polyester fiberfill
*   **Yarn Needle:** For sewing parts and weaving in ends
*   **Stitch Markers:** Recommended
*   **Scissors**
*   **Metal Keychain Ring:** With a short chain attached

---

**Abbreviations:**

*   **MR:** Magic Ring
*   **ch:** Chain
*   **sc:** Single Crochet
*   **inc:** Increase (2 sc in one stitch)
*   **dec:** Decrease (sc 2 together)
*   **sl st:** Slip Stitch
*   **FO:** Fasten Off
*   **BLO:** Back Loop Only
*   **R:** Round/Row
*   **(...) x N:** Repeat instructions in parentheses N times
*   **[ ]:** Total number of stitches at the end of the round/row

---

**Pattern Notes:**

*   This pattern is worked in continuous rounds unless otherwise stated. Use a stitch marker to keep track of the first stitch of each round.
*   Stuff parts firmly as you go, especially the head and body.
*   Leave a long tail for sewing when indicated.
*   Adjust hook size if your stitches are too loose or too tight.

---

**Instructions:**

**Head (White Yarn)**

R1: MR 6 sc [6]
R2: (inc) x 6 [12]
R3: (sc, inc) x 6 [18]
R4: (2 sc, inc) x 6 [24]
R5: (3 sc, inc) x 6 [30]
R6: (4 sc, inc) x 6 [36]
R7-R12: sc around (6 rounds) [36]
*Insert 8mm safety eyes between R9 and R10, about 7-8 stitches apart. You can adjust placement later during assembly if needed. Make sure they are centered on the front.*
R13: (4 sc, dec) x 6 [30]
R14: (3 sc, dec) x 6 [24]
*Start stuffing firmly, shaping the head.*
R15: (2 sc, dec) x 6 [18]
R16: (sc, dec) x 6 [12]
R17: (dec) x 6 [6]
FO, leaving a long tail. Weave the tail through the front loop of the remaining 6 stitches and pull tight to close the opening. Weave in end.

**Ears (White Yarn) - Make 2**

R1: MR 6 sc [6]
R2: (sc, inc) x 3 [9]
R3-R4: sc around (2 rounds) [9]
FO, leaving a long tail for sewing. Do not stuff. Flatten the ear and sew to the top of the head, between R3 and R6, centered above the eyes.

**Nose (Black Yarn)**

R1: MR 5 sc [5]
R2: (inc) x 5 [10]
R3: sc around [10]
FO, leaving a long tail for sewing. Stuff lightly. Sew the nose onto the head, centered just below the eyes (between R10 and R12 of the head).

**Tongue (Pink Yarn)**

Ch 4
R1: Sc in 2nd ch from hook, sc in next, 3 sc in last ch. Continue on the other side of the chain: sc in next, sc in last. [7]
Sl st to join. FO, leaving a short tail to secure.
Position the tongue just below the nose, with the rounded end slightly sticking out. Secure with a few stitches.

**Body (White Yarn)**

R1: MR 6 sc [6]
R2: (inc) x 6 [12]
R3: (sc, inc) x 6 [18]
R4: (2 sc, inc) x 6 [24]
R5: (3 sc, inc) x 6 [30]
R6-R12: sc around (7 rounds) [30]
*Start stuffing firmly.*
R13: (3 sc, dec) x 6 [24]
R14: (2 sc, dec) x 6 [18]
R15: (sc, dec) x 6 [12]
FO, leaving a long tail for sewing. Stuff firmly. Weave the tail through the front loop of the remaining 6 stitches and pull tight to close the opening. Weave in end.

**Arms (White Yarn) - Make 2**

R1: MR 6 sc [6]
R2-R6: sc around (5 rounds) [6]
FO, leaving a long tail for sewing. Stuff lightly, just the end. Flatten the opening.

**Legs (White Yarn) - Make 2**

R1: MR 6 sc [6]
R2: (inc) x 6 [12]
R3-R6: sc around (4 rounds) [12]
R7: (dec) x 6 [6]
FO, leaving a long tail for sewing. Stuff firmly. Weave the tail through the front loop of the remaining 6 stitches and pull tight to close the opening. Weave in end.

**Collar (Red Yarn)**

Ch 25 (or enough to comfortably fit around the neck joint of the body, test by wrapping)
R1: Sc in 2nd ch from hook and in each ch across. [24 sc]
FO, leaving a long tail for sewing.

**Collar Tag (Yellow/Gold Yarn)**

Ch 3
R1: Sc in 2nd ch from hook, sc in next ch. [2]
R2: Ch 1, turn. inc in first sc, inc in last sc. [4]
R3: Ch 1, turn. Sc in each sc across. [4]
R4: Ch 1, turn. Dec over first 2 sc, dec over last 2 sc. [2]
FO, leaving a long tail for sewing. Weave in the starting chain end. This will create a small, flattened diamond/square shape.

---

**Assembly:**

1.  **Attach Head to Body:** Using the long tail from the head, carefully sew the head to the body. Ensure it's centered and securely attached, giving Brian a good "neck."
2.  **Attach Arms:** Sew the flattened opening of the arms to the sides of the body, just below the neck/head joint, between R12 and R13 of the body.
3.  **Attach Legs:** Sew the legs to the bottom of the body, evenly spaced towards the front, so Brian can "stand" if desired.
4.  **Attach Collar:** Wrap the red collar around Brian's neck, just above where the body starts to narrow. Stitch the ends together at the back and then stitch the collar securely to the body in a few spots to prevent it from sliding around.
5.  **Attach Collar Tag:** Using the long tail from the yellow/gold tag, sew it onto the front of the red collar. Position it diagonally to resemble Brian's iconic tag.
6.  **Attach Keyring:** Locate the top center of Brian's head. Use pliers to open the small loop at the end of the keychain's short chain, and carefully thread it through a sturdy stitch on the very top of Brian's head. Close the loop tightly with pliers. You may also stitch it more securely with matching white yarn if desired.
7.  **Final Touches:** Weave in any remaining loose ends. Check that all parts are securely attached and stuffing is not visible.

Your Brian Griffin keychain is now complete! Enjoy your new Family Guy companion.