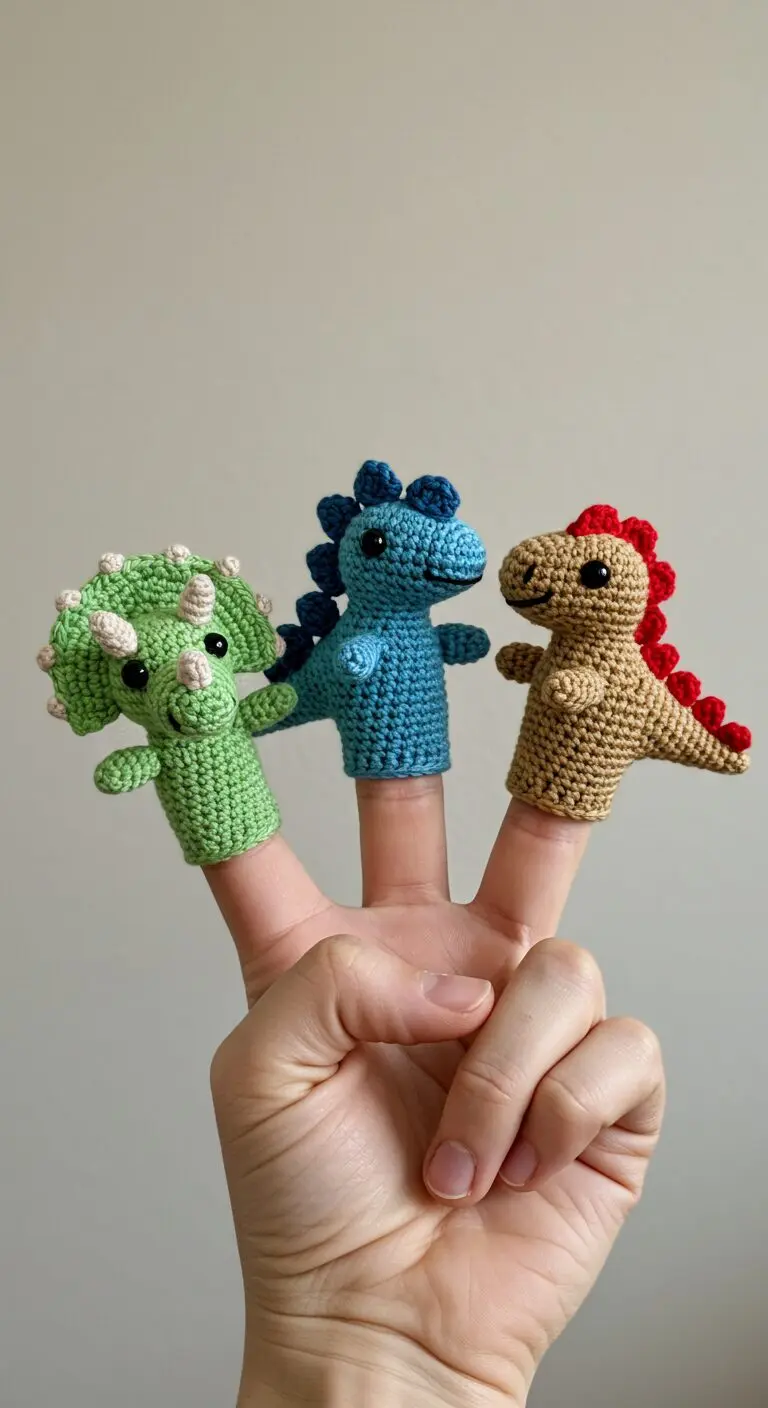
Discover the charm of these delightful crochet dinosaur finger puppets, perfect for sparking imagination in children and adults alike. These handcrafted miniature creatures, including a vibrant green triceratops, a cool blue stegosaurus-like dinosaur, and a classic brown T-Rex, are ready for adventure. Each puppet is intricately made, showcasing the care and skill involved in creating such charming toys. They offer a wonderful way to engage in storytelling and imaginative play, making them an excellent addition to any toy collection. These crochet dinosaur finger puppets are truly captivating.
Bringing Stories to Life with Dinosaur Finger Puppets
These unique dinosaur finger puppets are more than just toys; they are tools for creativity and development. They encourage children to invent narratives, practice their communication skills, and explore different roles. The soft, tactile nature of the crochet material adds to their appeal, making them safe and enjoyable for little hands. Whether used in educational settings, during quiet playtime at home, or as thoughtful handmade gifts, these crochet dinosaur finger puppets promise hours of engaging fun and imaginative exploration.
Here is a detailed crochet pattern to replicate the dinosaur finger puppets shown in the image.

---

**Amigurumi Dinosaur Finger Puppets Pattern**

This pattern creates three adorable dinosaur finger puppets: a Triceratops, a Stegosaurus, and a T-Rex. They are designed to be quick and fun to make, suitable for an intermediate crocheter.

**Finished Size:** Approximately 2.5 - 3 inches tall, suitable for an adult finger.

**Skill Level:** Intermediate

**Materials:**

*   **Yarn:** Sport or DK weight (100% cotton recommended for stitch definition)
    *   **Triceratops:** Green (main body), Light Green/Beige (horns, frill bumps)
    *   **Stegosaurus:** Blue (main body), Dark Blue (back plates)
    *   **T-Rex:** Brown (main body), Red (back spikes)
*   **Crochet Hook:** 2.5mm or 3.0mm (adjust to your tension; aim for tight stitches to prevent stuffing from showing)
*   **Safety Eyes:** 5mm or 6mm black (2 per dinosaur)
*   **Stuffing:** Polyester fiberfill
*   **Tapestry Needle:** For sewing parts and weaving in ends
*   **Stitch Markers:** Essential for working in continuous rounds
*   **Scissors**
*   **Black Embroidery Floss (optional):** For embroidering mouths

**Abbreviations (US Crochet Terms):**

*   **MR:** Magic Ring (also known as Magic Circle)
*   **ch:** Chain
*   **sc:** Single Crochet
*   **inc:** Increase (2 sc in one stitch)
*   **dec:** Decrease (single crochet 2 together)
*   **sl st:** Slip Stitch
*   **FO:** Fasten Off
*   **( ) xX:** Repeat instruction in parentheses X times
*   **[ ]:** Total number of stitches in the round/row

---

**General Notes for All Dinosaurs:**

*   Work in continuous rounds unless otherwise specified. Use a stitch marker to mark the first stitch of each round.
*   Stuff the head lightly but firmly enough to hold its shape. Do not stuff the finger sleeve.
*   Gauge is not critical for this project, but consistent tension is important for a neat finish.
*   Adjust the length of the finger sleeve (R10-R17) to fit your finger or desired length.
*   Leave a long tail for sewing when fastening off individual pieces.

---

**COMMON BASE FINGER PUPPET BODY (Make 1 for each dinosaur)**

*Start with the main color yarn for your chosen dinosaur (Green for Triceratops, Blue for Stegosaurus, Brown for T-Rex).*

**Head:**
R1: Start with MR, 6 sc. [6]
R2: (inc) x6. [12]
R3: (sc, inc) x6. [18]
R4: (2 sc, inc) x6. [24]
R5-R7: sc around. (3 rounds) [24]
*Insert safety eyes between R5 and R6, approximately 6-7 stitches apart. Secure washers firmly.*

**Neck/Body Transition:**
R8: (2 sc, dec) x6. [18]
R9: sc around. [18]
*Lightly stuff the head at this point. Ensure it's not overstuffed, which could distort the stitches or make it difficult to attach the frill/spikes.*

**Finger Sleeve:**
R10-R17: sc around. (8 rounds) [18]
R18: (inc, 8 sc) x2. [20]
R19: sc around. [20]
Sl st to first sc of R19. FO, weave in ends.

---

## 1. Green Triceratops Finger Puppet

**(Using the COMMON BASE FINGER PUPPET BODY in Green yarn)**

**Additional Materials:**
*   Light Green/Beige yarn (for horns, frill bumps)

**Parts:**

**1. Body/Head:** Follow "COMMON BASE FINGER PUPPET BODY" instructions using **Green** yarn.

**2. Frill (Green yarn):**
R1: Ch 12. Sc in 2nd ch from hook and next 10 ch. Ch 1, turn. [11]
R2-R5: Sc in next 11 st. Ch 1, turn. [11]
R6: inc, 9 sc, inc. Ch 1, turn. [13]
R7: Sc in next 13 st. Ch 1, turn. [13]
R8: inc, 11 sc, inc. Ch 1, turn. [15]
R9: Sc in next 15 st. Ch 1, turn. [15]
R10: inc, 13 sc, inc. Ch 1, turn. [17]
R11: Sc in next 17 st. Ch 1, turn. [17]
*Now, sc evenly around the entire edge of the frill to create a clean border. Place 2-3 sc in each corner to make the turn smooth. Sl st to join, FO, leaving a long tail for sewing.*

**3. Frill Bumps (Make 6-8 in Light Green/Beige yarn):**
R1: MR, 5 sc. [5]
Sl st to first sc, FO, leaving a short tail for sewing. (These are very small, no stuffing needed).

**4. Horns (Light Green/Beige yarn):**
**Large Horns (Make 2):**
R1: MR, 4 sc. [4]
R2: (sc, inc) x2. [6]
R3: sc around. [6]
FO, leaving a long tail for sewing. Lightly stuff the tip.
**Small Horn (Make 1):**
R1: MR, 4 sc. [4]
FO, leaving a long tail for sewing. No stuffing needed.

**5. Arms (Make 2 in Green yarn):**
R1: MR, 6 sc. [6]
R2: sc around. [6]
Sl st to first sc, FO, leaving a long tail for sewing. No stuffing needed.

**Assembly - Triceratops:**
1.  **Attach Frill:** Position the flat top edge of the green frill at the back of the dinosaur's head, centering it. Sew securely.
2.  **Attach Frill Bumps:** Sew the small light green/beige bumps evenly along the curved outer edge of the frill.
3.  **Attach Horns:**
    *   Sew the two large horns on the frill, positioned above and slightly to the sides of the eyes.
    *   Sew the small horn centrally on the snout area, between the eyes.
4.  **Attach Arms:** Sew the two arms to the sides of the body, just below the neck transition (around R9-R10 of the body).
5.  **Embroider Mouth:** Using black embroidery floss, embroider a small, curved smile below the small horn.

---

## 2. Blue Stegosaurus Finger Puppet

**(Using the COMMON BASE FINGER PUPPET BODY in Blue yarn)**

**Additional Materials:**
*   Dark Blue yarn (for back plates)

**Parts:**

**1. Body/Head:** Follow "COMMON BASE FINGER PUPPET BODY" instructions using **Blue** yarn.

**2. Back Plates (Make 6-8 in Dark Blue yarn):**
R1: Ch 6. Sc in 2nd ch from hook, sc in next 3 ch, 3 sc in last ch. Continue on other side of chain: sc in next 3 ch, inc in last ch. [12]
R2: sc around. [12]
Sl st to first sc, FO, leaving a long tail for sewing. (No stuffing needed)

**3. Legs (Make 4 in Blue yarn):**
R1: MR, 6 sc. [6]
R2: sc around. [6]
Sl st to first sc, FO, leaving a long tail for sewing. No stuffing needed.

**Assembly - Stegosaurus:**
1.  **Attach Back Plates:** Sew the dark blue back plates evenly along the top of the body, starting from the back of the head/neck area and continuing down the back towards the bottom of the finger sleeve. Position them to stand upright.
2.  **Attach Legs:** Sew two legs to the front sides of the body (around R9-R10) and two legs to the back sides of the body (around R13-R14).
3.  **Embroider Mouth:** Using black embroidery floss, embroider a small, curved smile.

---

## 3. Brown T-Rex Finger Puppet

**(Using the COMMON BASE FINGER PUPPET BODY in Brown yarn)**

**Additional Materials:**
*   Red yarn (for back spikes)

**Parts:**

**1. Body/Head:** Follow "COMMON BASE FINGER PUPPET BODY" instructions using **Brown** yarn.

**2. Back Spikes (Make 7-9 in Red yarn):**
R1: MR, 4 sc. [4]
Sl st to first sc, FO, leaving a short tail for sewing. (These are small nubs, no stuffing needed).

**3. Arms (Make 2 in Brown yarn):**
R1: MR, 4 sc. [4]
Sl st to first sc, FO, leaving a long tail for sewing. No stuffing needed.

**Assembly - T-Rex:**
1.  **Attach Back Spikes:** Sew the red spikes evenly along the top of the body, starting from the back of the head/neck area and continuing down the back towards the bottom of the finger sleeve. Position them to stand upright, forming a ridge.
2.  **Attach Arms:** Sew the very tiny arms to the sides of the body, slightly below the neck transition (around R9-R10).
3.  **Embroider Mouth:** Using black embroidery floss, embroider a small, curved smile.

---

**Finishing Touches for All:**

*   Weave in any remaining loose ends with your tapestry needle.
*   Gently reshape your dinosaurs if needed.

Enjoy your new adorable dinosaur finger puppets!