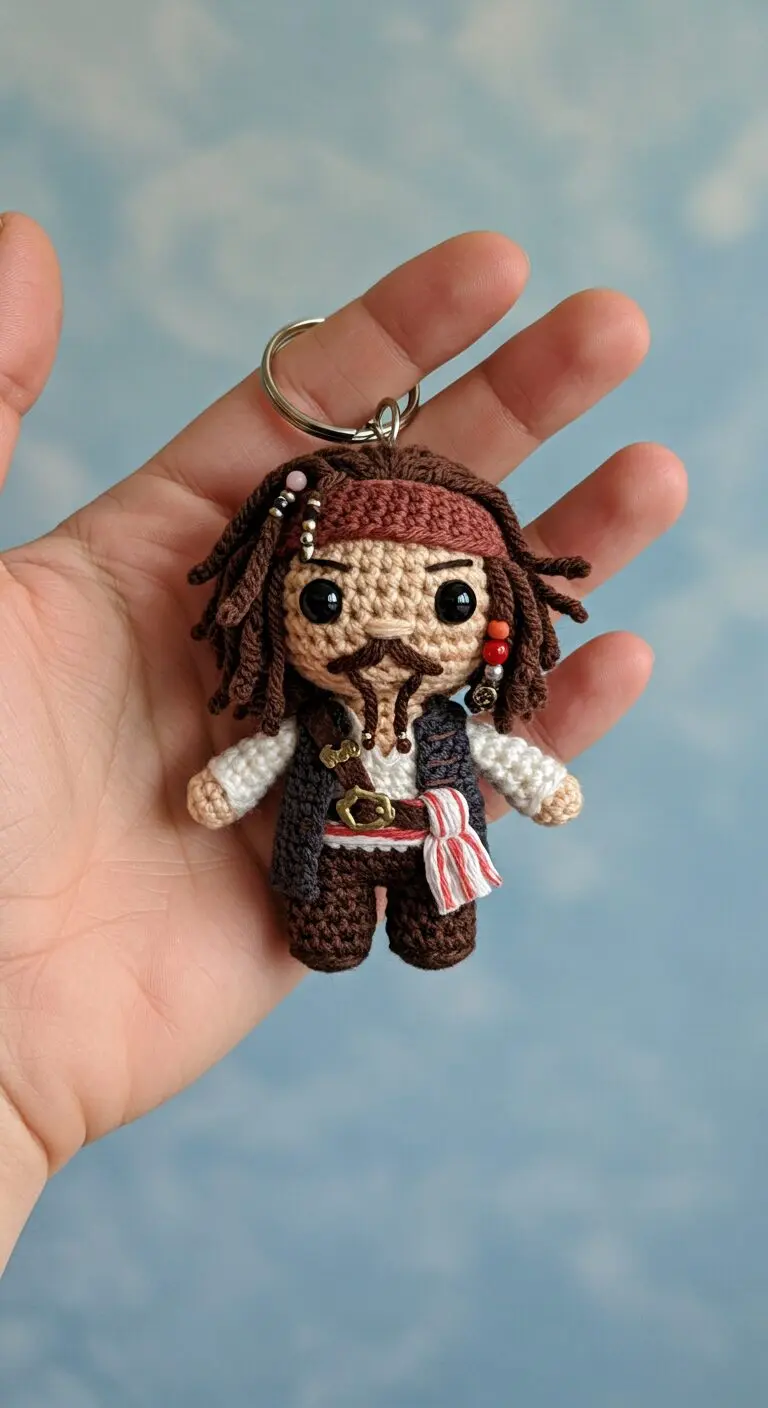
Embark on a miniature adventure with this incredible crochet Jack Sparrow keychain. This charming amigurumi figure perfectly captures the iconic pirate captain, from his dreadlocks to his signature sash. Handcrafted with meticulous detail, this tiny Captain Jack Sparrow brings a touch of swashbuckling fun to your everyday items. It’s a fantastic way to show off your love for the Pirates of the Caribbean saga.
Crafting Your Own Crochet Jack Sparrow: A Step-by-Step Guide
Whether you’re a fan of amigurumi or simply adore the eccentric pirate, this keychain is a delightful accessory. Its compact size makes it ideal for attaching to keys, backpacks, or even as a decorative charm. The intricate stitching and vibrant colors bring the character to life in a unique, handmade form, celebrating the spirit of adventure. Such a crochet Jack Sparrow creation makes a perfect gift for fellow pirate enthusiasts or a treasured addition to your own collection.
Here is a detailed crochet pattern to create your own Captain Jack Sparrow amigurumi keychain, inspired by the image provided.

---

**Captain Jack Sparrow Amigurumi Keychain Crochet Pattern**

**Skill Level:** Intermediate

**Finished Size:** Approximately 10-12 cm (4-5 inches) tall, excluding the keychain ring.

**Materials:**

*   **Yarn:** Sport or DK weight cotton yarn in the following colors:
    *   **Skin Tone:** (e.g., beige, light peach)
    *   **Dark Brown:** (for hair, pants, boots, belt, shoulder strap, facial hair)
    *   **Reddish Brown:** (for bandana)
    *   **Dark Grey:** (for vest)
    *   **White:** (for shirt, sash stripe)
    *   **Red:** (for sash stripe, small amount for dreadlock beads if not using actual beads)
*   **Crochet Hook:** 2.0mm or 2.25mm (B/1 or C/2 US size), or size needed to achieve tight stitches that stuffing won't show through.
*   **Safety Eyes:** 6mm or 8mm black.
*   **Polyester Fiberfill:** For stuffing.
*   **Tapestry Needle:** For sewing parts together and weaving in ends.
*   **Stitch Markers:** To keep track of rounds.
*   **Scissors.**
*   **Keychain Ring:** With chain attachment.
*   **Small Decorative Beads:** For dreadlocks (e.g., gold/silver metallic, red, pink/purple - as seen in image).
*   **Small Charm or Button:** For the belt buckle (gold/bronze colored).
*   **Black Embroidery Floss:** For eyebrows.
*   **Dark Brown Embroidery Floss:** For mustache and goatee (or use dark brown yarn strand).

**Abbreviations:**

*   **MR:** Magic Ring
*   **ch:** Chain
*   **sc:** Single Crochet
*   **inc:** Increase (2 sc in the next stitch)
*   **dec:** Decrease (single crochet 2 together)
*   **sl st:** Slip Stitch
*   **FO:** Fasten Off
*   **(...) x N:** Repeat instructions in parentheses N times
*   **[N]:** Total number of stitches at the end of the round/row

**Notes:**

*   Work in continuous rounds unless otherwise specified. Use a stitch marker to keep track of the first stitch of each round.
*   Stuff firmly as you go, especially for smaller parts like arms and legs, to maintain shape.
*   For color changes, always change yarn on the last pull-through of the stitch *before* the new color is introduced.
*   Small decorative beads can be threaded onto some of the dreadlock strands before crocheting, or sewn on after the dreadlocks are made.

---

**Pattern Instructions:**

**HEAD (Skin Tone, then Reddish Brown)**
Start with **Skin Tone** yarn.
R1: 6 sc in MR [6]
R2: (inc) x 6 [12]
R3: (sc, inc) x 6 [18]
R4: (2 sc, inc) x 6 [24]
R5: (3 sc, inc) x 6 [30]
R6: (4 sc, inc) x 6 [36]
R7-R13: sc in each st around (7 rounds) [36]
*Insert safety eyes between R10 and R11, approximately 7 stitches apart.*
R14: (4 sc, dec) x 6 [30]
R15: (3 sc, dec) x 6 [24]
*Start stuffing the head firmly and shape it.*
R16: (2 sc, dec) x 6 [18]
*Change to **Reddish Brown** yarn for the bandana.*
R17: (sc, dec) x 6 [12]
R18: (dec) x 6 [6]
FO, leave a long tail for sewing. Close the remaining hole using the tail and tapestry needle. Weave in ends.
*Attach the keychain ring securely to the top of the head (around R17-R18).*

**HAIR / DREADLOCKS (Dark Brown)**
Cut approximately 12-15 strands of **Dark Brown** yarn, each about 15-20 cm (6-8 inches) long.
*To create a dreadlock and attach it:*
1.  Take one strand of yarn.
2.  Fold it in half and insert your hook through a stitch on the head, just below the reddish-brown bandana, or slightly into the bandana itself, where the hair would emerge.
3.  Pull the loop of the folded yarn through the stitch.
4.  Insert the two yarn ends through the loop and pull tightly to create a lark's head knot.
5.  Now, working with *both strands as one*, chain 15-20 stitches (or desired length for the dreadlock).
6.  Skip the first chain from the hook, then sl st back down the chain to the head.
7.  FO and trim ends neatly.
*Repeat this process for all dreadlocks, distributing them evenly around the head, ensuring they emerge from under the bandana. Vary the lengths slightly if desired.*
*Thread small decorative beads onto some of the finished dreadlocks. Secure them in place by tying a small knot below the bead or with a tiny drop of craft glue (optional).*

**BODY & LEGS (Dark Brown, White, Dark Grey)**

**Legs (Make 2) - Dark Brown**
R1: 6 sc in MR [6]
R2: (inc) x 6 [12]
R3-R6: sc in each st around (4 rounds) [12]
FO on the first leg, leaving a tail to weave in. *Do not FO on the second leg.*
*Stuff both legs firmly.*

**Join Legs & Body (Dark Brown, then White, then Dark Grey)**
*From the second leg, ch 3.*
R7: Join to first leg with sc in any st on first leg, sc in next 11 st of first leg, sc in 3 ch (across the chain), sc in 12 st of second leg, sc in 3 ch (across the other side of the chain) [30]
R8-R9: sc in each st around (2 rounds) [30]
*Change to **White** yarn for the shirt.*
R10: sc in each st around [30]
R11: (4 sc, dec) x 5 [25]
R12: sc in each st around [25]
R13: (3 sc, dec) x 5 [20]
*Change to **Dark Grey** yarn for the vest.*
R14: sc in each st around [20]
R15: (3 sc, inc) x 5 [25]
R16-R17: sc in each st around (2 rounds) [25]
R18: (3 sc, dec) x 5 [20]
*Continue stuffing the body firmly as you go.*
R19: (2 sc, dec) x 5 [15]
R20: (sc, dec) x 5 [10]
FO, leave a long tail for sewing to the head. Close the remaining hole.

**ARMS (Make 2) - White, then Skin Tone**
Start with **White** yarn.
R1: 6 sc in MR [6]
R2: (sc, inc) x 3 [9]
R3-R5: sc in each st around (3 rounds) [9]
*Change to **Skin Tone** yarn.*
R6-R7: sc in each st around (2 rounds) [9]
R8: (sc, dec) x 3 [6]
*Stuff lightly.*
FO, leave a long tail for sewing. Flatten the top opening and sew it closed.

**SASH (White and Red)**
With **White** yarn.
Ch 25-30 (adjust length to comfortably wrap around the body's waist).
R1: Starting in the 2nd ch from hook, sc in each ch across [24-29]
*Change to **Red** yarn.*
R2: Ch 1, turn, sc in each st across [24-29]
*Change to **White** yarn.*
R3: Ch 1, turn, sc in each st across [24-29]
FO, leave a long tail for sewing.
*Lay the sash flat, fold it over in the middle (as shown in the reference image) to create the looped look, and secure the fold and ends with a few stitches.*

**BELT (Dark Brown)**
With **Dark Brown** yarn.
Ch 15-20 (adjust length to comfortably wrap around the body over the sash).
R1: Starting in 2nd ch from hook, sc in each ch across. [14-19]
FO, leave a tail for sewing.
*Sew the small charm/button to the middle of this strip to create the buckle.*

**SHOULDER STRAP (Dark Brown)**
With **Dark Brown** yarn.
Ch 25-30 (adjust length to fit diagonally across the vest from shoulder to hip).
R1: Starting in 2nd ch from hook, sl st in each ch across.
FO, leave a tail for sewing.

---

**ASSEMBLY & EMBELLISHMENTS:**

1.  **Attach Head to Body:** Using the long tail from the body, firmly sew the head onto the body, ensuring it is centered and secure.
2.  **Attach Arms:** Sew the arms to the sides of the body, positioning them so they emerge from the white shirt part, just below the dark grey vest line.
3.  **Facial Details:**
    *   Using **black embroidery floss**, embroider small, slightly arched eyebrows above the safety eyes.
    *   Using **dark brown embroidery floss** (or a single strand of dark brown yarn), embroider the distinct mustache and goatee. The goatee usually consists of a few vertical strands hanging down from the chin.
4.  **Sash:** Wrap the striped sash around the body's waist, over the dark brown pants. Position the folded part slightly to one side as pictured, and secure it with a few stitches to the body.
5.  **Belt:** Wrap the dark brown belt (with the buckle charm) over the sash. Position the buckle in the front. Secure with a few stitches to the body and sash.
6.  **Shoulder Strap:** Sew the shoulder strap diagonally across the chest/vest, from one shoulder down to the opposite hip, passing *under* the belt. Secure at both ends.
7.  **Final Touches:** Weave in any remaining yarn ends. Adjust any elements as needed to achieve the desired look.

Your adorable Captain Jack Sparrow Amigurumi Keychain is now ready to set sail!