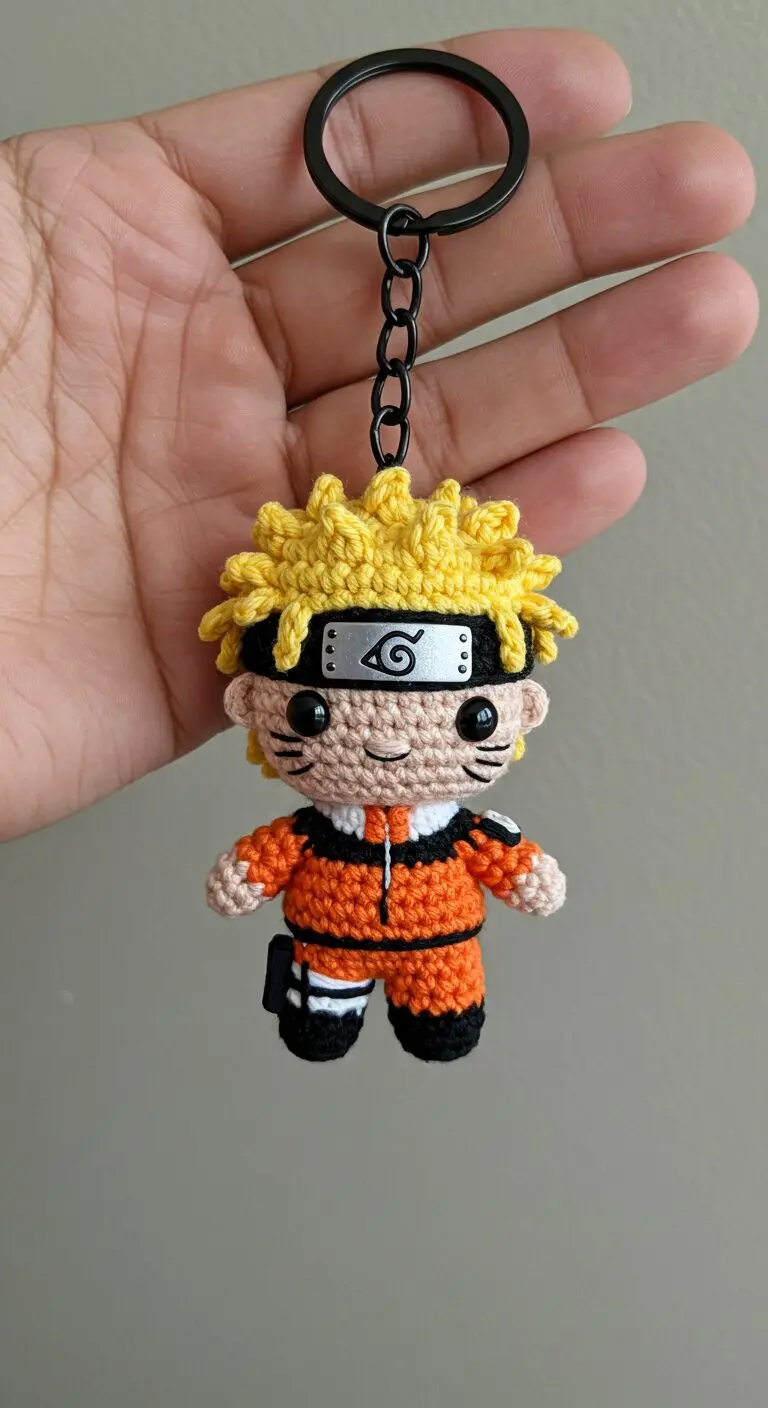
Discover the charm of this meticulously handcrafted crochet Naruto keychain, a delightful tribute to the beloved anime character. This miniature amigurumi figure captures Naruto Uzumaki’s iconic look, complete with his spiky blonde hair and signature orange outfit. Attached to a sturdy black keyring, this unique accessory is perfect for personalizing your keys, bag, or backpack. It’s an excellent way for fans to carry a piece of their favorite ninja wherever they go.
Show Your Fandom with a Unique Naruto Keychain
The intricate detail of this crochet Naruto keychain truly sets it apart, showcasing the skill involved in bringing this popular character to life in yarn. Its durable construction ensures that this charming accessory will withstand daily use while adding a pop of vibrant personality. Whether you’re a long-time follower of the Hidden Leaf Village or looking for a special gift, this Naruto keychain is a thoughtful choice. It beautifully merges practical utility with a passion for anime, making it a must-have for collectors and fans alike.
This is a fantastic request! Replicating amigurumi from an image requires careful observation of stitches, shapes, and details. This Naruto keychain is adorable and perfectly captures his look.

Here is a detailed, professional crochet pattern to create this Naruto Uzumaki amigurumi keychain.

---

## Naruto Uzumaki Amigurumi Keychain Crochet Pattern

This pattern creates a mini Naruto Uzumaki amigurumi, perfect for a keychain, approximately 4-5 inches tall depending on your yarn and hook tension.

**Skill Level:** Intermediate

---

### Materials Required:

*   **Yarn:** Worsted weight (or DK weight for a smaller keychain) acrylic yarn in the following colors:
    *   **Peach/Light Beige:** Skin Tone (e.g., Caron Simply Soft - Bone, or similar)
    *   **Bright Yellow:** Hair (e.g., Red Heart Super Saver - Bright Yellow)
    *   **Orange:** Jumpsuit (e.g., Red Heart Super Saver - Pumpkin)
    *   **Black:** Headband, shoes, accents, embroidery (e.g., Red Heart Super Saver - Black)
    *   **White:** Collar, zipper, leg wraps (e.g., Red Heart Super Saver - White)
    *   **Silver/Grey:** Headband plate (e.g., Red Heart Super Saver - Grey Heather)
*   **Crochet Hook:** 2.5mm or 3.0mm (depending on desired tightness and yarn weight)
*   **Safety Eyes:** 6mm or 8mm black safety eyes
*   **Polyester Fiberfill:** For stuffing
*   **Tapestry Needle:** For sewing parts together and weaving in ends
*   **Stitch Markers:** Essential for working in continuous rounds
*   **Scissors**
*   **Black Keychain Hardware:** Split ring and chain (as seen in the image)

---

### Abbreviations:

*   **MR:** Magic Ring
*   **ch:** Chain
*   **sl st:** Slip Stitch
*   **sc:** Single Crochet
*   **inc:** Increase (2 sc in one stitch)
*   **dec:** Decrease (sc2tog - single crochet two together)
*   **hdc:** Half Double Crochet
*   **dc:** Double Crochet
*   **FO:** Fasten Off
*   **BLO:** Back Loop Only
*   **FLO:** Front Loop Only
*   **st/sts:** Stitch/Stitches
*   **rnd/rnds:** Round/Rounds
*   **( )** : Repeat instructions within parentheses the specified number of times.
*   **[ ]** : Total number of stitches at the end of the round.

---

### Pattern Instructions:

Work in continuous rounds unless otherwise specified. Use a stitch marker to keep track of the first stitch of each round.

---

#### Head (Peach/Light Beige yarn)

1.  **Rnd 1:** MR, 6 sc in MR. [6]
2.  **Rnd 2:** (inc) x 6. [12]
3.  **Rnd 3:** (sc, inc) x 6. [18]
4.  **Rnd 4:** (2 sc, inc) x 6. [24]
5.  **Rnd 5:** (3 sc, inc) x 6. [30]
6.  **Rnd 6:** (4 sc, inc) x 6. [36]
7.  **Rnd 7-14:** Sc in each st around. (8 rounds) [36]
    *   *Insert safety eyes between Rnd 10 and 11, approximately 7-8 stitches apart. Begin stuffing firmly.*
8.  **Rnd 15:** (4 sc, dec) x 6. [30]
9.  **Rnd 16:** (3 sc, dec) x 6. [24]
10. **Rnd 17:** (2 sc, dec) x 6. [18]
11. **Rnd 18:** (sc, dec) x 6. [12]
    *   *Finish stuffing firmly.*
12. **Rnd 19:** (dec) x 6. [6]
    *   FO, leave a long tail for sewing. Close the hole by weaving the tail through the front loops of the remaining 6 stitches and pull tight. Weave in end.

---

#### Hair (Bright Yellow yarn)

The hair is created by first making a cap, then adding spikes.

**Hair Cap:**

1.  **Rnd 1:** MR, 6 sc in MR. [6]
2.  **Rnd 2:** (inc) x 6. [12]
3.  **Rnd 3:** (sc, inc) x 6. [18]
4.  **Rnd 4:** (2 sc, inc) x 6. [24]
5.  **Rnd 5:** (3 sc, inc) x 6. [30]
6.  **Rnd 6:** (4 sc, inc) x 6. [36]
7.  **Rnd 7:** Sc in each st around. [36]

**Spikes (work directly onto Rnd 7 of the Hair Cap, or by attaching yarn to stitches around the cap):**

*   For each spike, you will create a small "petal" or "leaf" like shape.
*   **Method:** (ch 4, sc in 2nd ch from hook, hdc in next ch, sl st in last ch), then sl st into the *next available stitch* on the hair cap.
*   Repeat this method, skipping 0-1 stitch between spikes, to create a dense, spiky appearance all over the top and front edges of the hair cap. Vary the starting points and density as desired to match the reference image. The goal is random, spiky texture.
*   Work spikes around the edge of Rnd 7, and then make more spikes into the interior of the cap, aiming for dense coverage.
*   Once spikes are complete, FO, leaving a long tail for sewing.

---

#### Headband (Black and Silver/Grey yarn)

**Headband Strip (Black yarn):**

1.  Ch 20.
2.  Starting in 2nd ch from hook, sc in each ch across. [19]
3.  Ch 1, turn. Sc in each st across. [19]
4.  FO, leave a long tail for sewing.

**Headband Plate (Silver/Grey yarn):**

1.  Ch 5.
2.  Starting in 2nd ch from hook, sc in each ch across. [4]
3.  Ch 1, turn. Sc in each st across. [4]
4.  FO, leave a long tail for sewing.

**Headband Assembly:**
*   Using black yarn and a tapestry needle, embroider the Konoha symbol (a swirled leaf) onto the center of the silver/grey plate. You can also add 4 small embroidered dots for the "rivets".
*   Sew the silver/grey plate onto the center of the black headband strip.

---

#### Body (Start with Orange yarn)

1.  **Rnd 1:** MR, 6 sc in MR. [6]
2.  **Rnd 2:** (inc) x 6. [12]
3.  **Rnd 3:** (sc, inc) x 6. [18]
4.  **Rnd 4:** (2 sc, inc) x 6. [24]
5.  **Rnd 5:** (3 sc, inc) x 6. [30]
6.  **Rnd 6-7:** Sc in each st around. (2 rounds) [30]
7.  **Rnd 8:** (3 sc, dec) x 6. [24]
8.  **Rnd 9:** Sc in each st around. [24]
9.  **Rnd 10:** (2 sc, dec) x 6. [18]
    *   *Start stuffing firmly.*
10. **Rnd 11:** Sc in each st around. [18]
11. **Rnd 12:** (sc, dec) x 6. [12]
    *   *Change to **White** yarn for collar/zipper.*
12. **Rnd 13:** Sc in each st around. [12]
    *   *Change to **Black** yarn for neck trim.*
13. **Rnd 14:** Sc in each st around. [12]
    *   FO, leave a long tail for sewing. Continue stuffing to shape.

---

#### Arms (Make 2) (Start with Peach/Light Beige yarn)

1.  **Rnd 1:** MR, 6 sc in MR. [6]
2.  **Rnd 2:** Sc in each st around. [6]
    *   *Change to **Orange** yarn.*
3.  **Rnd 3-5:** Sc in each st around. (3 rounds) [6]
    *   *Change to **Black** yarn for cuff detail.*
4.  **Rnd 6:** Sc in each st around. [6]
    *   FO, leave a long tail for sewing. Do not stuff.

---

#### Legs (Make 2) (Start with Black yarn)

1.  **Rnd 1:** MR, 6 sc in MR. [6]
2.  **Rnd 2:** (sc, inc) x 3. [9]
3.  **Rnd 3:** Sc in each st around. [9]
    *   *Change to **Orange** yarn.*
4.  **Rnd 4-6:** Sc in each st around. (3 rounds) [9]
    *   *Change to **White** yarn for leg wrap.*
5.  **Rnd 7:** Sc in each st around. [9]
    *   *Change to **Orange** yarn.*
6.  **Rnd 8:** Sc in each st around. [9]
    *   FO, leave a long tail for sewing. Lightly stuff the leg.

---

#### Side Pouch (Black yarn)

1.  Ch 4.
2.  Starting in 2nd ch from hook, sc in each ch across. [3]
3.  Ch 1, turn. Sc in each st across. [3]
4.  FO, leave a long tail for sewing. (This forms a small rectangle).

---

### Assembly and Detailing:

1.  **Attach Head to Body:** Using the long tail from the head, sew the head to the body. Ensure the black neck trim of the body is neatly aligned.
2.  **Attach Hair:** Position the yellow hair cap with spikes on top of Naruto's head, covering the crown. Sew securely in place.
3.  **Attach Headband:** Place the headband (black strip with grey plate) around Naruto's forehead, just below the hair. Position the plate centrally. Sew the ends of the black strip together at the back of the head, and then tack the headband securely to the head to keep it from shifting.
4.  **Facial Details:**
    *   Using black embroidery floss or a thin strand of black yarn and a tapestry needle, embroider Naruto's three whisker marks on each cheek.
    *   Embroider a small "v" or curved line for the mouth, centered below the eyes.
5.  **Attach Arms:** Sew the arms to the sides of the body, just below the neck/collar area.
6.  **Attach Legs:** Sew the legs to the bottom of the body. You can either sew them flat to the bottom or slightly forward for a sitting pose.
7.  **Jumpsuit Details (Black yarn):**
    *   Using black yarn and a tapestry needle, embroider a vertical line down the center front of the body (over the white stitches) to define the zipper opening.
    *   Embroider horizontal black lines on the white collar to mimic the collar details.
    *   Embroider a black stripe down each side of the orange body, following the contour from armpit to hip, to replicate the jumpsuit design.
8.  **Attach Side Pouch:** Sew the small black pouch onto one of Naruto's hips.
9.  **Keychain Attachment:** Thread the keychain chain through the top of Naruto's head (through the center of the hair or a secure stitch on the head) and attach the split ring. Ensure it's very secure if it will be used as a functional keychain.

---

Your Naruto Uzumaki amigurumi keychain is now complete! Enjoy your little ninja buddy!