Get ready for some delightful spooky fun with these charming Halloween finger puppets. Perfect for imaginative play or festive decorations, these handmade creations bring classic Halloween characters to life on your fingertips. From friendly ghosts to mischievous black cats, these puppets are sure to enchant both children and adults alike. Discover the magic of storytelling and creativity with this adorable set. They are an ideal way to celebrate the season.
Crafting Your Own Halloween Finger Puppets
Whether you’re looking for unique decor or engaging toys, Halloween finger puppets offer a wonderful way to celebrate the season. They can be used for puppet shows, as party favors, or simply as a cute addition to your holiday display. These small, intricate figures capture the spirit of Halloween in a charming and accessible format, making them a fantastic addition to any festive collection. Consider making your own for a personalized touch and endless creative possibilities.
Here is a detailed, professional crochet pattern to replicate the Halloween finger puppets from the image.
---
**Crochet Halloween Finger Puppet Set**
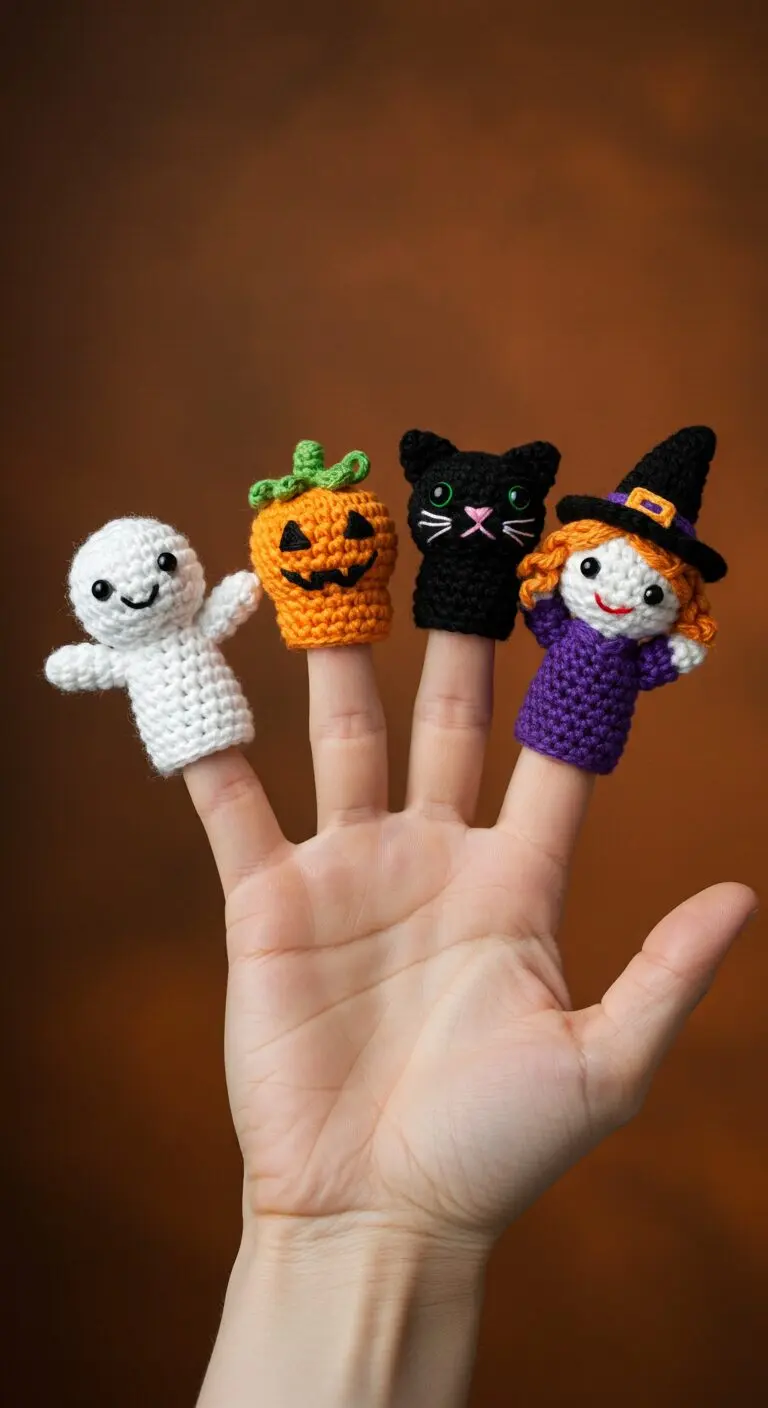
Create your own adorable set of Halloween finger puppets, perfect for storytelling, festive decorations, or a charming gift. This pattern includes instructions for a friendly Ghost, a mischievous Pumpkin, a sleek Black Cat, and a charming Witch.
**Skill Level:** Intermediate
**Finished Size:** Approximately 2.5 - 3 inches (6.5 - 7.5 cm) tall, designed to fit an average adult finger.
**Materials:**
* **Yarn:** Sport or DK weight yarn (approx. 50g/1.75oz per 125m/137yd) in the following colors:
* White (for Ghost, Witch's head/arms, Cat's whiskers)
* Orange (for Pumpkin, Witch's hair, Witch's hat buckle)
* Black (for Black Cat, Witch's hat, embroidery for Ghost/Pumpkin/Witch faces)
* Green (for Pumpkin's stem)
* Purple (for Witch's dress)
* Pink (for Cat's nose embroidery)
* Red (for Witch's mouth embroidery)
* **Crochet Hook:** 2.5mm or 3.0mm (or size suitable for your yarn weight to create tight stitches, preventing stuffing from showing)
* **Safety Eyes:** 5mm Green (for Black Cat)
* **Yarn Needle** (Tapestry needle)
* **Stitch Marker**
* **Fiberfill** (stuffing)
* **Scissors**
**Abbreviations:**
* **MR:** Magic Ring
* **ch:** chain
* **sc:** single crochet
* **inc:** increase (2 sc in one stitch)
* **dec:** decrease (sc2tog - single crochet 2 stitches together)
* **sl st:** slip stitch
* **FO:** fasten off
* **( )**: repeat instructions within parentheses
* **[ ]**: total number of stitches at the end of the round/row
---
### **General Notes for All Puppets:**
* Work in continuous rounds unless otherwise specified.
* Use a stitch marker to keep track of the beginning of each round.
* Stuff lightly as you go, especially for smaller parts like heads. The finger will fill most of the body.
* Embroider facial features firmly but gently.
* The last round of the main body section for each puppet (or the bottom of the dress for the Witch) forms the opening for the finger.
---
### **1. Ghost Finger Puppet**
**(White yarn, Black embroidery thread)**
**Body/Head (White):**
1. MR 6 sc [6]
2. inc in each sc [12]
3. (sc, inc) x 6 [18]
4. sc in each sc around [18]
5. (2 sc, inc) x 6 [24]
6-10. sc in each sc around (5 rounds) [24]
*Lightly stuff the top (head) part here.*
11. (2 sc, dec) x 6 [18]
12. (sc, dec) x 6 [12]
*Stuff the head more firmly.*
13. sc in each sc around [12] (This forms the neck)
14. (sc, inc) x 6 [18] (Start of the finger opening section)
15-23. sc in each sc around (9 rounds) [18]
24. FO, weave in end. (This leaves the bottom open for the finger).
**Arms (Make 2, White):**
1. MR 6 sc [6]
2. sc in each sc around [6]
3. (sc, dec) x 2 [4]
*Do not stuff.*
4. FO, leaving a long tail for sewing. Flatten and sew the arms to the sides of the ghost body, around rounds 10-12 of the main body, just below the head.
**Assembly & Features:**
* Using black embroidery thread, embroider two small round eyes on the front of the head, between rounds 8-9, about 4-5 stitches apart.
* Embroider a cheerful smile below the eyes.
---
### **2. Pumpkin Finger Puppet**
**(Orange yarn, Green yarn, Black embroidery thread)**
**Body (Orange):**
1. MR 6 sc [6]
2. inc in each sc [12]
3. (sc, inc) x 6 [18]
4. (2 sc, inc) x 6 [24]
5. (3 sc, inc) x 6 [30]
6-12. sc in each sc around (7 rounds) [30]
*Lightly stuff the top part of the pumpkin here.*
13. (3 sc, dec) x 6 [24]
14. (2 sc, dec) x 6 [18]
15. (sc, dec) x 6 [12] (This forms the constricted neck for the stem)
16. sc in each sc around [12]
*Stuff the top portion firmly.*
17. (sc, inc) x 6 [18] (Start of the finger opening section)
18-23. sc in each sc around (6 rounds) [18]
24. FO, weave in end. (This leaves the bottom open for the finger).
**Stem (Green):**
1. MR 6 sc [6]
2. sc in each sc around [6]
3. (sc, dec) x 2 [4]
4. sc in each sc around [4]
*Do not stuff.*
5. FO, leaving a long tail for sewing. Sew the stem to the very top center of the pumpkin body.
**Assembly & Features:**
* Using black embroidery thread, embroider two triangular eyes and a jagged smile onto the front of the pumpkin, centered on the main orange body section.
---
### **3. Black Cat Finger Puppet**
**(Black yarn, 5mm Green safety eyes, Pink and White embroidery thread)**
**Body/Head (Black):**
1. MR 6 sc [6]
2. inc in each sc [12]
3. (sc, inc) x 6 [18]
4. (2 sc, inc) x 6 [24]
5-11. sc in each sc around (7 rounds) [24]
*Insert 5mm green safety eyes between rounds 7 and 8, about 5 stitches apart. Lightly stuff the head here.*
12. (2 sc, dec) x 6 [18]
13. (sc, dec) x 6 [12]
*Stuff the head firmly.*
14. sc in each sc around [12] (This forms the neck)
15. (sc, inc) x 6 [18] (Start of the finger opening section)
16-20. sc in each sc around (5 rounds) [18]
21. FO, weave in end. (This leaves the bottom open for the finger).
**Ears (Make 2, Black):**
1. MR 4 sc [4]
2. (sc, inc) x 2 [6]
3. sc in each sc around [6]
4. FO, leaving a long tail for sewing. Pinch the bottom of each ear flat and sew to the top of the head, between rounds 1 and 2 (from the MR), about 5-6 stitches apart.
**Assembly & Features:**
* Using pink embroidery thread, embroider a small triangular nose centered between the eyes.
* Using white embroidery thread, embroider 2-3 whiskers on each side of the nose.
---
### **4. Witch Finger Puppet**
**(Purple yarn, White yarn, Orange yarn, Black yarn, Red embroidery thread)**
**Body/Dress (Start with Purple yarn):**
1. MR 6 sc [6]
2. inc in each sc [12]
3. (sc, inc) x 6 [18]
4. (2 sc, inc) x 6 [24]
5. (3 sc, inc) x 6 [30]
6-10. sc in each sc around (5 rounds) [30]
*This completes the dress section. Round 10 is the opening for the finger.*
11. (3 sc, dec) x 6 [24]
12-14. sc in each sc around (3 rounds) [24]
15. (2 sc, dec) x 6 [18]
16. sc in each sc around [18]
17. (sc, dec) x 6 [12]
*Lightly stuff the body below this point.*
*Change to White yarn.*
18. sc in each sc around [12] (This is the neck)
**Head (White):**
19. (sc, inc) x 6 [18]
20. (2 sc, inc) x 6 [24]
21-25. sc in each sc around (5 rounds) [24]
*Embroider eyes with black thread between rounds 22 and 23, about 4-5 stitches apart. Embroider red smile below eyes.*
*Stuff the head firmly.*
26. (2 sc, dec) x 6 [18]
27. (sc, dec) x 6 [12]
28. dec x 6 [6]
29. FO, leaving a tail. Close the hole by weaving the tail through the front loops of the remaining 6 stitches and pulling tight. Weave in end.
**Arms (Make 2, White and Purple):**
1. MR 5 sc [5] (White yarn)
2. sc in each sc around [5]
3. Change to Purple yarn.
4. sc in each sc around [5]
5. FO, leaving a long tail for sewing. Do not stuff. Sew arms to the sides of the body, just below the color change to white (round 17-18).
**Hair Wig Cap (Orange):**
1. MR 6 sc [6]
2. inc in each sc [12]
3. (sc, inc) x 6 [18]
4. (2 sc, inc) x 6 [24]
5. sc in each sc around [24]
6. FO, leaving a long tail for sewing. Sew this cap onto the witch's head, covering the top.
**Hair Strands (Orange):**
1. Cut multiple strands of orange yarn, about 6-8 inches (15-20 cm) long.
2. Using a crochet hook, attach the strands to the wig cap using the lark's head knot method. Insert hook into a stitch on the wig cap, fold a strand of yarn in half, loop the folded end onto the hook, pull through the stitch to form a loop, then pull the two yarn ends through that loop and tighten.
3. Cover the wig cap with strands, focusing on the sides and back to create a short bob style. Trim the hair to desired length as seen in the image.
**Witch Hat (Black yarn):**
**Brim:**
1. MR 6 sc [6]
2. inc in each sc [12]
3. (sc, inc) x 6 [18]
4. (2 sc, inc) x 6 [24]
5. (3 sc, inc) x 6 [30]
6. sl st in each sc around. [30]
7. FO, leaving a long tail for sewing.
**Cone Top:**
1. MR 4 sc [4]
2. (sc, inc) x 2 [6]
3. sc in each sc around [6]
4. (2 sc, inc) x 2 [8]
5. sc in each sc around [8]
6. (3 sc, inc) x 2 [10]
7. sc in each sc around [10]
8. (4 sc, inc) x 2 [12]
9. sc in each sc around [12]
10. (5 sc, inc) x 2 [14]
11. sc in each sc around [14]
12. (6 sc, inc) x 2 [16]
13. sc in each sc around [16]
14. (7 sc, inc) x 2 [18]
15. sc in each sc around [18]
16. FO, leaving a long tail for sewing.
**Hat Buckle (Orange yarn):**
1. Ch 5.
2. Starting in 2nd ch from hook: sc in next 4 ch. [4]
3. FO, leaving a tail for sewing.
**Assembly & Features (Witch):**
* Sew the black cone top to the center of the black hat brim.
* Sew the orange buckle onto the black hat cone, positioned at the front where the cone meets the brim.
* Sew the completed witch hat onto the top of the witch's head, slightly covering the hair as shown in the image.
* Ensure all embroidered features and hair are properly visible.
Enjoy your handmade Halloween Finger Puppet Set!