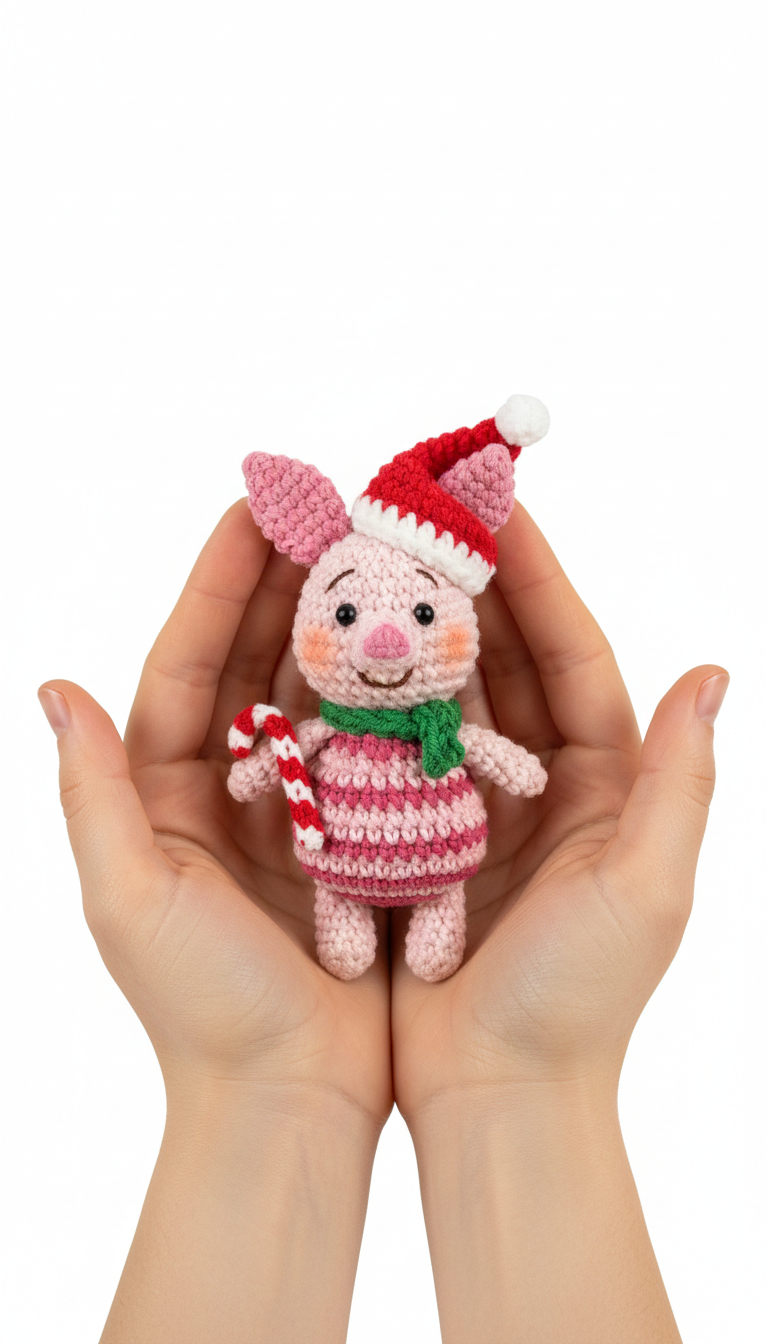
Welcome the festive season with our adorable Holiday Pig Amigurumi! This charming little piglet, sporting a cheerful Santa hat and a cozy green scarf, is holding a sweet candy cane, ready to spread holiday cheer. Perfect for decorating your home or gifting to a loved one, this pattern guides you through creating your very own miniature festive friend.
Craft Your Own Adorable Holiday Companion
Bringing this little pig to life is a delightful experience, suitable for crocheters looking for a charming holiday project. Its small size makes it a quick and rewarding make, perfect for last-minute gifts or as a cute addition to your festive decor. Imagine the smiles this sweet, handcrafted amigurumi will bring to anyone who sees it!
Crochet Pattern: Charming Christmas Pig Amigurumi: Free Crochet Pattern
Materials
- Sport weight yarn in Light Pink, Dark Pink, Red, White, Green
- 2.5mm crochet hook
- Fiberfill stuffing
- 6mm safety eyes (black)
- Black embroidery floss (for nostrils)
- Tapestry needle
- Stitch marker
- Scissors
Abbreviations
- AR: Adjustable Ring (Magic Ring)
- ch: chain
- sc: single crochet
- inc: increase (2 sc in one stitch)
- dec: decrease (sc 2 stitches together)
- sl st: slip stitch
- FO: Fasten Off
- Rnd(s): Round(s)
- st(s): stitch(es)
- BLO: Back Loop Only
- FLO: Front Loop Only
Instructions
Head (Light Pink)
- Rnd 1: 6 sc in AR. (6 sts)
- Rnd 2: Inc in each st around. (12 sts)
- Rnd 3: (Sc, inc) x 6. (18 sts)
- Rnd 4: (2 sc, inc) x 6. (24 sts)
- Rnd 5: (3 sc, inc) x 6. (30 sts)
- Rnd 6-10: Sc in each st around. (30 sts)
- Insert safety eyes between Rnd 7 and 8, about 6-7 sts apart.
- Rnd 11: (3 sc, dec) x 6. (24 sts)
- Rnd 12: (2 sc, dec) x 6. (18 sts)
- Start stuffing. Continue to stuff firmly as you go.
- Rnd 13: (Sc, dec) x 6. (12 sts)
- FO, leaving a long tail for sewing.
Snout (Dark Pink)
- Rnd 1: 6 sc in AR. (6 sts)
- Rnd 2: (Sc, inc) x 3. (9 sts)
- Rnd 3: Sc in each st around. (9 sts)
- FO, leaving a long tail for sewing. Lightly stuff. Embroider two small lines with black floss for nostrils.
Ears (Light Pink, make 2)
- Rnd 1: 4 sc in AR. (4 sts)
- Rnd 2: (Sc, inc) x 2. (6 sts)
- Rnd 3: (2 sc, inc) x 2. (8 sts)
- Rnd 4: Sc in each st around. (8 sts)
- FO, leaving a long tail for sewing. Do not stuff. Flatten the ear.
Body (Light Pink & Dark Pink Stripes)
- Start with Light Pink.
- Rnd 1: 6 sc in AR. (6 sts)
- Rnd 2: Inc in each st around. (12 sts)
- Rnd 3: (Sc, inc) x 6. (18 sts)
- Rnd 4: (2 sc, inc) x 6. (24 sts)
- Rnd 5: (3 sc, inc) x 6. (30 sts)
- Rnd 6: (4 sc, inc) x 6. (36 sts)
- Rnd 7-8: Sc in each st around. (36 sts)
- Change to Dark Pink.
- Rnd 9-10: Sc in each st around. (36 sts)
- Change to Light Pink.
- Rnd 11-12: Sc in each st around. (36 sts)
- Change to Dark Pink.
- Rnd 13-14: Sc in each st around. (36 sts)
- Change to Light Pink.
- Rnd 15: (4 sc, dec) x 6. (30 sts)
- Start stuffing.
- Rnd 16: (3 sc, dec) x 6. (24 sts)
- Rnd 17: (2 sc, dec) x 6. (18 sts)
- FO, leaving a long tail for sewing. Continue stuffing firmly.
Arms (Light Pink, make 2)
- Rnd 1: 6 sc in AR. (6 sts)
- Rnd 2-6: Sc in each st around. (6 sts)
- FO, leaving a long tail for sewing. Stuff lightly.
Legs (Light Pink, make 2)
- Rnd 1: 6 sc in AR. (6 sts)
- Rnd 2: (Sc, inc) x 3. (9 sts)
- Rnd 3-5: Sc in each st around. (9 sts)
- FO, leaving a long tail for sewing. Stuff lightly.
Santa Hat (Red & White)
- Start with Red yarn.
- Rnd 1: 6 sc in AR. (6 sts)
- Rnd 2: Sc in each st around. (6 sts)
- Rnd 3: (Sc, inc) x 3. (9 sts)
- Rnd 4: Sc in each st around. (9 sts)
- Rnd 5: (2 sc, inc) x 3. (12 sts)
- Rnd 6: Sc in each st around. (12 sts)
- Rnd 7: (3 sc, inc) x 3. (15 sts)
- Rnd 8: Sc in each st around. (15 sts)
- Rnd 9: (4 sc, inc) x 3. (18 sts)
- Rnd 10: Sc in each st around. (18 sts)
- Change to White yarn.
- Rnd 11: Sc in BLO around. (18 sts)
- Rnd 12: Sc in each st around. (18 sts)
- FO, weave in ends.
- Pom-pom (White): Make a small pom-pom and attach it to the tip of the hat.
Scarf (Green)
- Ch 35.
- Row 1: Sc in 2nd ch from hook and in each ch across. (34 sts)
- Row 2: Ch 1, turn, sc in each st across. (34 sts)
- FO, weave in ends.
Candy Cane (Red & White)
- Using Red yarn, ch 15.
- Switch to White yarn. Sl st in the 2nd ch from hook (this makes the stripe), then ch 15 again.
- Repeat switching colors and chaining 15 for 4-5 stripes.
- Twist the strands of red and white together to form the candy cane shape. You can use a thin piece of floral wire inside for better shaping, or simply stiffen with fabric stiffener if desired.
- Alternatively, for a simpler candy cane: With Red yarn, ch 10. FO. With White yarn, ch 10. FO. Twist the two chains together and bend into a ‘J’ shape.
- Or, for a crocheted spiral: With Red, Ch 25. With White, Ch 25. Hold both chains together and sc along both chains, alternating colors with each stitch to create a spiral. Form into a ‘J’.
- Let’s use the simplest: Ch 15 with Red. Ch 15 with White. Twist them together and shape.
- Corrected Candy Cane (Red & White)
- Using Red yarn, ch 17. FO.
- Using White yarn, ch 17. FO.
- Twist the red and white chains together to form stripes, then gently bend into a candy cane ‘J’ shape. Secure the ends with a bit of glue or by tying them.
Assembly
- Sew the head to the top of the body, making sure it’s centered.
- Sew the snout to the front of the head, just below the eyes. Embroider small blush circles on the cheeks using a little Dark Pink yarn.
- Sew the ears to the top sides of the head.
- Sew the arms to the sides of the body, just below the neck.
- Sew the legs to the bottom of the body.
- Wrap the green scarf around the pig’s neck.
- Carefully attach the candy cane to one of the pig’s hands (you can lightly tack it with a stitch or glue).
- Weave in all remaining ends.