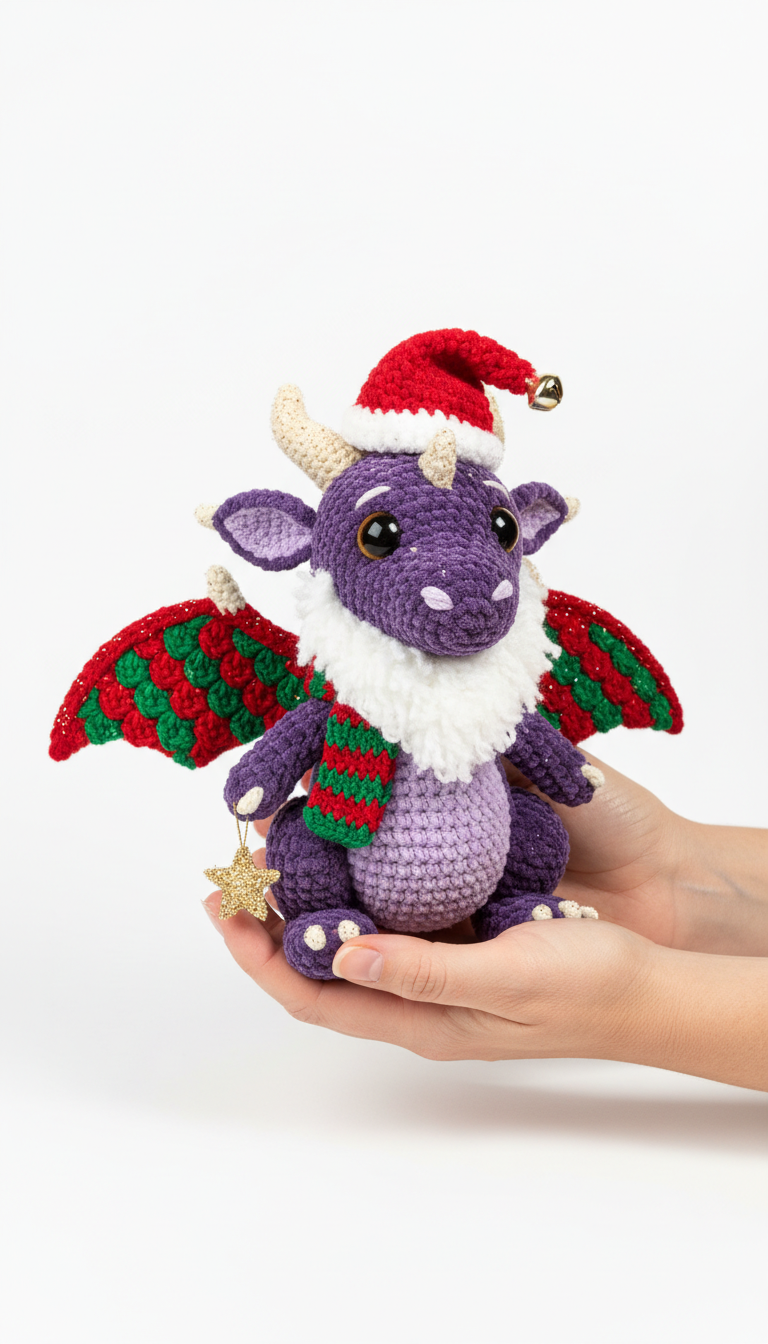
Get ready to bring some magical holiday cheer into your home with this adorable Christmas Dragon Amigurumi! This pattern guides you through creating your very own festive dragon, complete with a Santa hat, cozy scarf, and sparkling wings. Perfect for holiday decor or a special handmade gift, this little purple dragon is sure to capture hearts.
Craft a Magical Holiday with Your Handmade Dragon
There’s nothing quite like the joy of a handmade Christmas, and this crochet dragon adds a whimsical touch to your celebrations. Personalize its colors, add extra glitter, or make a whole family of dragons for unique gifts that friends and family will cherish. It’s more than just a toy; it’s a tiny guardian of holiday spirit.
Crochet Pattern: Charming Crochet Christmas Dragon Amigurumi Pattern: Your Festive Friend!
Materials
- Worsted weight yarn in: Main Purple (e.g., ‘Grape’), Accent Purple (e.g., ‘Lavender’), Red, Green, Beige/Cream, White
- Fluffy white yarn (e.g., ‘fun fur’ or chenille for collar)
- 3.0mm crochet hook (or size suitable for your yarn to achieve tight stitches)
- 10-12mm Black safety eyes
- Polyester fiberfill for stuffing
- Tapestry needle
- Stitch markers
- Small gold bell
- Small gold star ornament (optional)
- Glitter spray or sparkle yarn (optional, for wings)
Abbreviations
- MR: Magic Ring
- ch: chain
- sc: single crochet
- inc: increase (2 sc in one stitch)
- dec: decrease (sc two stitches together)
- sl st: slip stitch
- FO: Fasten Off
- Rnd: Round
- BLO: Back Loop Only
- FLO: Front Loop Only
- hdc: half double crochet
- dc: double crochet
Instructions
Gauge: Not crucial for this project, just ensure your stitches are tight enough so stuffing doesn’t show through.
Note: Work in continuous rounds unless otherwise specified. Use a stitch marker to mark the beginning of each round.
Head (Main Purple)
- Rnd 1: 6 sc in MR (6)
- Rnd 2: inc in each st around (12)
- Rnd 3: (sc, inc) x6 (18)
- Rnd 4: (2 sc, inc) x6 (24)
- Rnd 5: (3 sc, inc) x6 (30)
- Rnd 6-12: sc in each st around (30)
- Insert safety eyes between Rnd 10 and 11, about 6 stitches apart.
- Rnd 13: (3 sc, dec) x6 (24)
- Rnd 14: (2 sc, dec) x6 (18)
- Stuff firmly.
- Rnd 15: (sc, dec) x6 (12)
- Rnd 16: dec x6 (6)
- FO, weave in tail to close opening.
Snout (Accent Purple)
- Rnd 1: 4 sc in MR (4)
- Rnd 2: (sc, inc) x2 (6)
- Rnd 3: sc in each st around (6)
- Leave a long tail for sewing. Lightly stuff.
Horns (Make 2, Beige/Cream)
- Rnd 1: 4 sc in MR (4)
- Rnd 2: (sc, inc) x2 (6)
- Rnd 3: sc in each st around (6)
- Rnd 4: (2 sc, inc) x2 (8)
- Rnd 5: sc in each st around (8)
- FO, leave long tail for sewing. Do not stuff.
Ears (Make 2, Main Purple)
- ch 5
- Row 1: sc in 2nd ch from hook, hdc in next ch, dc in next ch, sl st in last ch.
- FO, leave long tail for sewing.
Body (Main Purple)
- Rnd 1: 6 sc in MR (6)
- Rnd 2: inc in each st around (12)
- Rnd 3: (sc, inc) x6 (18)
- Rnd 4: (2 sc, inc) x6 (24)
- Rnd 5: (3 sc, inc) x6 (30)
- Rnd 6: (4 sc, inc) x6 (36)
- Rnd 7-14: sc in each st around (36)
- Rnd 15: (4 sc, dec) x6 (30)
- Rnd 16-18: sc in each st around (30)
- Rnd 19: (3 sc, dec) x6 (24)
- Stuff firmly.
- Rnd 20: (2 sc, dec) x6 (18)
- FO, leave a long tail for sewing to head.
Belly Patch (Accent Purple)
- ch 6
- Rnd 1: sc in 2nd ch from hook, sc in next 3 ch, 3 sc in last ch. Continue on other side of ch: sc in next 3 ch, 2 sc in last st (12)
- Rnd 2: inc, 3 sc, inc x3, 3 sc, inc x2 (18)
- FO, leave long tail for sewing.
Arms (Make 2, Main Purple)
- Rnd 1: 6 sc in MR (6)
- Rnd 2-5: sc in each st around (6)
- FO, leave long tail for sewing. Lightly stuff.
Legs (Make 2, Main Purple)
- Rnd 1: 6 sc in MR (6)
- Rnd 2: inc in each st around (12)
- Rnd 3-5: sc in each st around (12)
- Rnd 6: (2 sc, dec) x3 (9)
- Stuff firmly. FO, leave long tail for sewing.
Foot Pads (Make 6 small circles, Beige/Cream)
- Rnd 1: 4 sc in MR (4)
- FO, leave long tail for sewing.
Tail (Main Purple)
- Rnd 1: 4 sc in MR (4)
- Rnd 2: sc in each st around (4)
- Rnd 3: (sc, inc) x2 (6)
- Rnd 4-5: sc in each st around (6)
- Rnd 6: (2 sc, inc) x2 (8)
- Rnd 7: sc in each st around (8)
- Stuff lightly. FO, leave long tail for sewing.
Wings (Make 2)
Start with Red yarn. Incorporate sparkle yarn if desired or spray with glitter after completion.
- ch 11
- Row 1 (Red): sc in 2nd ch from hook, sc in next 9 ch (10). ch 1, turn.
- Row 2 (Red): sc in each st across (10). ch 1, turn.
- Row 3 (Green): (sl st, 2dc, sl st) in first st, skip 1 st, *(sl st, 2dc, sl st) in next st, skip 1 st* repeat to end. You’ll have 5 ‘scales’. ch 1, turn.
- Row 4 (Green): sc in each st across, working into the tops of the dc stitches and any sl sts. (Approx 10 sc, adjust as needed to maintain width). ch 1, turn.
- Row 5 (Red): Repeat Row 3 pattern, offsetting the scales slightly if desired by starting in a different stitch. (5 scales). ch 1, turn.
- Row 6 (Red): Repeat Row 4. ch 1, turn.
- Continue alternating Red and Green rows (Rows 3-6 pattern) until you have about 4-5 Red scale rows and 4-5 Green scale rows, decreasing stitches at the outer edge in the sc rows to gently curve the wing. Finish with a Red row.
- Outline the wing with sc in Red around the entire edge for a neat finish. FO, leave long tail for sewing.
White Fluffy Collar (Fluffy White Yarn)
- ch 25 (or enough to comfortably go around the dragon’s neck)
- Row 1: hdc in 2nd ch from hook and in each ch across. ch 1, turn (24)
- Row 2-3: hdc in each st across. (24)
- FO, leave long tails for tying or sewing around neck.
Santa Hat (Red & White)
- Using Red Yarn:
- Rnd 1: 4 sc in MR (4)
- Rnd 2: (sc, inc) x2 (6)
- Rnd 3: sc in each st around (6)
- Rnd 4: (2 sc, inc) x2 (8)
- Rnd 5: sc in each st around (8)
- Rnd 6: (3 sc, inc) x2 (10)
- Rnd 7: sc in each st around (10)
- Rnd 8: (4 sc, inc) x2 (12)
- Rnd 9: sc in each st around (12)
- Rnd 10: (5 sc, inc) x2 (14)
- Rnd 11: sc in each st around (14)
- Switch to White Yarn:
- Rnd 12: sc in BLO in each st around (14)
- Rnd 13: sc in each st around (14)
- FO, weave in ends. Attach a small gold bell to the tip of the hat.
Scarf (Red & Green)
- Using Red Yarn: ch 40 (adjust length as needed)
- Row 1: sc in 2nd ch from hook and in each ch across (39). ch 1, turn.
- Row 2 (Red): sc in each st across (39). ch 1, turn.
- Switch to Green Yarn:
- Row 3 (Green): sc in each st across (39). ch 1, turn.
- Row 4 (Green): sc in each st across (39). ch 1, turn.
- Continue alternating 2 rows of Red and 2 rows of Green until desired width (approx. 6-8 rows total).
- FO, weave in ends.
Assembly
- 1. Head & Body: Sew the head to the body, ensuring it’s centered and secure.
- 2. Snout: Sew the snout to the front of the head, below the eyes.
- 3. Horns: Sew the horns to the top of the head, slightly behind the eyes.
- 4. Ears: Sew the ears to the sides of the head, below the horns.
- 5. Belly Patch: Sew the accent purple belly patch onto the front of the body.
- 6. Arms: Sew the arms to the sides of the body, just below the neck.
- 7. Legs: Sew the legs to the bottom of the body.
- 8. Foot Pads: Sew the small beige/cream foot pads onto the bottom of the legs, 3 per leg.
- 9. Tail: Sew the tail to the back of the body.
- 10. Wings: Sew the wings to the back of the body, slightly above the arms. Ensure they are symmetrical.
- 11. Collar: Wrap and tie/sew the fluffy white collar around the dragon’s neck.
- 12. Scarf: Drape and secure the striped scarf around the dragon’s neck.
- 13. Santa Hat: Place the Santa hat on the dragon’s head. You can lightly tack it down with a few stitches if desired.
- 14. Final Touches: If using, attach the small gold star ornament to one of the dragon’s hands with a few stitches, or just let it hold it.
Your festive Christmas Dragon is complete! Enjoy your adorable holiday friend.