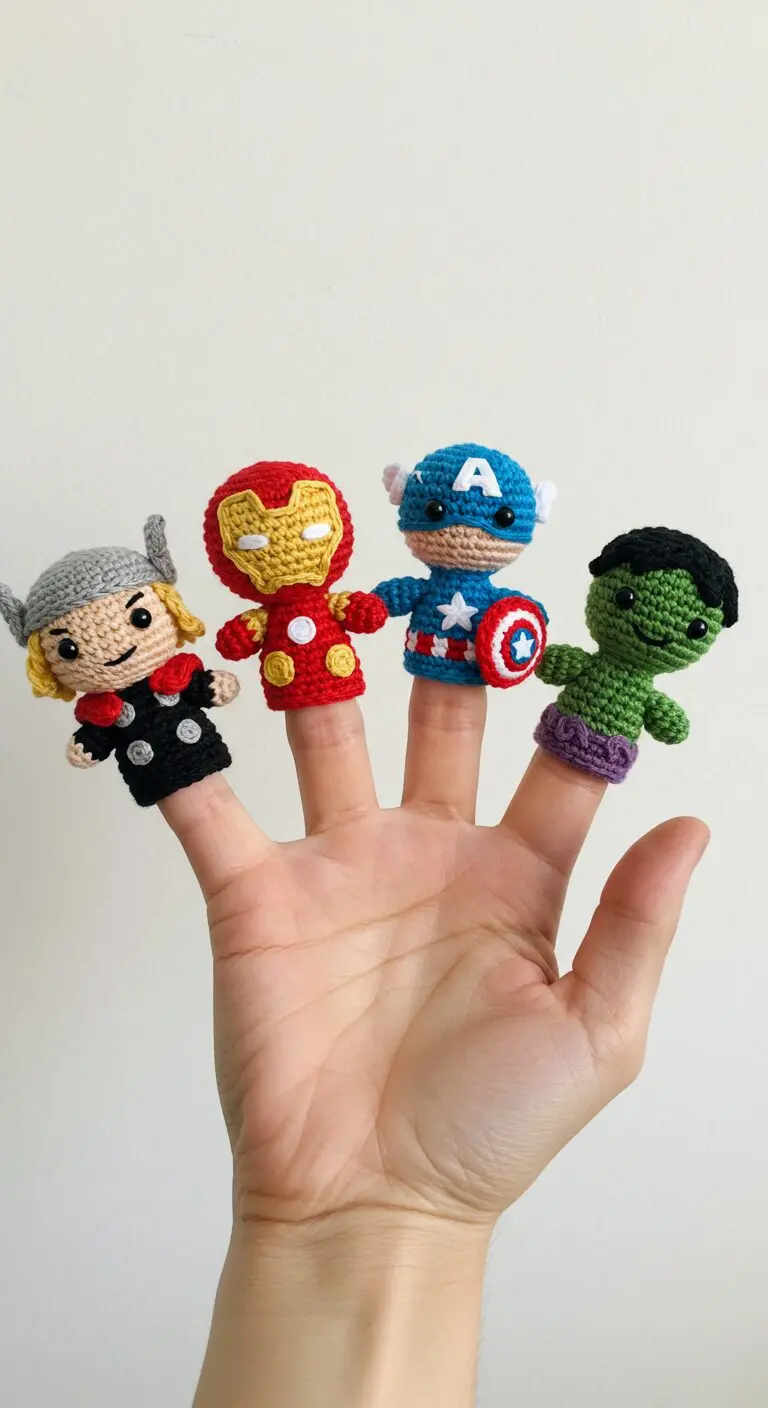
Discover the delightful world of crochet finger puppets, as seen in this charming collection featuring iconic Marvel superheroes. These miniature creations, handcrafted with care, bring beloved characters like Thor, Iron Man, Captain America, and Hulk right to your fingertips. Perfect for imaginative play or as unique decorative pieces, these handmade treasures offer endless fun and storytelling opportunities. They are a wonderful way to engage children in creative play.
Bringing Stories to Life with Superhero Crochet Finger Puppets
Whether used for interactive storytelling, as unique gifts, or simply as adorable collectibles, these superhero crochet finger puppets are sure to spark joy. Their intricate details and soft textures make them appealing to both children and adults. Embrace the magic of handmade crafts and let these charming little heroes inspire countless adventures and creative play. These unique pieces are a testament to the versatility of crochet finger puppets.
Here is a detailed crochet pattern to create the Marvel-themed finger puppets shown in the image. This pattern is designed for an intermediate crocheter.

---

**Marvel Finger Puppets Amigurumi Pattern (Set of 4)**

**Difficulty Level:** Intermediate

**Finished Size:** Approximately 3.5 - 4 inches tall (each puppet)

**Materials:**

*   **Yarn:** (DK/Light Worsted weight, 100% cotton recommended for stitch definition)
    *   **Thor:** Skin Tone (e.g., beige), Blonde/Yellow, Grey, Black, Red
    *   **Iron Man:** Red, Gold/Yellow, White (small amount)
    *   **Captain America:** Blue, Skin Tone, White, Red
    *   **Hulk:** Green, Black, Purple
    *   Small amount of black embroidery floss for mouths.
*   **Crochet Hook:** 2.5mm (C/2)
*   **Safety Eyes:** 6mm (2 pairs for Thor, Captain America, Hulk. Iron Man's eyes are embroidered.)
*   **Stuffing:** Polyester fiberfill
*   **Tapestry Needle:** For weaving in ends and sewing parts
*   **Stitch Markers:** Essential for working in rounds
*   **Scissors**

**Abbreviations:**

*   **MR:** Magic Ring
*   **ch:** Chain
*   **sc:** Single Crochet
*   **inc:** Increase (2 sc in one stitch)
*   **dec:** Decrease (sc 2 together)
*   **sl st:** Slip Stitch
*   **FO:** Fasten Off
*   **( )**: Repeat instructions in parentheses
*   **[ ]**: Total number of stitches at the end of the round/row
*   **BLO:** Back Loop Only

**General Notes:**

*   Work in continuous rounds unless otherwise specified. Use a stitch marker to mark the first stitch of each round.
*   Stuff firmly as you go, especially the head, but leave the finger tube base unstuffed or lightly stuffed only at the top.
*   All parts are worked in a spiral.
*   When changing colors, make the last yarn over of the previous stitch with the new color.

---

### **1. Thor Finger Puppet**

**Colors:** Skin Tone, Blonde, Grey, Black, Red

**Head & Body (Skin Tone, then Black)**

*   **Start with Skin Tone yarn.**
    *   **R1:** MR, 6 sc [6]
    *   **R2:** (inc) x6 [12]
    *   **R3:** (sc, inc) x6 [18]
    *   **R4:** (2 sc, inc) x6 [24]
    *   **R5-R8:** Sc in each st around (4 rounds) [24]
    *   *Insert 6mm safety eyes between R6 and R7, about 5 stitches apart. Embroider a small smile with black embroidery floss between R5 and R6.*
    *   **R9:** (2 sc, dec) x6 [18]
    *   *Start stuffing the head firmly.*
    *   **R10:** (sc, dec) x6 [12]
    *   **Change to Black yarn.**
    *   **R11:** (sc, inc) x6 [18]
    *   **R12-R17:** Sc in each st around (6 rounds) [18]
    *   **R18:** (2 sc, dec) x4, 2 sc [14] - *This helps to taper the finger tube slightly.*
    *   **R19-R20:** Sc in each st around (2 rounds) [14]
    *   Sl st to next st, FO. Weave in end.

**Hair (Blonde)**

*   **Start with Blonde yarn.**
    *   **R1:** MR, 6 sc [6]
    *   **R2:** (inc) x6 [12]
    *   **R3:** (sc, inc) x6 [18]
    *   **R4:** (2 sc, inc) x6 [24]
    *   **R5:** Sc in each st around [24]
    *   **R6:** (sc, ch 5, skip 4 st, sc in next st) repeat 2 times, sc 4, sl st to first sc. [24 sts + 2 ch-5 spaces] - *This creates a cap with spaces for the helmet wings.*
    *   Sl st to next st, FO, leaving a long tail for sewing.
    *   *Embroider hair strands in the back using a few long stitches with blonde yarn.*

**Helmet (Grey)**

*   **Start with Grey yarn.**
    *   **R1:** MR, 6 sc [6]
    *   **R2:** (inc) x6 [12]
    *   **R3:** (sc, inc) x6 [18]
    *   **R4:** (2 sc, inc) x6 [24]
    *   **R5:** Sc in each st around [24]
    *   **Wings (make 2):** Ch 4, (sl st into 2nd ch from hook, sc in next, hdc in last). FO, leaving a tail for sewing.
    *   Sl st to next st, FO, leaving a long tail for sewing.
    *   *Position the helmet over the blonde hair. Sew in place, making sure the hair around the face is visible. Sew the grey wings onto the sides of the helmet, slightly angled up.*

**Arms (Make 2 - Black & Red)**

*   **Start with Black yarn.**
    *   **R1:** MR, 6 sc [6]
    *   **R2-R4:** Sc in each st around (3 rounds) [6]
    *   **Change to Red yarn.**
    *   **R5:** Sc in each st around [6]
    *   Sl st to next st, FO, leaving a long tail for sewing. Stuff lightly.

**Assembly:**

1.  Sew the Hair onto the top of the head.
2.  Sew the Helmet over the hair, allowing some blonde hair to show around the face.
3.  Sew the Helmet Wings to the sides of the helmet.
4.  Sew the Arms to the sides of the body around R12-R13.

---

### **2. Iron Man Finger Puppet**

**Colors:** Red, Gold/Yellow, White

**Head & Body (Red & Gold)**

*   **Start with Red yarn.**
    *   **R1:** MR, 6 sc [6]
    *   **R2:** (inc) x6 [12]
    *   **R3:** (sc, inc) x6 [18]
    *   **R4:** (2 sc, inc) x6 [24]
    *   **R5-R6:** Sc in each st around (2 rounds) [24]
    *   **Change to Gold/Yellow yarn.**
    *   **R7-R8:** Sc in each st around (2 rounds) [24]
    *   *Embroider Iron Man's eye slots and mouth slit onto the gold section with black embroidery floss. The eyes are almond shapes, and the mouth is a horizontal line.*
    *   **Change to Red yarn.**
    *   **R9:** (2 sc, dec) x6 [18]
    *   *Start stuffing the head firmly.*
    *   **R10:** (sc, dec) x6 [12]
    *   **R11:** (sc, inc) x6 [18]
    *   **R12-R17:** Sc in each st around (6 rounds) [18]
    *   **R18:** (2 sc, dec) x4, 2 sc [14]
    *   **R19-R20:** Sc in each st around (2 rounds) [14]
    *   Sl st to next st, FO. Weave in end.

**Arc Reactor (White & Gold/Yellow)**

*   **Start with White yarn.**
    *   **R1:** MR, 6 sc [6]
    *   Sl st to first st, FO, leaving a long tail for sewing.
    *   *With Gold/Yellow yarn, make a small "X" or "plus" sign embroidery on the center of the white circle.*

**Arms (Make 2 - Red & Gold/Yellow)**

*   **Start with Red yarn.**
    *   **R1:** MR, 6 sc [6]
    *   **R2-R3:** Sc in each st around (2 rounds) [6]
    *   **Change to Gold/Yellow yarn.**
    *   **R4:** Sc in each st around [6]
    *   Sl st to next st, FO, leaving a long tail for sewing. Stuff lightly.

**Assembly:**

1.  Sew the Arc Reactor to the front center of Iron Man's body, around R14-R15.
2.  Sew the Arms to the sides of the body around R12-R13.

---

### **3. Captain America Finger Puppet**

**Colors:** Blue, Skin Tone, White, Red

**Head & Body (Blue, Skin Tone, Red, White)**

*   **Start with Blue yarn.**
    *   **R1:** MR, 6 sc [6]
    *   **R2:** (inc) x6 [12]
    *   **R3:** (sc, inc) x6 [18]
    *   **R4:** (2 sc, inc) x6 [24]
    *   **R5-R6:** Sc in each st around (2 rounds) [24]
    *   **Change to Skin Tone yarn.**
    *   **R7-R8:** Sc in each st around (2 rounds) [24]
    *   *Insert 6mm safety eyes between R6 and R7, about 5 stitches apart. Embroider a small smile with black embroidery floss below the eyes.*
    *   **Change to Blue yarn.**
    *   **R9:** (2 sc, dec) x6 [18]
    *   *Start stuffing the head firmly.*
    *   **R10:** (sc, dec) x6 [12]
    *   **R11:** (sc, inc) x6 [18]
    *   **R12-R13:** Sc in each st around (2 rounds) [18] (Blue)
    *   **R14:** BLO, sc in each st around [18] (Blue) - *This creates a ridge for the belt/bottom of shirt.*
    *   **R15:** Sc in each st around [18] (Red)
    *   **R16:** Sc in each st around [18] (White)
    *   **R17:** Sc in each st around [18] (Red)
    *   **R18:** (2 sc, dec) x4, 2 sc [14] (Blue)
    *   **R19-R20:** Sc in each st around (2 rounds) [14] (Blue)
    *   Sl st to next st, FO. Weave in end.

**Helmet Details:**

*   **"A" (White):** Using white yarn, embroider a small "A" onto the front blue part of the helmet (R5-R6).
*   **Wings (Make 2 - White):**
    *   Ch 5.
    *   Sl st into 2nd ch from hook, sc in next, hdc in next, dc in last ch.
    *   FO, leaving a long tail for sewing.
    *   *Sew one wing to each side of the blue helmet, slightly behind the eyes and angled upwards.*

**Shield (Red, White, Blue)**

*   **Start with Red yarn.**
    *   **R1:** MR, 6 sc [6]
    *   **Change to White yarn.**
    *   **R2:** (inc) x6 [12]
    *   **Change to Red yarn.**
    *   **R3:** (sc, inc) x6 [18]
    *   **Change to Blue yarn.**
    *   **R4:** (2 sc, inc) x6 [24]
    *   *Using White yarn, embroider a small star in the center blue section.*
    *   Sl st to next st, FO, leaving a long tail for sewing.

**Arms (Make 2 - Blue)**

*   **Start with Blue yarn.**
    *   **R1:** MR, 6 sc [6]
    *   **R2-R4:** Sc in each st around (3 rounds) [6]
    *   Sl st to next st, FO, leaving a long tail for sewing. Stuff lightly.

**Assembly:**

1.  Embroider the "A" and sew the Wings onto the helmet.
2.  Sew the Shield to one of the arms, and then sew that arm/shield combo to the side of the body around R12-R13.
3.  Sew the other Arm to the opposite side of the body around R12-R13.

---

### **4. Hulk Finger Puppet**

**Colors:** Green, Black, Purple

**Head & Body (Green & Purple)**

*   **Start with Green yarn.**
    *   **R1:** MR, 6 sc [6]
    *   **R2:** (inc) x6 [12]
    *   **R3:** (sc, inc) x6 [18]
    *   **R4:** (2 sc, inc) x6 [24]
    *   **R5-R9:** Sc in each st around (5 rounds) [24]
    *   *Insert 6mm safety eyes between R6 and R7, about 5 stitches apart. Embroider a wide, angry smile with black embroidery floss between R5 and R6.*
    *   **R10:** (2 sc, dec) x6 [18]
    *   *Start stuffing the head firmly.*
    *   **R11:** (sc, dec) x6 [12]
    *   **R12:** (sc, inc) x6 [18]
    *   **R13-R17:** Sc in each st around (5 rounds) [18]
    *   **Change to Purple yarn.**
    *   **R18:** (2 sc, dec) x4, 2 sc [14]
    *   **R19-R20:** Sc in each st around (2 rounds) [14]
    *   Sl st to next st, FO. Weave in end.

**Hair (Black)**

*   **Start with Black yarn.**
    *   **R1:** MR, 6 sc [6]
    *   **R2:** (inc) x6 [12]
    *   **R3:** (sc, inc) x6 [18]
    *   **R4:** (2 sc, inc) x6 [24]
    *   **R5:** Sc in each st around [24]
    *   **R6:** (ch 2, sl st into next st) x around or to cover head shape. Work 5 sc, then (ch 2, sl st into next st) x 5, 4 sc, (ch 2, sl st into next st) x 5
    *   Sl st to next st, FO, leaving a long tail for sewing.
    *   *Shape the hair to have jagged edges around the face and a messy look on top. You can also embroider some short strands on the sides.*

**Arms (Make 2 - Green)**

*   **Start with Green yarn.**
    *   **R1:** MR, 6 sc [6]
    *   **R2-R4:** Sc in each st around (3 rounds) [6]
    *   Sl st to next st, FO, leaving a long tail for sewing. Stuff lightly.

**Assembly:**

1.  Sew the Hair cap onto Hulk's head, positioning it to create his signature messy hairstyle.
2.  Sew the Arms to the sides of the body around R13-R14.

---

Your Marvel Finger Puppets are complete! Enjoy playing with these miniature heroes.