Get ready to spread holiday cheer with your very own handmade Cozy Nordic Reindeer Crochet Sweater! Inspired by classic Fair Isle designs, this pattern guides you through creating a beautifully textured jumper featuring festive reindeer and snowflake motifs. Perfect for keeping warm and stylish during the winter season, this sweater will become a cherished part of your festive wardrobe.
Crafting Holiday Warmth: The Joy of a Handmade Festive Jumper
There’s nothing quite like the satisfaction of wearing something you’ve created with your own hands, especially during the holidays. This crochet reindeer sweater is more than just a garment; it’s a labor of love that brings warmth, comfort, and a unique touch to your seasonal celebrations. Imagine cozying up by the fire, knowing you crocheted this beautiful piece yourself!
Crochet Pattern: Cozy Nordic Reindeer Crochet Sweater: Your Festive Jumper Pattern
Materials
- Worsted Weight Yarn (Aran): Color A (Off-White/Cream) – approx. 1200-1500 yards
- Worsted Weight Yarn (Aran): Color B (Christmas Red) – approx. 200-300 yards
- Worsted Weight Yarn (Aran): Color C (Forest Green) – approx. 150-250 yards
- Crochet Hook: 5.0mm (H/8)
- Yarn needle
- Scissors
- Stitch markers
- Measuring tape
Abbreviations
- ch: chain
- sc: single crochet
- hdc: half double crochet
- dc: double crochet
- fpdc: front post double crochet
- bpdc: back post double crochet
- sl st: slip stitch
- sk: skip
- st(s): stitch(es)
- BLO: back loop only
- rep: repeat
- MC: main color (Color A)
- CC1: contrasting color 1 (Color B – Red)
- CC2: contrasting color 2 (Color C – Green)
- FO: fasten off
Instructions
This pattern is written for a women’s size Small, with modifications for Medium, Large, and X-Large in parentheses. Adjust hook size if necessary to achieve desired gauge. Gauge: 14 hdc x 10 rows = 4 inches (10 cm).
Notes:
- Work in continuous rounds for the body and sleeves unless otherwise specified.
- For colorwork sections (yoke), use tapestry crochet technique, carrying unused colors loosely under stitches. Change colors on the last pull-through of the previous stitch.
- Cable sections are created using front post double crochet stitches to mimic the textured look of knit cables.
Bottom Ribbing (Body)
Using Color A and 5.0mm hook, ch 11.
- Row 1: Sc in 2nd ch from hook and in each ch across. (10 sc)
- Row 2: Ch 1, turn, sc in BLO of each st across. (10 sc)
- Rep Row 2 until piece measures approximately 28 (32, 36, 40) inches when slightly stretched. Join ends with sl st to form a loop. Do not FO.
Body
Set Up Round: Ch 1, work 98 (112, 126, 140) hdc evenly around the top edge of the ribbing. Sl st to first hdc to join. (Ensure stitch count is a multiple of 7 for cable pattern.)
Body Rounds (HDC and Cable Panel):
Work in continuous rounds.
- Rounds 1-4: Hdc in each st around.
- Round 5 (Cable Setup): *Hdc in next 6 sts, fpdc around next st*; rep from * around. (This creates a simple vertical ‘ridge’ cable effect).
- Rounds 6-9: Hdc in each st around.
- Round 10 (Cable Repeat): *Hdc in next 6 sts, fpdc around next fpdc from Round 5*; rep from * around.
- Rep Rounds 6-10 for the cable pattern, alternating blocks of hdc with cable definition rows, for a total of 18 (19, 20, 21) inches from the bottom ribbing, or until desired length to underarm.
- Shape Armholes: Mark 14 (16, 18, 20) stitches for each armhole (7 (8, 9, 10) sts on each side of the side seams). Continue working hdc up to first armhole marker, ch 2, sk marked stitches, hdc across to second armhole marker, ch 2, sk marked stitches. (This will create openings for sleeves). Continue working in rows for the front and back panels for 6 (7, 8, 9) inches. FO.
Sleeves (Make 2)
Cuff Ribbing
Using Color A and 5.0mm hook, ch 9.
- Row 1: Sc in 2nd ch from hook and in each ch across. (8 sc)
- Row 2: Ch 1, turn, sc in BLO of each st across. (8 sc)
- Rep Row 2 until piece measures approximately 8 (9, 10, 11) inches when slightly stretched. Join ends with sl st to form a loop. Do not FO.
Sleeve Body
Set Up Round: Ch 1, work 28 (32, 36, 40) hdc evenly around the top edge of the cuff ribbing. Sl st to first hdc to join. (Ensure stitch count is a multiple of 7).
Work in continuous rounds.
- Rounds 1-4: Hdc in each st around.
- Round 5 (Cable Setup): *Hdc in next 6 sts, fpdc around next st*; rep from * around.
- Rounds 6-9: Hdc in each st around.
- Round 10 (Cable Repeat): *Hdc in next 6 sts, fpdc around next fpdc from Round 5*; rep from * around.
- Rep Rounds 6-10 for the cable pattern, increasing 1 hdc on each side every 5th round until total length is 17 (18, 19, 20) inches from cuff, or desired length to underarm. You should have 48 (52, 56, 60) hdc sts.
- Shape Armholes: Mark 7 (8, 9, 10) stitches on each side. Continue working hdc across remaining stitches. FO.
Joining Body and Sleeves for Yoke
Orient body and sleeves with right sides facing out. Place sleeve openings into the body armholes. Using Color A, sl st or sc to join the pieces at the underarm seams. You will now be working in a large round across the back, one sleeve, front, and other sleeve. Count your total stitches. Example: (Front stitches + Sleeve stitches + Back stitches + Sleeve stitches – 4 underarm corner stitches).
Yoke Set Up Round: Work hdc in each st around, making sure to decrease 4 (4, 4, 4) stitches evenly around the underarms where pieces join to create a smooth transition. Total stitches should be a multiple of the motif repeat (e.g., 100-140 stitches for S-XL).
Yoke (Tapestry Crochet – Colorwork)
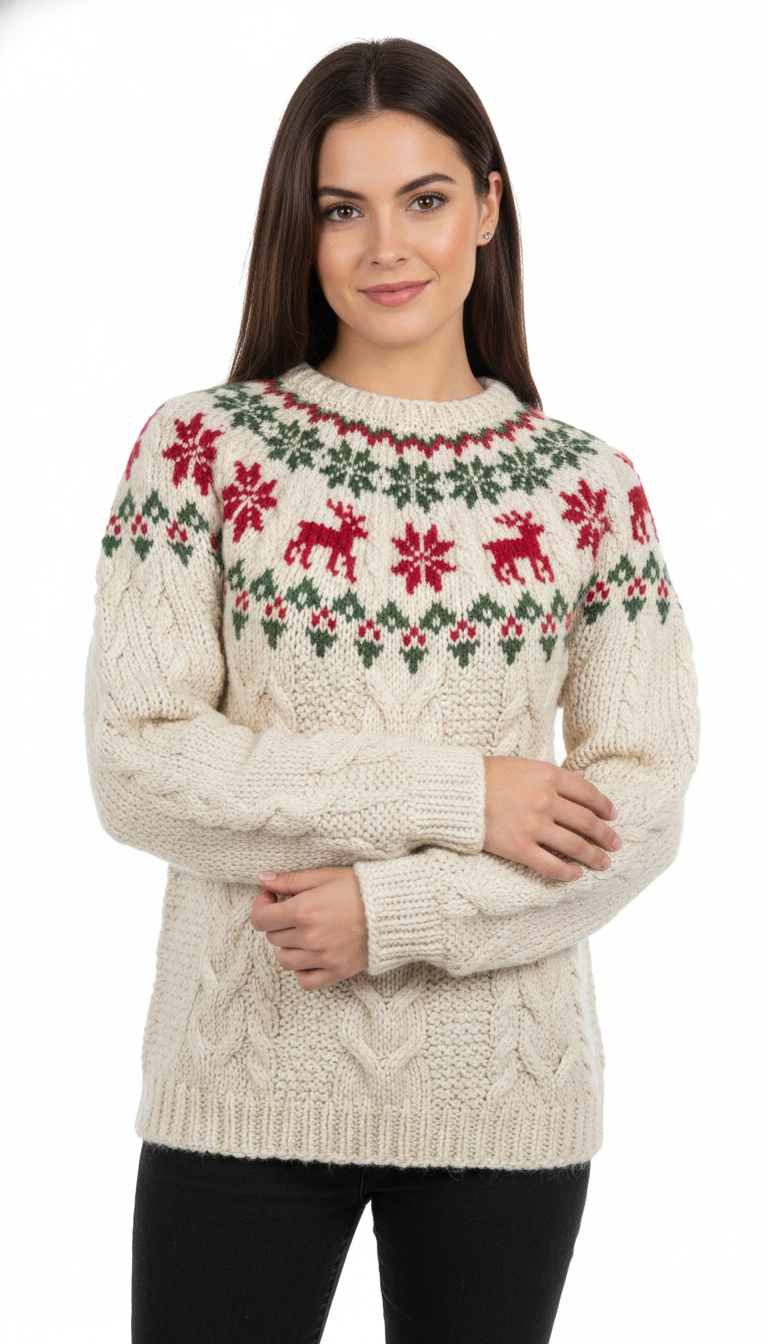
The yoke will use tapestry crochet to create the reindeer and snowflake motifs. You will be working in SC stitches for better definition. Carry unused colors throughout the work. Refer to the image for placement of motifs.
Motif Guidance:
- Reindeer Motif: Typically 7-9 stitches wide. Place these evenly around the yoke with Color B (Red) on Color A (Off-White) background.
- Snowflake Motif (Large): Use Color B (Red).
- Snowflake/Diamond Motif (Small): Use Color C (Green).
- Border Lines: Use Color C (Green) for horizontal lines.
Work approximately 10-12 rounds of SC colorwork for the yoke. Start with a few rounds of plain SC in Color A, then introduce the green border pattern, then a red snowflake row, then a green pattern, then the red reindeer row, and repeat/arrange motifs as seen in the image. You will need to decrease stitches evenly in the yoke rounds to shape the neckline (e.g., decrease 8-12 stitches every 2-3 rounds). End with a few plain SC rounds in Color A.
Neck Ribbing
Using Color A and 5.0mm hook, attach yarn to neckline edge.
- Round 1: Sc evenly around neckline edge. Sl st to join. (Ensure a multiple of 2 stitches).
- Round 2: Ch 2 (does not count as st), *fpdc around next st, bpdc around next st*; rep from * around. Sl st to join.
- Rep Round 2 for 3-4 rounds, or until desired neck ribbing height. FO.
Finishing
Weave in all loose ends securely. Block your sweater gently to set stitches and shape.