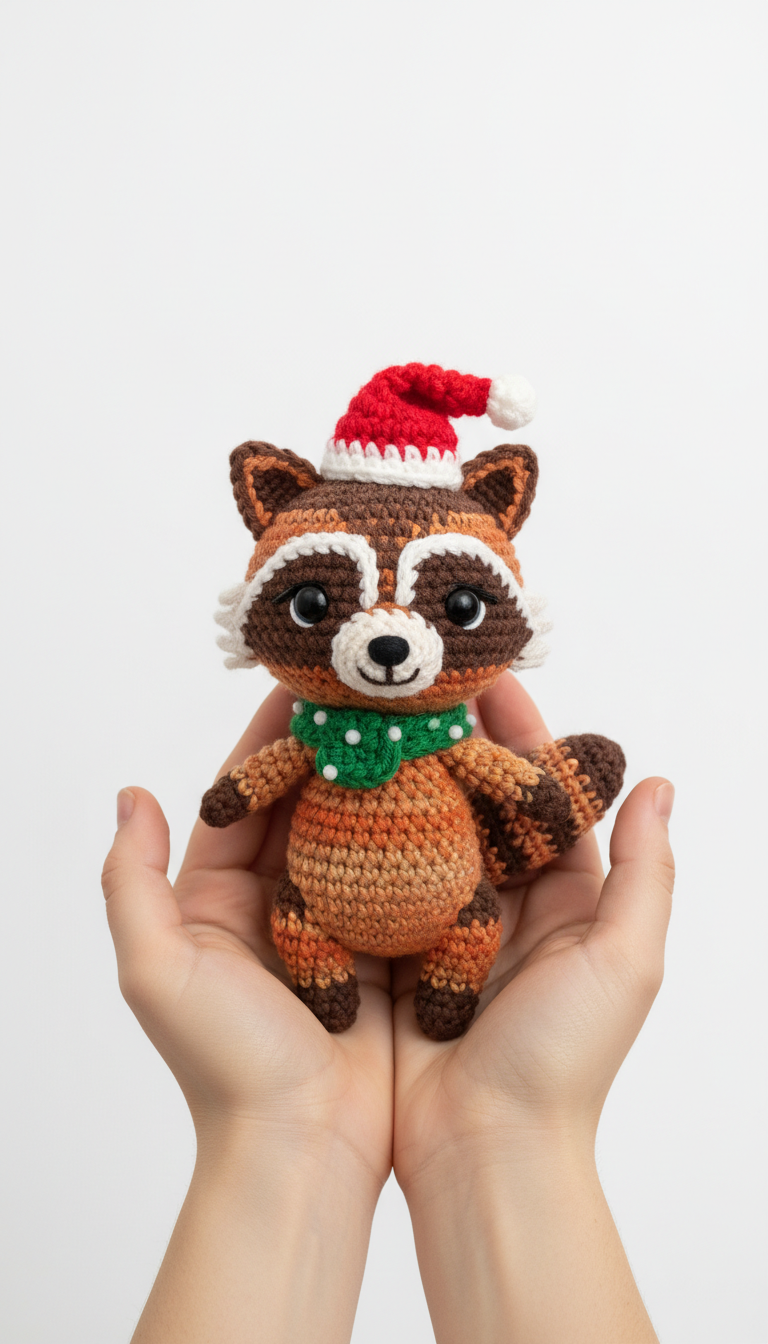
Get ready to spread some holiday cheer with this adorable Christmas Raccoon Amigurumi! Dressed in his festive Santa hat and a charming green polka-dot scarf, this little guy is the perfect handmade gift or a delightful addition to your seasonal decor. His mischievous eyes and striped tail capture the playful spirit of the holidays, making him an instant favorite.
Bring Festive Charm to Your Home
There’s something truly special about a handmade holiday decoration, and this crochet raccoon is no exception. He adds a whimsical touch to any Christmas display, from sitting on a mantelpiece to peeking out from under the tree. Crafting this amigurumi is a joyful experience, and the finished raccoon is a wonderful way to share handmade warmth with loved ones or simply brighten your own festive season.
Crochet Pattern: Craft a Jolly Christmas Raccoon Amigurumi: Free Crochet Pattern!
Materials
- Worsted weight yarn in: Light Brown (Main Body), Dark Brown (Mask, Stripes, Feet), White (Muzzle, Eye Highlights, Santa Hat Trim, Scarf Dots), Red (Santa Hat), Green (Scarf), Black (Nose embroidery)
- 2.5mm or 3.0mm crochet hook (or size suitable for yarn and desired tension)
- 6mm or 8mm safety eyes
- Polyester fiberfill for stuffing
- Tapestry needle
- Stitch markers
- Scissors
Abbreviations
- MR: Magic Ring
- ch: chain
- sc: single crochet
- inc: increase (2 sc in one stitch)
- dec: decrease (sc 2 together)
- FLO: front loop only
- BLO: back loop only
- st(s): stitch(es)
- rnd: round
- **: repeat instructions between asterisks
Instructions
This pattern is worked in continuous rounds unless otherwise stated. Use a stitch marker to keep track of the first stitch of each round.
Head and Body (Light Brown, Dark Brown, White)
Start with Light Brown yarn.
- Rnd 1: 6 sc in MR (6)
- Rnd 2: *inc* x6 (12)
- Rnd 3: *sc, inc* x6 (18)
- Rnd 4: *2 sc, inc* x6 (24)
- Rnd 5: *3 sc, inc* x6 (30)
- Rnd 6: *4 sc, inc* x6 (36)
- Rnd 7-8: sc in each st around (36)
- Rnd 9: 13 sc (Light Brown), 10 sc (Dark Brown for mask), 13 sc (Light Brown) (36)
- Rnd 10: 12 sc (Light Brown), 12 sc (Dark Brown), 12 sc (Light Brown) (36)
- Rnd 11: 11 sc (Light Brown), 14 sc (Dark Brown), 11 sc (Light Brown) (36)
- Rnd 12: 10 sc (Light Brown), 16 sc (Dark Brown), 10 sc (Light Brown) (36)
- Rnd 13: 10 sc (Light Brown), 16 sc (Dark Brown), 10 sc (Light Brown) (36)
- Rnd 14: 9 sc (Light Brown), 18 sc (Dark Brown), 9 sc (Light Brown) (36)
- Rnd 15: *4 sc, dec* x6 (30)
- Rnd 16: *3 sc, dec* x6 (24)
- Rnd 17: *2 sc, dec* x6 (18). Stuff head firmly. Insert safety eyes between Rnd 11 and 12, about 6-7 sts apart, within the dark brown mask area.
- Rnd 18: *sc, dec* x6 (12)
- Rnd 19: *dec* x6 (6). Fasten off.
Continue with Body (starting from the base of the head, using Light Brown). Attach yarn to FLO of Rnd 17 from head.
- Rnd 1: 18 sc (18)
- Rnd 2: *2 sc, inc* x6 (24)
- Rnd 3: *3 sc, inc* x6 (30)
- Rnd 4: sc in each st around (30)
- Rnd 5: Change to Medium Brown. sc in each st around (30)
- Rnd 6: sc in each st around (30)
- Rnd 7: Change to Light Brown. sc in each st around (30)
- Rnd 8: sc in each st around (30)
- Rnd 9: Change to Medium Brown. sc in each st around (30)
- Rnd 10: sc in each st around (30)
- Rnd 11: Change to Light Brown. sc in each st around (30)
- Rnd 12: *3 sc, dec* x6 (24)
- Rnd 13: *2 sc, dec* x6 (18). Start stuffing.
- Rnd 14: *sc, dec* x6 (12)
- Rnd 15: *dec* x6 (6). Fasten off, leaving a long tail for closing. Finish stuffing and close the hole.
Ears (Make 2)
Start with Dark Brown yarn.
- Rnd 1: 6 sc in MR (6)
- Rnd 2: *sc, inc* x3 (9)
- Rnd 3: sc in each st around (9)
- Change to Light Brown yarn.
- Rnd 4: sc in each st around (9). Fasten off, leaving a long tail for sewing. Fold flat and sew to the top of the head.
Arms (Make 2)
Start with Dark Brown yarn.
- Rnd 1: 5 sc in MR (5)
- Rnd 2: *inc* x5 (10)
- Rnd 3: sc in each st around (10)
- Change to Medium Brown yarn.
- Rnd 4-6: sc in each st around (10)
- Change to Light Brown yarn.
- Rnd 7-9: sc in each st around (10). Fasten off, leaving a long tail for sewing. Stuff lightly. Sew to the sides of the body between the color changes.
Legs (Make 2)
Start with Dark Brown yarn.
- Rnd 1: 6 sc in MR (6)
- Rnd 2: *inc* x6 (12)
- Rnd 3: sc in each st around (12)
- Change to Light Brown yarn.
- Rnd 4-6: sc in each st around (12). Fasten off, leaving a long tail for sewing. Stuff lightly. Sew to the bottom of the body.
Tail (Dark Brown, Medium Brown, Light Brown)
Start with Dark Brown yarn.
- Rnd 1: 6 sc in MR (6)
- Rnd 2: *inc* x6 (12)
- Rnd 3-4: sc in each st around (12)
- Change to Medium Brown yarn.
- Rnd 5-6: sc in each st around (12)
- Change to Light Brown yarn.
- Rnd 7-8: sc in each st around (12)
- Change to Dark Brown yarn.
- Rnd 9-10: sc in each st around (12)
- Change to Medium Brown yarn.
- Rnd 11-12: sc in each st around (12). Fasten off, leaving a long tail for sewing. Stuff lightly and shape. Sew to the back of the body.
Santa Hat (Red, White)
Start with Red yarn.
- Rnd 1: 4 sc in MR (4)
- Rnd 2: sc in each st around (4)
- Rnd 3: *sc, inc* x2 (6)
- Rnd 4: sc in each st around (6)
- Rnd 5: *2 sc, inc* x2 (8)
- Rnd 6: sc in each st around (8)
- Rnd 7: *3 sc, inc* x2 (10)
- Rnd 8: sc in each st around (10)
- Rnd 9: *4 sc, inc* x2 (12)
- Rnd 10: sc in each st around (12)
- Rnd 11: *5 sc, inc* x2 (14)
- Rnd 12: sc in each st around (14)
- Rnd 13: *6 sc, inc* x2 (16)
- Rnd 14: sc in each st around (16)
- Rnd 15: *7 sc, inc* x2 (18)
- Rnd 16: sc in each st around (18)
- Change to White yarn.
- Rnd 17: sc in each st around (18). Fasten off.
Pompom (White): Make a small pompom or a tiny bobble stitch (3 dc together in one st, ch 1, pull through) and attach to the tip of the hat. Sew hat to the top of the raccoon’s head.
Scarf (Green, White)
With Green yarn.
- ch 30 (or desired length to wrap around neck)
- Starting in 2nd ch from hook, sc in each ch across. (29 sc)
- Fasten off, weave in ends.
Embellishments: With White yarn and tapestry needle, embroider small French knots or tiny straight stitches randomly on the green scarf to create the polka-dot effect. Embroider a small black nose onto the white muzzle area.
Assembly
- Sew all pieces securely to the body as shown in the image.
- Weave in all remaining loose ends.