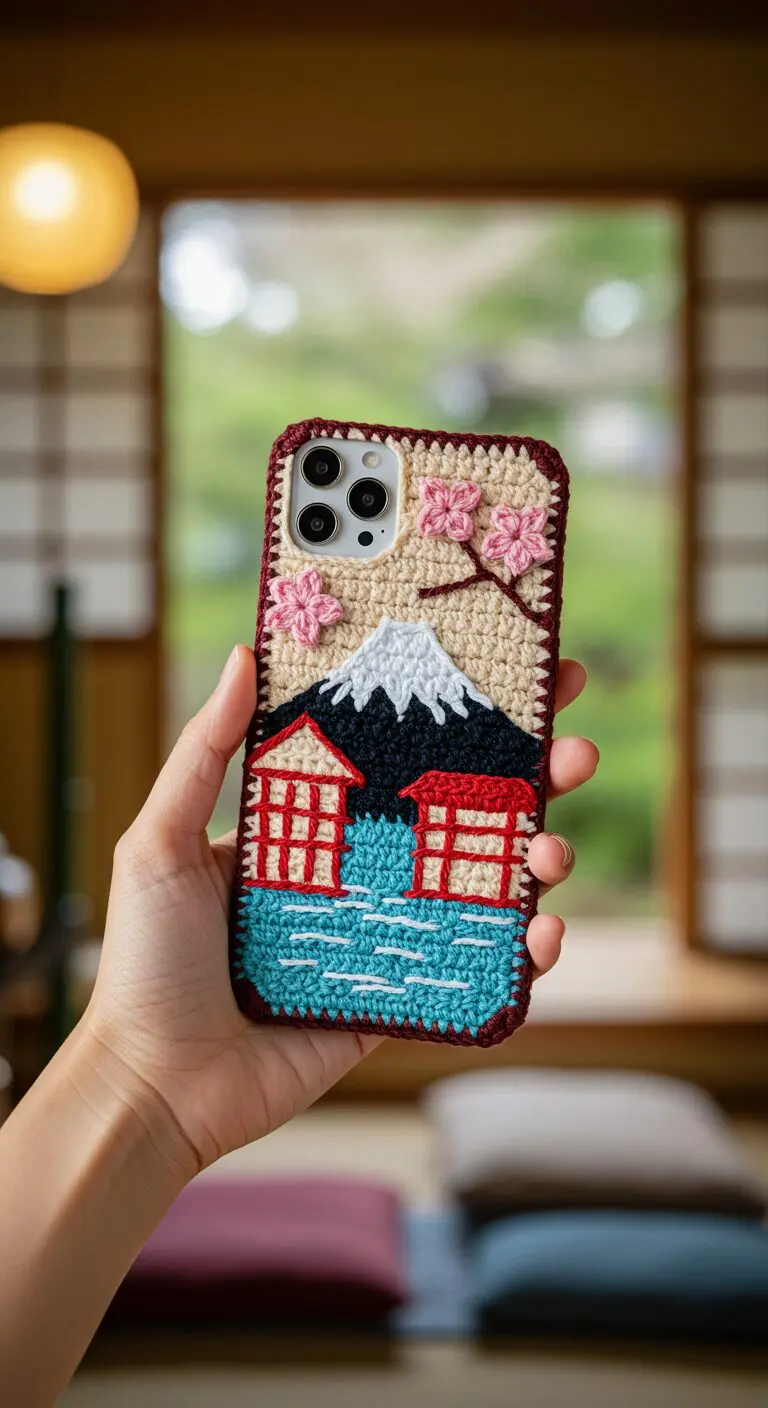
Bring the serene beauty of Japan right to your fingertips with this unique Japanese-Inspired Crochet Phone Case! Featuring iconic Mount Fuji, traditional houses, serene waters, and delicate cherry blossoms, this project is a wonderful way to combine your love for crochet with a touch of cultural artistry.
Stitch Your Own Scenic Tech Accessory
Whether you’re an experienced crocheter looking for a charming new challenge or a beginner eager to try amigurumi-style appliques, this guide will help you create a stunning, personalized phone case. It’s more than just a case; it’s a miniature piece of art that travels with you!
Materials You’ll Need:
- Yarn: Small amounts of Worsted weight (or DK) yarn in: Beige/Cream (sky/base), Black (mountain base), White (snow), Red (house roofs/trim), Light Blue/Teal (water), Dark Blue (deeper water shade), Dark Brown (branch), Light Pink (cherry blossoms), Dark Red/Burgundy (case border).
- Crochet Hook: Size appropriate for your yarn (e.g., 3.0mm or 3.5mm for Worsted/DK).
- Yarn Needle: For weaving in ends and assembly.
- Scissors
- Stitch Markers (optional)
- Fabric Glue or Hot Glue Gun (optional): For securing appliqués.
- Clear Phone Case: To attach your crochet piece onto (optional, but recommended for protection).
Essential Crochet Abbreviations:
- ch: chain
- sc: single crochet
- sl st: slip stitch
- inc: increase (2 sc in one stitch)
- dec: decrease (sc 2 stitches together)
- st(s): stitch(es)
- FO: Fasten off
Instructions:
Part 1: The Phone Case Base (Beige/Cream Yarn)
- Measure your phone’s length and width. Chain enough stitches to match the width of your phone.
- Sc into the second chain from hook and across. Ch 1, turn.
- Continue crocheting rows of single crochet until the piece measures the length of your phone. FO, leaving a long tail for sewing.
- (Optional) Add a border around the finished base using dark red/burgundy yarn for a neat edge.
Part 2: Mount Fuji Applique (Black & White Yarn)
- Mountain Base (Black): Chain a length slightly shorter than the width of your phone case. Sc across. Work several rows, decreasing evenly on both ends to form a wide triangle shape. FO.
- Snow Cap (White): Chain a few stitches. Sc across. Decrease rapidly to form a smaller, jagged triangle. This doesn’t need to be perfect; irregular edges mimic snow. FO.
- Sew the white snow cap onto the top of the black mountain base.
Part 3: Traditional Houses Applique (Beige & Red Yarn)
- House Body (Beige): Create two small rectangles for the house bodies. Adjust size to fit below the mountain. FO.
- Roofs (Red): For each house, create a small triangle for the roof. FO.
- Sew the red roofs onto the beige house bodies. Using red yarn and a yarn needle, surface slip stitch or embroider window grid details onto the houses as seen in the image.
Part 4: The Water Applique (Teal & Light Blue Yarn)
- Using teal or light blue yarn, crochet a rectangle that fills the bottom portion of your phone case, below the houses.
- Using white or a lighter blue yarn, embroider or surface slip stitch small horizontal lines across the water rectangle to create the effect of ripples or waves.
Part 5: Cherry Blossom Branch Applique (Brown & Pink Yarn)
- Branch (Brown): Using brown yarn, crochet a thin, curving chain or series of slip stitches to form a branch shape. You can make it as simple or intricate as you like.
- Blossoms (Pink): Create small 5-petal flowers. A simple method is to ch 2, make 5 sc into the second ch from hook, sl st to first sc, then for each petal, (ch 2, dc, ch 2, sl st) into one sc. Repeat 5 times. FO. Make 3-4 blossoms.
- Sew the brown branch onto the top right (or desired) corner of your phone case base. Then sew the pink blossoms onto the branch.
Assembly: Bringing It All Together
- Arrange all your crocheted appliqués on the beige phone case base. Play around with the placement until you’re happy with the scene.
- Carefully sew each appliqué onto the base using your yarn needle and matching yarn colors. Make sure to hide your knots on the back.
- Once all pieces are securely sewn, place your crocheted masterpiece onto a clear phone case. You can sew it onto the existing clear case (carefully threading through the case holes if possible), or use a strong fabric glue or hot glue to secure it in place around the edges and camera cutout. Ensure camera and button access remains clear.
- Trim any excess yarn and weave in all remaining ends for a clean finish.
Show Off Your Craft!
Your beautiful, custom-made Japanese landscape phone case is now complete! It’s a fantastic conversation starter and a testament to your crochet skills. Enjoy carrying a piece of art inspired by serene Japanese vistas wherever you go.