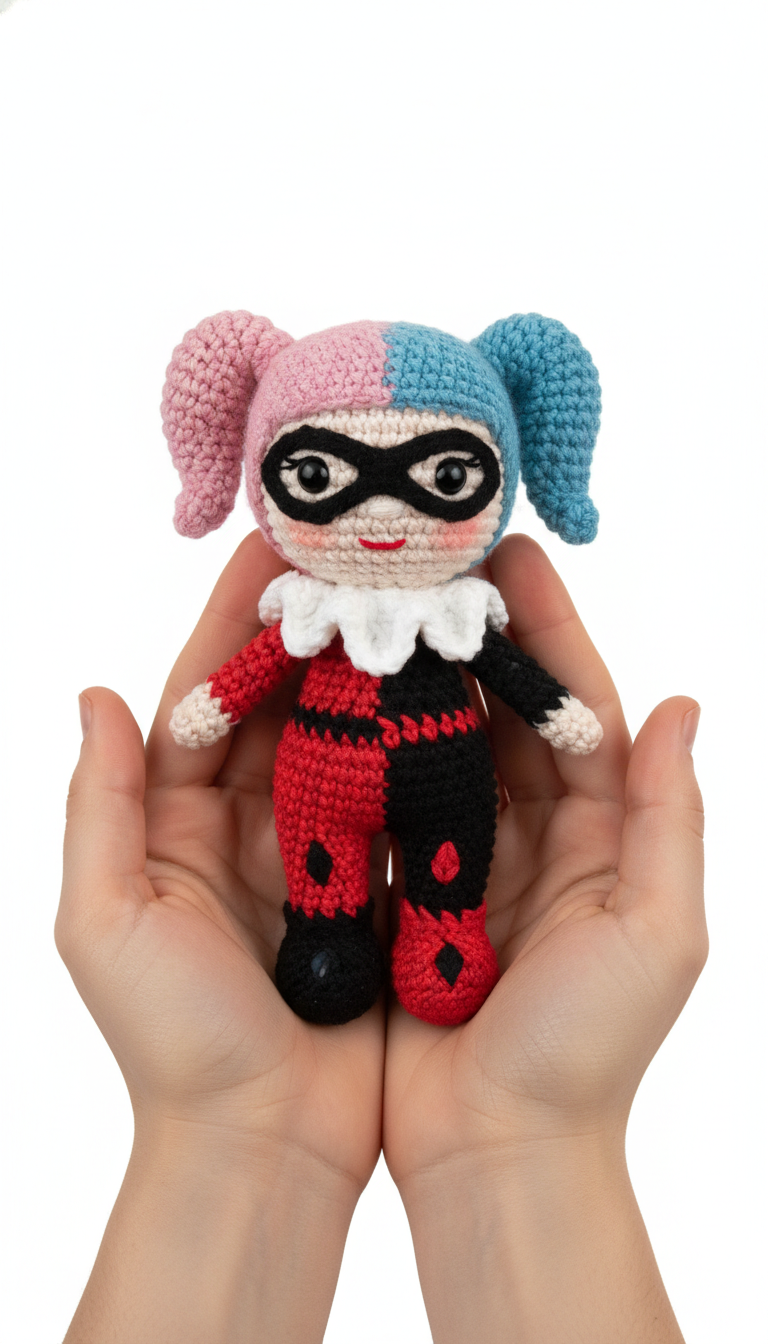
Embrace your mischievous side and crochet this adorable Harley Quinn amigurumi doll! Perfect for fans of the iconic character, this pattern guides you through creating a charming, handmade companion. Whether for display or as a unique gift, this project promises to bring a touch of Gotham’s most beloved jester to life right in your hands.
Unleash Your Inner Anti-Hero with This Fun Crochet Project
Crafting your own Harley Quinn amigurumi is not just about making a doll; it’s about bringing a beloved character to life with your own two hands. This pattern is designed to be enjoyable for crocheters of various skill levels, resulting in a unique, personalized collectible that stands out from store-bought alternatives.
Crochet Pattern: Craft Your Own Mischievous Jester: The Harley Quinn Amigurumi Pattern!
Materials
- Light beige (skin tone) yarn
- Black yarn
- Red yarn
- White yarn
- Pink yarn
- Light blue yarn
- 2.5mm or 3.0mm crochet hook (or size suitable for yarn weight)
- 8mm safety eyes
- Polyester fiberfill for stuffing
- Tapestry needle
- Stitch markers
- Embroidery floss (optional, for finer details)
- Blush (optional, for cheeks)
Abbreviations
- MR: Magic Ring
- ch: Chain
- sc: Single crochet
- inc: Increase (2 sc in one stitch)
- dec: Decrease (sc 2 stitches together)
- sl st: Slip stitch
- FO: Fasten off
- BLO: Back Loop Only
- FLO: Front Loop Only
- hdc: Half double crochet
- dc: Double crochet
- st/sts: Stitch/stitches
- rnd/rnds: Round/rounds
Instructions
General Notes: Work in continuous rounds unless otherwise specified. Use a stitch marker to mark the beginning of each round. Stuff firmly as you go.
Head (Light Beige Yarn)
- Rnd 1: MR 6 sc (6)
- Rnd 2: 6 inc (12)
- Rnd 3: (1 sc, 1 inc) x6 (18)
- Rnd 4: (2 sc, 1 inc) x6 (24)
- Rnd 5: (3 sc, 1 inc) x6 (30)
- Rnd 6: (4 sc, 1 inc) x6 (36)
- Rnds 7-13: Sc in each st around (36)
- Insert safety eyes between Rnd 10 and 11, about 6-7 sts apart.
- Rnd 14: (4 sc, 1 dec) x6 (30)
- Rnd 15: (3 sc, 1 dec) x6 (24)
- Rnd 16: (2 sc, 1 dec) x6 (18)
- Stuff head firmly.
- Rnd 17: (1 sc, 1 dec) x6 (12)
- Rnd 18: 6 dec (6)
- FO, weave in tail and close hole. Embroider a small red smile on the face between Rnds 9 and 10. Add blush to cheeks if desired.
Hair Puffs (Make 1 Pink, 1 Light Blue)
- Rnd 1: MR 6 sc (6)
- Rnd 2: 6 inc (12)
- Rnd 3: (1 sc, 1 inc) x6 (18)
- Rnds 4-6: Sc in each st around (18)
- Rnd 7: (1 sc, 1 dec) x6 (12)
- Stuff lightly. FO, leaving a long tail for sewing. Attach one pink puff to the left side of the head, and one blue puff to the right side, slightly above the eyes.
Mask (Black Yarn)
- Embroider directly onto the head around the safety eyes to create the mask shape. Start from one eye, create an almond shape extending outwards, connecting to the other eye with a narrow strip across the bridge of the nose.
Body
Start with one Leg, then make a second. Join the two legs to form the body.
Legs (Make 2)
- Leg 1 (Red Yarn):
- Rnd 1: MR 6 sc (6)
- Rnd 2: 6 inc (12)
- Rnds 3-4: Sc in each st around (12)
- Rnd 5: Change to Black yarn. Sc in each st around (12)
- Rnds 6-7: Sc in each st around (12)
- Rnd 8: Change to Red yarn. Sc in each st around (12)
- Rnds 9-10: Sc in each st around (12)
- FO Leg 1, leaving yarn for later. Stuff firmly.
- Leg 2 (Black Yarn):
- Rnd 1: MR 6 sc (6)
- Rnd 2: 6 inc (12)
- Rnds 3-4: Sc in each st around (12)
- Rnd 5: Change to Red yarn. Sc in each st around (12)
- Rnds 6-7: Sc in each st around (12)
- Rnd 8: Change to Black yarn. Sc in each st around (12)
- Rnds 9-10: Sc in each st around (12)
- Do NOT FO Leg 2. Continue to join. Stuff firmly.
Joining Legs and Body
- Rnd 11: From Leg 2, ch 2. Join to Leg 1 with sc. Sc 12 around Leg 1. Sc 2 in each ch st of the chain. Sc 12 around Leg 2. Sc 2 in each ch st on the other side of the chain. (28 sc + 4 sc = 32) (32)
- Rnd 12: Sc in each st around. (Ensure your first stitch is positioned so the black/red split continues naturally.) (32)
- Rnd 13: (3 sc, 1 dec) x6, 2 sc (26) (Continue alternating Red and Black yarn for the body. The left side of the body will be red, the right side will be black. Or vice versa, ensure consistency.)
- Rnds 14-17: Sc in each st around (26)
- Rnd 18: (11 sc, 1 dec) x2 (24)
- Rnd 19: Sc in each st around (24)
- Rnd 20: (2 sc, 1 dec) x6 (18)
- Stuff body firmly. Change to White yarn.
- Rnd 21: Sc in each st around (18)
- FO, leaving a long tail for sewing the head to the body.
Collar (White Yarn)
- With the doll’s neck opening facing you, join white yarn with a sl st to the BLO of Rnd 20 of the body.
- Rnd 1: Ch 2 (counts as 1 hdc), 2 hdc in each st around in BLO of Rnd 20, sl st to top of ch 2. (36 hdc)
- Rnd 2: Ch 1, (sc in next st, ch 2, sc in same st) around the entire collar, creating a ruffled edge. Sl st to first sc.
- FO, weave in ends.
Arms (Make 2)
- Arm 1 (White Yarn):
- Rnd 1: MR 6 sc (6)
- Rnds 2-3: Sc in each st around (6)
- Rnd 4: Change to Red yarn. Sc in each st around (6)
- Rnds 5-7: Sc in each st around (6)
- Stuff lightly. FO, leaving a long tail for sewing.
- Arm 2 (White Yarn):
- Rnd 1: MR 6 sc (6)
- Rnds 2-3: Sc in each st around (6)
- Rnd 4: Change to Black yarn. Sc in each st around (6)
- Rnds 5-7: Sc in each st around (6)
- Stuff lightly. FO, leaving a long tail for sewing.
Assembly
- Sew the head to the body securely, making sure it’s centered.
- Sew the red arm to the red side of the body, and the black arm to the black side of the body, slightly below the collar.
- Using the tapestry needle and contrasting yarn colors (black yarn on red sections, red yarn on black sections), embroider diamond shapes onto the body and legs as seen in the image. For example, a black diamond on the red upper leg, and a red diamond on the black lower leg. Repeat for the body sections.
- Weave in all remaining loose ends.