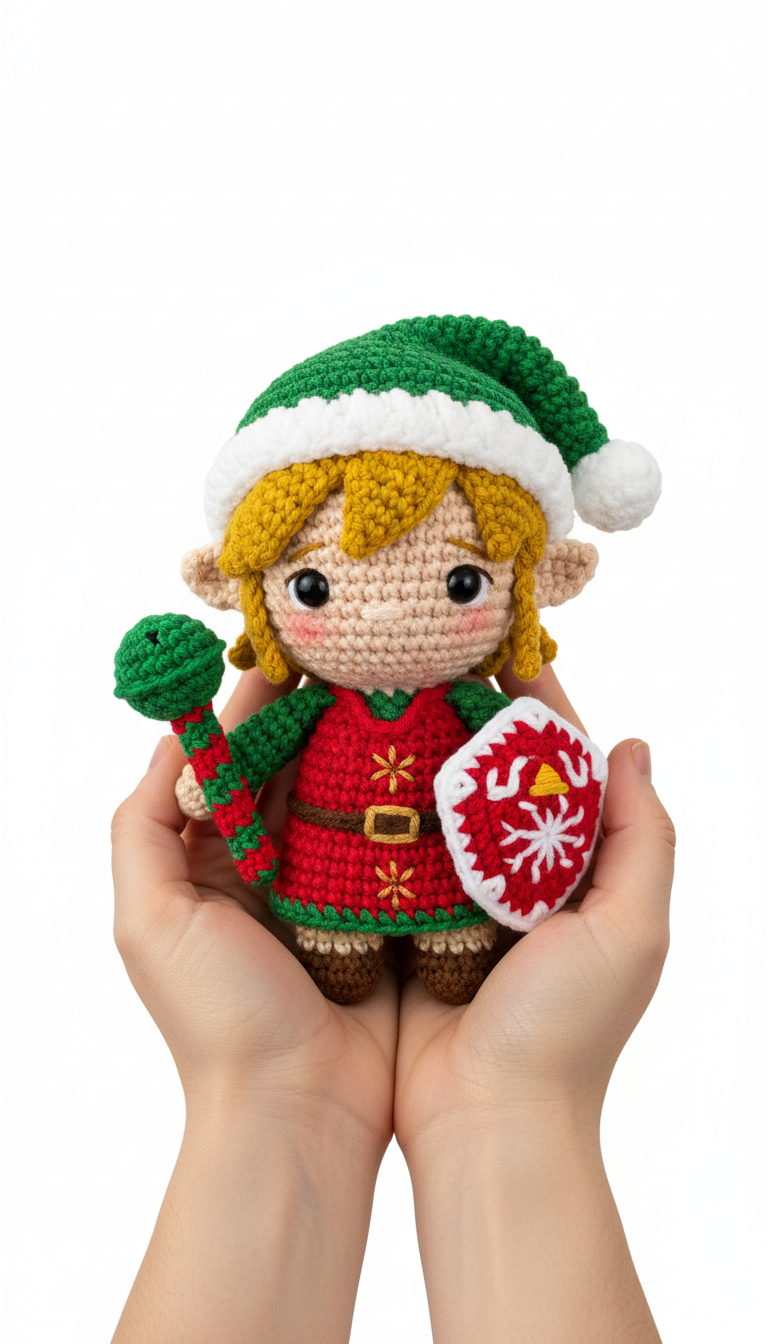
Bring a touch of Hyrule magic to your holiday decor with this adorable Christmas Link amigurumi! This pattern guides you through creating your very own festive hero, complete with a Santa hat, iconic tunic, and miniature sword and shield. Perfect for fans of The Legend of Zelda, this charming little doll makes a fantastic handmade gift or a unique addition to your holiday display.
Craft Your Own Holiday Legend
There’s nothing quite like the satisfaction of crocheting a beloved character, especially when given a festive twist! This Christmas Link amigurumi is designed to capture the spirit of both adventure and holiday cheer. Imagine the delight on a fan’s face receiving this unique handmade gift, or proudly displaying it as a fun conversation piece among your seasonal decorations. Get ready to embark on a joyful crafting quest!
Crochet Pattern: Crochet a Festive Hero: Christmas Link Amigurumi Pattern!
Materials
- Worsted weight yarn in: Light Peach (skin), Golden Yellow (hair, belt buckle accent), Christmas Red (tunic, shield, mace accent), Emerald Green (hat, sleeves, mace, tunic trim, shield trim), White (hat trim, pom-pom, shield snowflake), Dark Brown (belt, boots)
- 3.0mm crochet hook (or size to achieve tight stitches)
- 6mm black safety eyes
- Polyester fiberfill stuffing
- Tapestry needle
- Stitch markers
- Embroidery floss in light pink (for cheeks)
- Optional: Small amount of cardboard or plastic canvas for shield rigidity
Abbreviations
- MR – Magic Ring
- sc – single crochet
- inc – increase (2 sc in one stitch)
- dec – decrease (sc 2 together)
- sl st – slip stitch
- ch – chain
- FO – Fasten off
- ( ) – repeat instructions in parentheses
- [ ] – total number of stitches at the end of the round/row
Instructions
General Notes: Work in continuous rounds unless otherwise stated. Use a stitch marker to keep track of your first stitch. Stuff firmly as you go.
Head (Light Peach yarn)
- R1: MR 6 sc [6]
- R2: (inc) x6 [12]
- R3: (sc, inc) x6 [18]
- R4: (2sc, inc) x6 [24]
- R5: (3sc, inc) x6 [30]
- R6: (4sc, inc) x6 [36]
- R7-R14: 36 sc (8 rounds)
- Insert safety eyes between R10 and R11, about 6-7 stitches apart. Embroider a small straight line for the mouth just below the eyes with dark brown yarn or floss. Add a touch of pink embroidery floss or blush for cheeks.
- R15: (4sc, dec) x6 [30]
- R16: (3sc, dec) x6 [24]
- R17: (2sc, dec) x6 [18]
- Start stuffing the head firmly.
- R18: (sc, dec) x6 [12]
- R19: (dec) x6 [6]
- FO, leaving a long tail for sewing. Finish stuffing and close the hole.
Ears (Light Peach yarn, make 2)
- R1: Ch 5. Sc in 2nd ch from hook, sc in next 2 ch, 3sc in last ch. Turn to work along other side of chain: sc in next 3 ch. [9]
- R2: Sc in each stitch around. [9]
- Fold in half and sl st through both layers to close. FO, leaving a tail for sewing.
Hair (Golden Yellow yarn)
- Cap: Follow Head instructions for R1-R6. [36]
- R7-R10: 36 sc (4 rounds)
- Sl st, FO. Do not stuff. Place this cap onto the head.
- Sideburns (make 2): Attach yarn to the side of the hair cap. Ch 5, sc in 2nd ch from hook, sc in next 3 ch. Sl st into the cap to secure.
- Fringe: Attach yarn to the front of the hair cap, between the eyes. Ch 6, sc in 2nd ch from hook, sc in next 4 ch. Sl st into cap. Repeat 3-4 more times for desired fringe fullness, varying chain length slightly (e.g., Ch 5, Ch 7).
- Sew the hair cap securely to the head, tucking the ears into place between the hair and head before sewing the cap down fully.
Santa Hat (Emerald Green yarn, with White trim)
- R1: MR 6 sc [6]
- R2: (sc, inc) x3 [9]
- R3-R4: 9 sc (2 rounds)
- R5: (2sc, inc) x3 [12]
- R6-R7: 12 sc (2 rounds)
- R8: (3sc, inc) x3 [15]
- R9-R10: 15 sc (2 rounds)
- R11: (4sc, inc) x3 [18]
- R12-R13: 18 sc (2 rounds)
- R14: (5sc, inc) x3 [21]
- R15-R16: 21 sc (2 rounds)
- R17: (6sc, inc) x3 [24]
- R18-R19: 24 sc (2 rounds)
- Change to White yarn.
- R20: In BLO (back loop only), sc in each stitch around. [24]
- R21: Sc in each stitch around. [24]
- Sl st, FO.
- Pom-pom: Create a small pom-pom with white yarn and sew it to the tip of the hat.
Body (starting with Dark Brown yarn for boots, make 2)
- Leg 1 (Dark Brown):
- R1: MR 6 sc [6]
- R2: (inc) x6 [12]
- R3: In BLO, 12 sc [12]
- R4-R5: 12 sc (2 rounds)
- Stuff firmly. Sl st, FO.
- Leg 2 (Dark Brown):
- Repeat Leg 1 instructions for R1-R5. Do not FO. Ch 3.
- Join Legs & Body (Christmas Red yarn):
- R6: Attach to first leg, sc in 12 stitches of first leg, sc in 3 ch, sc in 12 stitches of second leg, sc in 3 ch. [30]
- R7-R14: 30 sc (8 rounds)
- Stuff body firmly as you go.
- Change to Emerald Green yarn.
- R15: 30 sc [30]
- R16: (3sc, dec) x6 [24]
- R17: (2sc, dec) x6 [18]
- Sl st, FO, leaving a long tail for sewing. Finish stuffing.
Arms (Light Peach yarn, make 2)
- R1: MR 6 sc [6]
- R2-R3: 6 sc (2 rounds)
- Change to Emerald Green yarn.
- R4-R10: 6 sc (7 rounds)
- Stuff lightly. Sl st, FO, leaving a long tail for sewing.
Belt (Dark Brown yarn, with Golden Yellow detail)
- Ch 25 (or enough to wrap around the body).
- Row 1: Sc in 2nd ch from hook and across. [24]
- FO.
- With Golden Yellow yarn, embroider a small square or rectangle in the middle of the belt to resemble a buckle.
Mace/Sword (Emerald Green yarn, with Christmas Red detail)
- R1: MR 6 sc [6]
- R2: 6 sc [6]
- R3: (sc, inc) x3 [9]
- R4-R10: 9 sc (7 rounds)
- Stuff lightly.
- With Christmas Red yarn, embroider a spiral pattern around the handle.
- Sl st, FO, leaving a tail for sewing.
Shield (Christmas Red yarn)
- Main Body: Ch 10.
- R1: Sc in 2nd ch from hook, sc in next 7 ch, 3sc in last ch. Turn to work along other side of chain: sc in next 8 ch, inc in last ch. [20]
- R2: Inc, sc in next 7, (inc) x3, sc in next 7, (inc) x2. [26]
- R3: Sc in each stitch around. [26]
- Sl st, FO. (Optional: Cut a piece of cardboard or plastic canvas to fit inside for rigidity.)
- Trim (Emerald Green yarn): Work sc stitches around the edge of the shield. Sl st, FO.
- Details: Embroider a white snowflake or star in the center, and a small golden yellow triangle (Triforce-like symbol) at the top.
Assembly:
- Sew the head to the top of the body.
- Sew the arms to the sides of the body, just below the neck.
- Wrap the belt around the body and sew it in place.
- Sew the mace/sword into one hand and the shield into the other.
- Place the Santa hat on Link’s head, adjusting for desired look, and secure with a few stitches if desired.