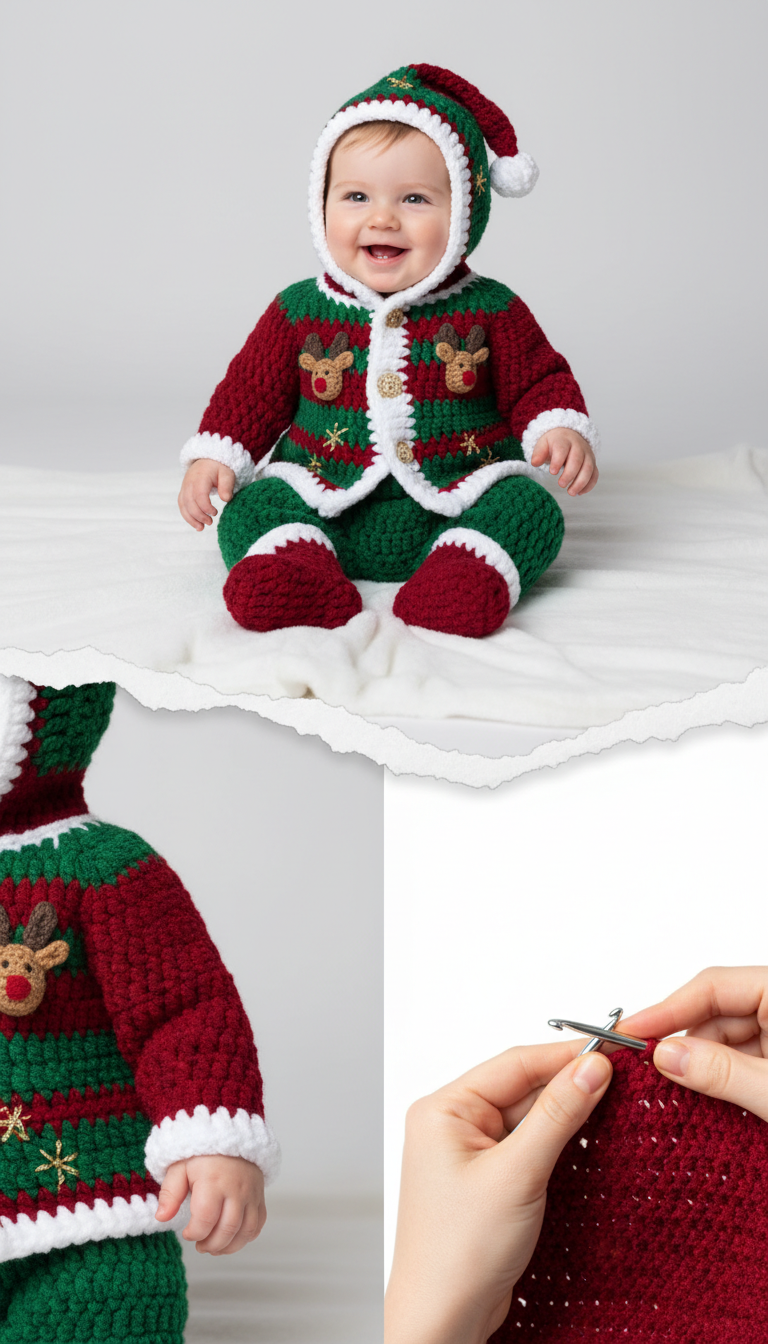
Get ready to spread holiday cheer with this absolutely enchanting crochet baby elf costume! Perfect for festive photoshohoots, Christmas parties, or simply making your little one the star of the season. This delightful outfit features vibrant holiday colors, charming reindeer appliques, and a playful pointed hood, ensuring your baby looks irresistibly cute and cozy.
Craft a Cherished Holiday Keepsake
There’s nothing quite like a handmade gift to capture the magic of the holidays. This crochet elf costume isn’t just an outfit; it’s a labor of love that will become a treasured family heirloom. Imagine the smiles and memories you’ll create, dressing your little one in this unique, cozy, and festive ensemble that truly embodies the spirit of Christmas.
Crochet Pattern: Crochet a Magical Christmas: Adorable Baby Elf Costume Pattern
Materials
- Worsted Weight Yarn (Red)
- Worsted Weight Yarn (Forest Green)
- Worsted Weight Yarn (White)
- Worsted Weight Yarn (Light Brown – for reindeer)
- Worsted Weight Yarn (Small amount of Black – for reindeer eyes)
- Worsted Weight Yarn (Small amount of Bright Red – for reindeer noses)
- Gold Embroidery Floss
- Crochet Hook size H (5.0mm) or size needed to obtain gauge
- Tapestry needle
- Scissors
- Stitch markers
- Fiberfill (for reindeer)
- 4-5 Gold 1/2-inch buttons
Abbreviations
- ch – chain
- sl st – slip stitch
- sc – single crochet
- hdc – half double crochet
- dc – double crochet
- inc – increase (2 sc in one stitch)
- dec – decrease (sc2tog)
- Fsc – foundation single crochet
- FO – fasten off
Instructions
Gauge: 4 sc x 4 rows = 1 inch (adjust hook size if necessary)
Note: This pattern is written for a 6-12 month size. Adjustments for smaller/larger sizes can be made by changing initial chain counts and row repetitions, maintaining the stitch pattern.
Jacket
Back Panel (Red & Green Stripes)
Row 1 (Red): Ch 40, hdc in 2nd ch from hook and across. (39 hdc) Turn.
Row 2 (Red): Ch 1, hdc in each st across. Turn.
Rows 3-4 (Green): Ch 1, hdc in each st across. Turn. Change to Red.
Rows 5-6 (Red): Ch 1, hdc in each st across. Turn. Change to Green.
Repeat Rows 3-6 until panel measures approximately 8 inches from bottom edge, ending with 2 rows of Green. FO.
Front Panels (Make 2 – Red & Green Stripes)
Row 1 (Red): Ch 20, hdc in 2nd ch from hook and across. (19 hdc) Turn.
Row 2 (Red): Ch 1, hdc in each st across. Turn.
Rows 3-4 (Green): Ch 1, hdc in each st across. Turn. Change to Red.
Rows 5-6 (Red): Ch 1, hdc in each st across. Turn. Change to Green.
Repeat Rows 3-6 until panel measures approximately 8 inches from bottom edge, ending with 2 rows of Green. FO.
Sleeves (Make 2 – Red & Green Stripes)
Round 1 (Red): Ch 28, join with sl st to form a ring. Ch 1, sc in each ch around. (28 sc) Join with sl st. (Or use Fsc 28, join).
Round 2 (Red): Ch 1, hdc in each st around. Join with sl st.
Round 3 (Green): Ch 1, hdc in each st around. Join with sl st.
Round 4 (Green): Ch 1, hdc in each st around. Join with sl st.
Round 5 (Red): Ch 1, hdc in each st around. Join with sl st.
Round 6 (Red): Ch 1, hdc in each st around. Join with sl st.
Repeat Rounds 3-6 until sleeve measures approximately 7 inches. FO, leaving a long tail for sewing.
Jacket Assembly
Sew shoulder seams: Place front panels on top of the back panel, right sides together. Sew approximately 5 stitches from the outer edge of each front panel to the back panel shoulders.
Set in sleeves: Center the top of each sleeve to the shoulder seam. Sew sleeves to armholes.
Sew side seams of the jacket and sleeve seams from underarm down to the bottom of the jacket and sleeve cuff.
Hood (Red & Green)
Row 1 (Red): Ch 50. Hdc in 2nd ch from hook and across. (49 hdc) Turn.
Row 2 (Red): Ch 1, hdc in each st across. Turn.
Rows 3-4 (Green): Ch 1, hdc in each st across. Turn. Change to Red.
Rows 5-6 (Red): Ch 1, hdc in each st across. Turn. Change to Green.
Repeat Rows 3-6 until hood measures approximately 8 inches high, ending with 2 rows of Green. Fold hood in half and sew the top seam.
Attach hood to jacket neckline, centering the hood seam at the back of the jacket neckline.
White Trim (Jacket Edges, Hood, Cuffs)
Using White yarn, attach yarn to the bottom right corner of a front panel. Ch 1, sc evenly around the entire jacket opening (both front panels, neckline, and bottom edge), making sure to work 3 sc in corners for a neat turn. Join with sl st.
Trim Row 2 (Optional decorative trim): Ch 2, (dc, ch 1, dc) in same st (V-stitch), skip 1 st, sc in next st, skip 1 st, repeat (V-stitch, skip 1 st, sc, skip 1 st) around until all edges are trimmed. Join with sl st. FO.
Repeat the decorative trim around the outer edge of the hood and around the cuffs of the sleeves.
Buttons
Sew 4-5 gold buttons evenly spaced along one front panel opening.
Pants (Green with Red Cuffs)
Legs (Make 2)
Round 1 (Green): Ch 35, join with sl st to form a ring. Ch 1, hdc in each ch around. (34 hdc) Join with sl st. (Or Fsc 34, join).
Rounds 2-15: Ch 1, hdc in each st around. Join with sl st. (Adjust length as desired).
Cuff (Red): Change to Red yarn. Ch 1, sc in each st around. Join with sl st.
Round 17 (Red): Ch 1, sc in each st around. Join with sl st. FO for first leg. For second leg, do not FO.
Joining Legs & Body
With second leg still on hook, ch 3. Join with sl st to any stitch on the first leg. Ch 1, sc in each st around the first leg, sc in each of the 3 chs, sc in each st around the second leg, sc in each of the 3 chs. (Total stitches = 34 + 34 + 3 + 3 = 74 sc). Join with sl st.
Round 1 (Body – Green): Ch 1, hdc in each st around. Join with sl st. (74 hdc)
Rounds 2-8: Ch 1, hdc in each st around. Join with sl st. (Adjust body height as needed).
Waistband (Green): Ch 1, sc in each st around. Join with sl st.
Round 10 (Waistband): Ch 1, sc in each st around. Join with sl st. FO.
Reindeer Appliques (Make 2)
Head (Light Brown)
Round 1: Start with magic ring. Ch 1, 6 sc in ring. (6 sc) Pull tight to close. Join with sl st.
Round 2: Ch 1, inc in each st around. (12 sc) Join with sl st.
Round 3: Ch 1, (sc in next st, inc) 6 times. (18 sc) Join with sl st. FO, leaving a long tail for sewing.
Ears (Make 4 – Light Brown)
Ch 3. Sc in 2nd ch from hook, hdc in last ch. FO, leaving a tail.
Antlers (Make 4 – Light Brown)
Ch 5. Sl st in 2nd ch from hook, sc in next ch, ch 3, sl st in 2nd ch from hook, sl st in next ch (from main chain), sc in next ch, sl st in last ch. FO, leaving a tail.
Assembly of Reindeer
Sew two ears and two antlers to each head.
Embroider small black eyes with black yarn.
Embroider a small red nose with bright red yarn.
Lightly stuff the head with fiberfill if desired, then flatten slightly.
Sew the finished reindeer appliques onto the front panels of the jacket.
Finishing Touches
Gold Stars/Snowflakes
Using gold embroidery floss, embroider small star or snowflake designs sparsely on the green striped sections of the jacket, as shown in the image.
Hat Pom-pom
Create a small white pom-pom (approximately 1-inch diameter) and securely attach it to the tip of the hood.