2.3K
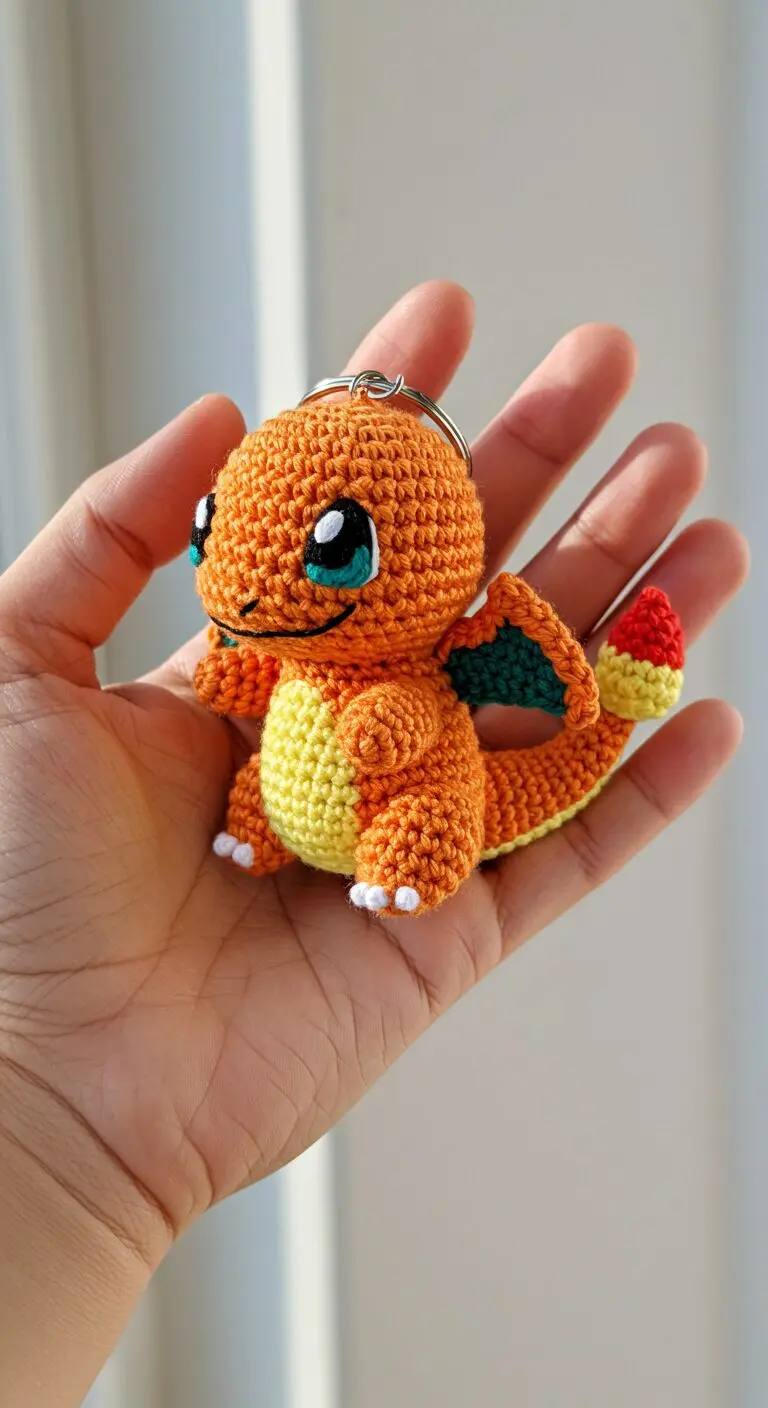
Are you ready to catch ’em all with your crochet hook? Dive into the world of Pokémon crafting with this adorable Crochet Charmander Amigurumi Keychain pattern!
Ignite Your Creativity: Crochet Your Own Charmander!
Whether you’re a seasoned Trainer or just starting your crochet journey, this detailed guide will help you create a miniature fiery companion perfect for your keys, backpack, or just to display. Get ready to crochet your favorite fire-type Pokémon!
Materials:
- Orange yarn (Worsted weight for body, head, limbs, tail base)
- Yellow yarn (Worsted weight for belly, tail middle)
- Red yarn (Worsted weight for tail flame)
- Dark Green yarn (for wing detail)
- Black embroidery floss (for mouth, nostrils)
- White embroidery floss (for claws)
- Safety eyes (e.g., 5mm or 6mm, blue or black)
- Crochet hook (e.g., 2.5mm or 3.0mm, suitable for your yarn weight)
- Stuffing (polyester fiberfill)
- Yarn needle
- Stitch marker (optional, but highly recommended)
- Scissors
- Keychain ring and pliers (optional, if making a keychain)
Abbreviations:
- MR: Magic Ring
- ch: chain
- sc: single crochet
- inc: increase (2 sc in one stitch)
- dec: decrease (sc 2 stitches together)
- sl st: slip stitch
- FO: Fasten off
- st(s): stitch(es)
- (…) x N: Repeat instructions in parentheses N times
- [N]: Total number of stitches in the round
Notes:
- Work in continuous rounds unless otherwise stated. Use a stitch marker to keep track of your rounds.
- Finished size will vary based on yarn weight and hook size.
Head (Orange Yarn):
- R1: 6 sc in MR [6]
- R2: (inc) x 6 [12]
- R3: (sc, inc) x 6 [18]
- R4: (2 sc, inc) x 6 [24]
- R5: (3 sc, inc) x 6 [30]
- R6-R10: sc around (5 rounds) [30]
- Place safety eyes between R8 and R9, about 6-7 stitches apart. Embroider nostrils and smile with black embroidery floss.
- R11: (3 sc, dec) x 6 [24]
- R12: (2 sc, dec) x 6 [18]
- Start stuffing firmly.
- R13: (sc, dec) x 6 [12]
- R14: (dec) x 6 [6]
- FO, leave a long tail for sewing. Close the hole by weaving the tail through the front loop of the remaining 6 stitches and pulling tight.
Body (Start with Yellow Yarn for Belly, then Orange):
- R1: 6 sc in MR (yellow) [6]
- R2: (inc) x 6 (yellow) [12]
- R3: (sc, inc) x 6 (yellow) [18]
- R4: (2 sc, inc) x 6 (yellow) [24]
- R5: sc around (yellow) [24]
- Change to orange yarn.
- R6-R9: sc around (4 rounds) [24]
- R10: (2 sc, dec) x 6 [18]
- R11: (sc, dec) x 6 [12]
- Stuff firmly. FO, leave a long tail for sewing.
Tail (Orange, Yellow, and Red Yarn):
- R1: 4 sc in MR (orange) [4]
- R2: sc around [4]
- R3: (sc, inc) x 2 [6]
- R4-R5: sc around [6]
- R6: (2 sc, inc) x 2 [8]
- R7-R8: sc around [8]
- Change to yellow yarn.
- R9: (3 sc, inc) x 2 [10]
- R10: sc around [10]
- Change to red yarn for the flame tip.
- R11: (dec) x 5 [5]
- Stuff lightly. FO, close hole by weaving tail through remaining stitches and pulling tight.
Arms (Make 2 – Orange Yarn, White Embroidery Floss for Claws):
- R1: 6 sc in MR [6]
- R2-R4: sc around (3 rounds) [6]
- Stuff lightly. FO, leave a long tail for sewing.
- Use white embroidery floss to embroider small claw details on the front of the arm/hand.
Legs (Make 2 – Orange Yarn, White Embroidery Floss for Claws):
- R1: 6 sc in MR [6]
- R2-R4: sc around (3 rounds) [6]
- Stuff lightly. FO, leave a long tail for sewing.
- Use white embroidery floss to embroider small claw details on the front of the foot.
Wings (Make 2 – Orange and Dark Green Yarn):
- Start with orange yarn: Ch 5.
- Row 1: Sc in 2nd ch from hook, 3 sc. Ch 1, turn. [4]
- Row 2: Sc in each st across. Ch 1, turn. [4]
- Row 3: Dec, 2 sc. Ch 1, turn. [3]
- Row 4: Dec, sc. Ch 1, turn. [2]
- Row 5: Dec. [1]
- FO.
- Using dark green yarn, surface crochet or embroider the inner wing membrane pattern onto the orange wing shape.
Assembly:
- Sew the head to the body.
- Sew the tail to the lower back of the body.
- Sew the arms to the sides of the body, just below the neck.
- Sew the legs to the bottom of the body, allowing it to sit flat.
- Sew the wings to the upper back of the body.
- If making a keychain, attach a keychain ring to the top of Charmander’s head.
Congratulations! You’ve successfully crocheted your very own adorable Charmander. This little fiery friend is ready to accompany you on all your adventures!