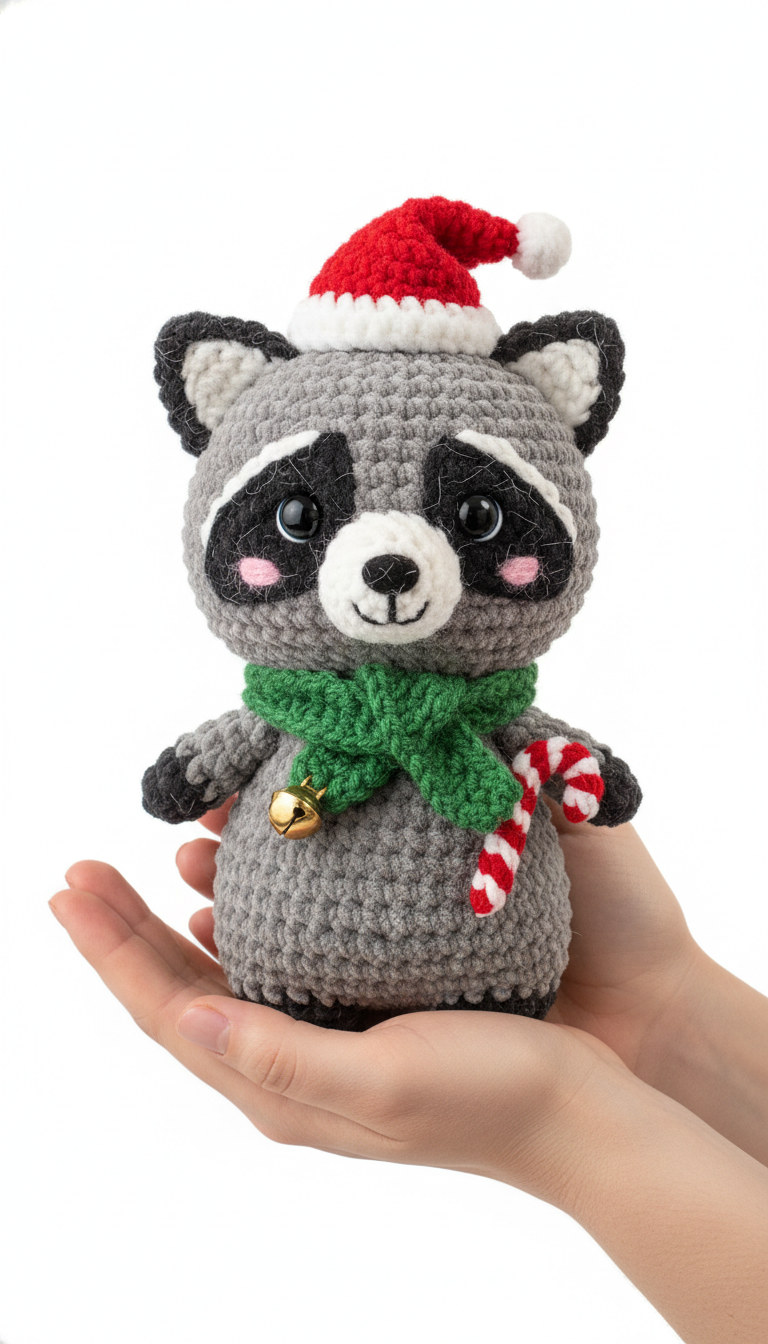
Bring a touch of handmade magic to your holiday decor with this adorable Christmas Raccoon Amigurumi! This charming little fellow, complete with a Santa hat, cozy scarf, and tiny candy cane, is ready to spread cheer. Perfect for gifting or adorning your festive display, this pattern will guide you to create a lovable, huggable friend.
Craft Your Own Cuddly Holiday Companion
There’s nothing quite like the joy of creating a special handmade gift or decoration. This Christmas Raccoon isn’t just a toy; it’s a tiny bundle of holiday spirit, crafted with love. Imagine the smiles it will bring to loved ones, or how it will brighten your own home. It’s a delightful project that captures the essence of festive cheer in every stitch.
Crochet Pattern: Crochet Christmas Raccoon Amigurumi Pattern: A Festive Holiday Friend!
Materials
- Worsted weight yarn in Grey, Black, White, Red, Green, Pink
- 3.5mm crochet hook (or size to achieve tight stitches)
- 9mm safety eyes
- Polyester fiberfill for stuffing
- Tapestry needle
- Stitch markers
- Small golden bell
Abbreviations
- ch: chain
- sl st: slip stitch
- sc: single crochet
- inc: increase (2 sc in one stitch)
- dec: decrease (sc 2 together)
- BLO: back loop only
- FO: Fasten off
- (X): number of stitches at the end of the round
- [ ]: repeat instructions in brackets
Instructions
Gauge: Not crucial for this project, but stitches should be tight enough so stuffing does not show through.
Note: Work in continuous rounds unless otherwise specified. Use a stitch marker to keep track of the first stitch of each round.
Head (Grey Yarn)
- Rnd 1: 6 sc in magic ring (6)
- Rnd 2: [inc] x6 (12)
- Rnd 3: [sc, inc] x6 (18)
- Rnd 4: [2 sc, inc] x6 (24)
- Rnd 5: [3 sc, inc] x6 (30)
- Rnd 6: [4 sc, inc] x6 (36)
- Rnd 7: [5 sc, inc] x6 (42)
- Rnd 8-14: sc around (42) (7 rounds)
- Insert safety eyes between Rnd 10 and 11, about 8-9 stitches apart.
- Rnd 15: [5 sc, dec] x6 (36)
- Rnd 16: [4 sc, dec] x6 (30)
- Rnd 17: [3 sc, dec] x6 (24)
- Stuff head firmly.
- Rnd 18: [2 sc, dec] x6 (18)
- Rnd 19: [sc, dec] x6 (12)
- Rnd 20: [dec] x6 (6)
- FO, leave a long tail for sewing. Close the remaining hole.
Body (Grey Yarn)
- Rnd 1: 6 sc in magic ring (6)
- Rnd 2: [inc] x6 (12)
- Rnd 3: [sc, inc] x6 (18)
- Rnd 4: [2 sc, inc] x6 (24)
- Rnd 5: [3 sc, inc] x6 (30)
- Rnd 6: [4 sc, inc] x6 (36)
- Rnd 7-15: sc around (36) (9 rounds)
- Stuff body firmly.
- Rnd 16: [4 sc, dec] x6 (30)
- Rnd 17: [3 sc, dec] x6 (24)
- Rnd 18: [2 sc, dec] x6 (18)
- FO, leave a long tail for sewing.
Ears (Make 2)
Outer Ear (Grey Yarn)
- Rnd 1: 6 sc in magic ring (6)
- Rnd 2: [sc, inc] x3 (9)
- Rnd 3: [2 sc, inc] x3 (12)
- Sl st, FO.
Inner Ear (White Yarn)
- Rnd 1: 4 sc in magic ring (4)
- Rnd 2: [sc, inc] x2 (6)
- Sl st, FO.
Sew white inner ear onto the grey outer ear. Fold the grey ear in half slightly and sew to flatten.
Eye Patches (Black Yarn, Make 2)
- Rnd 1: Ch 4. Sc in 2nd ch from hook, sc in next ch, 3 sc in last ch. Continue on other side of ch: sc, 2 sc in last st (8)
- Rnd 2: inc, sc, 3 inc, sc, 2 inc (14)
- FO, leave a long tail for sewing.
Snout (White Yarn)
- Rnd 1: Ch 5. Sc in 2nd ch from hook, 2 sc, 3 sc in last ch. Continue on other side of ch: 3 sc, 2 sc in last st (12)
- Rnd 2: inc, 2 sc, 3 inc, 2 sc, 2 inc (18)
- FO, leave a long tail for sewing.
Arms (Make 2)
Start with Black yarn for paw tips.
- Rnd 1: 6 sc in magic ring (6)
- Rnd 2: sc around (6)
- Change to Grey yarn.
- Rnd 3-10: sc around (6) (8 rounds)
- Stuff lightly. Pinch opening flat and sc across to close (3 sc). FO, leave a long tail.
Tail (Grey & Black Yarn)
- Rnd 1: With Black yarn, 4 sc in magic ring (4)
- Rnd 2: sc around (4)
- Change to Grey yarn.
- Rnd 3: [sc, inc] x2 (6)
- Rnd 4: sc around (6)
- Change to Black yarn.
- Rnd 5: [2 sc, inc] x2 (8)
- Rnd 6: sc around (8)
- Change to Grey yarn.
- Rnd 7: [3 sc, inc] x2 (10)
- Rnd 8: sc around (10)
- Stuff lightly. Pinch opening flat and sc across to close (5 sc). FO, leave a long tail.
Santa Hat
Hat Cone (Red Yarn)
- Rnd 1: 4 sc in magic ring (4)
- Rnd 2: [sc, inc] x2 (6)
- Rnd 3: sc around (6)
- Rnd 4: [2 sc, inc] x2 (8)
- Rnd 5: sc around (8)
- Rnd 6: [3 sc, inc] x2 (10)
- Rnd 7: sc around (10)
- Rnd 8: [4 sc, inc] x2 (12)
- Rnd 9: sc around (12)
- Rnd 10: [5 sc, inc] x2 (14)
- Rnd 11: sc around (14)
- Rnd 12: [6 sc, inc] x2 (16)
- Rnd 13: sc around (16)
- Rnd 14: [7 sc, inc] x2 (18)
- Rnd 15: sc around (18)
- Rnd 16: [8 sc, inc] x2 (20)
- Rnd 17: sc around (20)
- Rnd 18: [9 sc, inc] x2 (22)
- Rnd 19: sc around (22)
Brim (White Yarn)
- Rnd 20: Join white yarn. sc around in BLO (22)
- Rnd 21: sc around (22)
- Sl st, FO.
Pompom (White Yarn)
- Make a small pompom (approx. 1-1.5 cm diameter) using white yarn. Attach securely to the tip of the hat.
Scarf (Green Yarn)
- Ch 4.
- Row 1: Sc in 2nd ch from hook, sc in next 2 ch (3 sc). Ch 1, turn.
- Repeat Row 1 until scarf measures approximately 15-20 cm long, or desired length to wrap around the raccoon’s neck.
- FO, weave in ends.
- Attach a small golden bell to one end of the scarf.
Candy Cane (Red & White Yarn)
- Using Red yarn: Ch 16.
- Row 1: Sc in 2nd ch from hook, sc in each ch across (15). Ch 1, turn.
- Change to White yarn.
- Row 2: Sc in each st across (15). Ch 1, turn.
- Change to Red yarn.
- Row 3: Sc in each st across (15). Ch 1, turn.
- Change to White yarn.
- Row 4: Sc in each st across (15). Ch 1, turn.
- Change to Red yarn.
- Row 5: Sc in each st across (15). FO.
- Weave in ends. Gently twist and bend into a candy cane shape. You may use a thin wire or fabric stiffener if a rigid shape is desired.
Assembly:
- 1. Head to Body: Sew the head securely to the body.
- 2. Facial Features:
- Sew the black eye patches around the safety eyes. Ensure they are positioned symmetrically.
- Using white yarn and a tapestry needle, embroider a thin line around the outer edge of each eye patch and above the eyes to create the distinctive white raccoon markings.
- Sew the white snout below the eyes, centered.
- Embroider a small black triangular nose and a ‘Y’ or ‘V’ shaped mouth onto the snout with black yarn.
- Embroider small pink blush spots below the eyes using pink yarn.
- 3. Ears: Sew the assembled ears to the top of the head, slightly to the sides.
- 4. Arms: Sew the arms to the sides of the body, just below the neck.
- 5. Tail: Sew the tail to the back of the body, near the bottom.
- 6. Accessories:
- Place the Santa hat on the raccoon’s head. You can sew it down with a few stitches if desired.
- Tie the green scarf around the raccoon’s neck, ensuring the bell is visible.
- Sew the candy cane to one of the raccoon’s hands, or lightly stitch it to the body for posing.