Unleash your inner artisan and dive into the delightful world of crochet with this exquisite guide! Today, we’re crafting a beautiful Floral Puff Stitch Crossbody Bag that’s perfect for adding a touch of handmade charm to any outfit.
Craft Your Own Chic Crochet Crossbody Bag
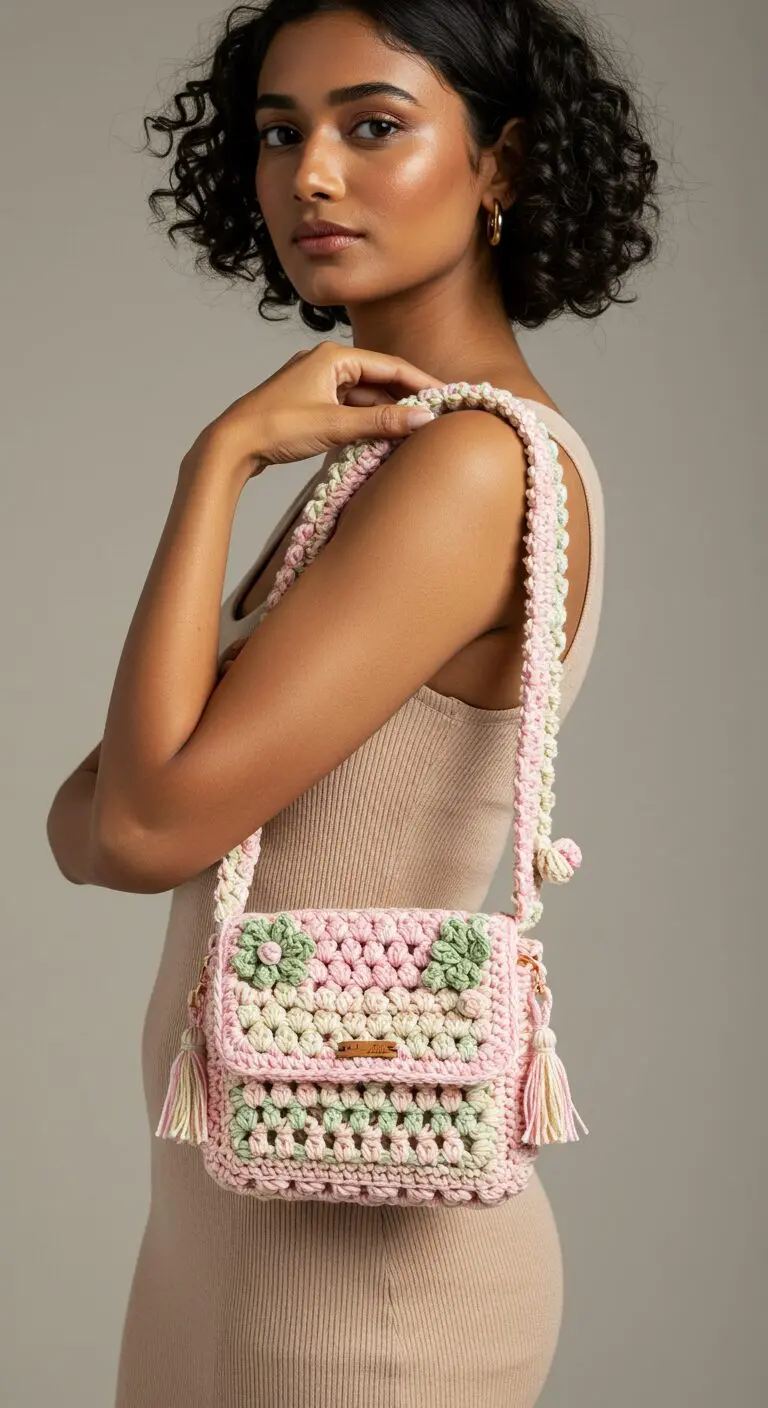
This charming bag features a beautiful textured body created with puff stitches, a decorative flap adorned with sweet floral appliques, and playful tassels. It’s an intermediate project that yields a stunning and functional accessory. Get ready to crochet your new favorite bag!
Materials You’ll Need:
- Worsted weight cotton yarn:
- Color A (Light Pink) – approx. 200 yards
- Color B (Cream/Beige) – approx. 100 yards
- Color C (Light Green) – approx. 50 yards
- Crochet hook: H/5.0mm (or size to obtain gauge)
- Yarn needle
- Scissors
- Magnetic snap closure (optional)
- Small leather tag (optional, for embellishment)
Abbreviations:
- ch: chain
- sc: single crochet
- dc: double crochet
- sl st: slip stitch
- sk: skip
- st(s): stitch(es)
- Puff St: Puff Stitch (Yarn over, insert hook into st, pull up a loop (3 loops on hook). [Yarn over, insert hook into same st, pull up a loop] 2 more times (7 loops on hook). Yarn over, pull through all 7 loops on hook. Ch 1 to secure.)
- FO: Fasten off
Notes:
- Gauge: 4 Puff St clusters and 8 rows = 4 inches (adjust hook size if necessary).
- Ch 1 at the beginning of rows does NOT count as a stitch.
- Color changes are indicated.
Pattern Instructions:
Bag Body (Make 2 identical panels)
Using Color A (Pink):
- Ch 29.
- Row 1: Sc in 2nd ch from hook and across. (28 sc)
- Row 2: Ch 1, turn. Sc in first st. (Puff St, sk 1 sc) across, ending with sc in last st. (13 Puff Sts, 2 sc)
- Row 3: Ch 1, turn. Sc in first st and in each st and ch-1 space across. (28 sc)
- Repeat Rows 2-3 for a total of 18 rows, alternating colors every 2 rows as desired (e.g., Pink, Cream, Green, Pink, etc. to mimic the image). For the image, it looks like: 6 rows Pink, 6 rows Cream/Beige, 6 rows Green. Adjust as desired.
- FO, leaving a long tail on one panel for seaming.
Side/Bottom Panel
Using Color A (Pink):
- Ch 72.
- Row 1: Sc in 2nd ch from hook and across. (71 sc)
- Row 2-5: Ch 1, turn. Sc in each st across. (71 sc)
- FO, leaving a long tail for seaming.
Bag Flap
Using Color A (Pink):
- Ch 29.
- Row 1: Sc in 2nd ch from hook and across. (28 sc)
- Row 2: Ch 1, turn. Sc in first st. (Puff St, sk 1 sc) across, ending with sc in last st. (13 Puff Sts, 2 sc)
- Row 3: Ch 1, turn. Sc in first st and in each st and ch-1 space across. (28 sc)
- Repeat Rows 2-3 for 4 rows of Color A, then switch to Color B for 4 rows, then back to Color A for 4 rows (total 12 rows).
- FO, leaving a long tail for attaching to bag.
Shoulder Strap
Using Color A (Pink) and Color C (Green) together:
- Ch 150 (or desired length).
- Row 1: Sc in 2nd ch from hook and across. (149 sc)
- Row 2: Ch 1, turn. Sc in each st across. (149 sc)
- FO, leaving long tails for attaching.
Puff Stitch Flowers (Make 3)
Using Color C (Green):
- Make a magic ring.
- Round 1: Ch 2 (does not count as st), (Puff St, ch 1) 5 times in ring. Sl st to first Puff St. (5 petals)
- FO, leaving a long tail for sewing.
Tassels (Make 2)
Using all three colors (A, B, C) together:
- Cut several strands of each color, about 10-12 inches long.
- Gather the strands, fold them in half.
- Tie a separate piece of yarn around the loop to create the head of the tassel.
- Trim the ends evenly.
- Attach a tassel to each side of the bag using the tie-off strands.
Assembly:
- Seam the Bag: Using your yarn needle and the long tail from one bag panel, whip stitch or single crochet the side/bottom panel to the two bag body panels. Start from one top corner, go all the way down the side, across the bottom, and up the other side.
- Attach Flap: Position the flap on the back top edge of the bag. Sew it securely along the top edge.
- Attach Strap: Sew the ends of the shoulder strap securely to the top corners of the bag’s side panels.
- Attach Flowers: Sew the three green puff stitch flowers evenly spaced onto the front of the bag flap.
- Add Embellishments: If using, sew the magnetic snap closure underneath the flap and on the front of the bag body. Attach the small leather tag to the center of the flap.
- Weave in Ends: Securely weave in all remaining loose ends.
Congratulations! You’ve just crocheted a beautiful and unique crossbody bag. Enjoy carrying your handmade masterpiece!