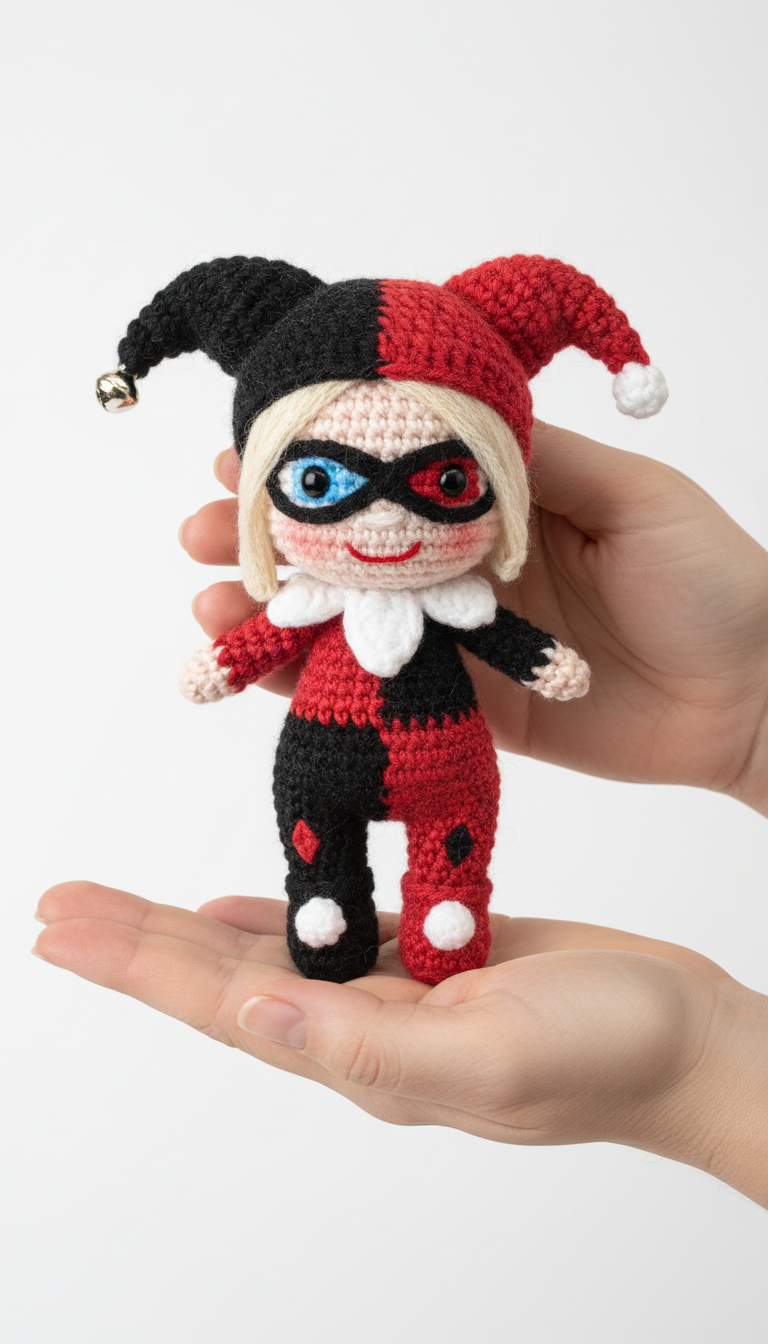
Dive into the whimsical world of Gotham with our detailed Harley Quinn Amigurumi pattern! This adorable crochet doll captures the iconic jester look of the beloved anti-heroine, complete with her signature red and black costume, two-toned hat, and mischievous smile. Perfect for fans and crafters alike, this project promises a delightful challenge and a fantastic finished piece.
Unleash Your Inner Anti-Hero: Crafting a Harley Quinn Doll
Creating your own Harley Quinn amigurumi is more than just crocheting a doll; it’s bringing a vibrant character to life with your own hands. This pattern offers a rewarding experience, allowing you to pay homage to a fan-favorite character while honing your amigurumi skills. The finished doll makes a unique collectible, a cherished gift for a comic enthusiast, or a playful addition to your own collection.
Crochet Pattern: Crochet Harley Quinn Amigurumi Pattern: Craft Your Own Mischievous Jester Doll
Materials
- Sport/DK weight yarn in: Beige (Skin Tone), Blonde (Hair), Red, Black, White, Small amounts of Light Blue and Pink (for eye details/cheeks)
- 2.5mm or 3.0mm crochet hook (or size suitable for your yarn to achieve tight stitches)
- 6mm safety eyes (optional, can embroider instead)
- Polyester fiberfill for stuffing
- Tapestry needle
- Stitch markers
- Scissors
- Small silver bell (for hat)
- Small white pompom maker or yarn for making pompoms
Abbreviations
- MR: Magic Ring
- ch: Chain
- sc: Single Crochet
- inc: Increase (2 sc in one stitch)
- dec: Decrease (sc 2 together)
- sl st: Slip Stitch
- FO: Fasten Off
- BLO: Back Loop Only
- (): Repeat instructions in parentheses
- []: Total number of stitches
Instructions
Head (Beige Yarn)
- R1: 6 sc in MR [6]
- R2: (inc) x6 [12]
- R3: (sc, inc) x6 [18]
- R4: (2 sc, inc) x6 [24]
- R5: (3 sc, inc) x6 [30]
- R6: (4 sc, inc) x6 [36]
- R7-R14: sc around (8 rounds) [36]
- R15: (4 sc, dec) x6 [30]
- R16: (3 sc, dec) x6 [24]
- R17: (2 sc, dec) x6 [18]
- If using safety eyes, insert between R11 and R12, about 6-7 stitches apart. Stuff firmly.
- R18: (sc, dec) x6 [12]
- R19: (dec) x6 [6]
- FO, close opening.
Hair (Blonde Yarn)
- R1: 6 sc in MR [6]
- R2: (inc) x6 [12]
- R3: (sc, inc) x6 [18]
- R4: (2 sc, inc) x6 [24]
- R5: (3 sc, inc) x6 [30]
- R6-R8: sc around (3 rounds) [30]
- For bangs/strands: Ch 7, sc in 2nd ch from hook and next 5 ch, sl st into next sc on R8. Repeat for 8-10 strands around the front. FO, leaving a long tail for sewing.
Body/Legs (Red and Black Yarn)
- Start with Red yarn.
- R1: 6 sc in MR [6]
- R2: (inc) x6 [12]
- R3: (sc, inc) x6 [18]
- R4: (2 sc, inc) x6 [24]
- R5: (3 sc, inc) x6 [30]
- R6: (4 sc, inc) x6 [36]
- R7-R9: 18 sc in Red, change to Black, 18 sc in Black. Sl st to first sc of Red to join. [36]
- R10-R12: 18 sc in Black, change to Red, 18 sc in Red. Sl st to first sc of Black to join. [36]
- Stuff body lightly.
- Divide for Legs:
- Left Leg (Doll’s Left, Red dominant):
- R13: Using Red yarn, sc in the first 18 stitches (of the 18 Red stitches from R12). Sl st to join. [18]
- R14-R19: sc around in Red (6 rounds) [18]
- R20: (sc, dec) x6 [12]
- R21: (dec) x6 [6]
- Stuff firmly. FO, leaving a tail to close.
- Right Leg (Doll’s Right, Black dominant):
- R13: Join Black yarn to the remaining 18 stitches (of the 18 Black stitches from R12). sc in these 18 stitches. Sl st to join. [18]
- R14-R19: sc around in Black (6 rounds) [18]
- R20: (sc, dec) x6 [12]
- R21: (dec) x6 [6]
- Stuff firmly. FO, leaving a tail to close.
Arms (Make 2)
- Start with Beige yarn for hand.
- R1: 6 sc in MR [6]
- R2: (sc, inc) x3 [9]
- R3-R4: sc around [9]
- Doll’s Left Arm: Change to Red yarn.
- R5: sc around [9]
- R6: In BLO, sc around in White yarn (creates cuff edge). Sl st to join, FO White. Change back to Red yarn.
- R7-R10: sc around in Red (4 rounds) [9]
- Stuff lightly. Sl st ends together, FO, leaving a tail for sewing.
- Doll’s Right Arm: Change to Black yarn.
- R5: sc around [9]
- R6: In BLO, sc around in White yarn (creates cuff edge). Sl st to join, FO White. Change back to Black yarn.
- R7-R10: sc around in Black (4 rounds) [9]
- Stuff lightly. Sl st ends together, FO, leaving a tail for sewing.
Collar (White Yarn)
- Ch 25 (or enough to wrap around the neck comfortably), sl st to first ch to form a loop.
- R1: Ch 2 (counts as first hdc), hdc in each ch around. Sl st to join [24 hdc approx].
- R2: (Ch 2, 3 dc in next st, ch 2, sl st in next st) repeat around for ruffle.
- FO, leaving a long tail for sewing.
Jester Hat (Red and Black Yarn)
- Point 1 (Doll’s Left – Red Yarn):
- R1: 4 sc in MR [4]
- R2: sc around [4]
- R3: (sc, inc) x2 [6]
- R4: sc around [6]
- R5: (2 sc, inc) x2 [8]
- R6: sc around [8]
- R7: (3 sc, inc) x2 [10]
- R8-R9: sc around [10]
- Stuff lightly. FO, weave in ends. Create a small White pompom and attach it to the tip.
- Point 2 (Doll’s Right – Black Yarn):
- Repeat instructions for Point 1. Before FO, insert the small silver bell inside. Stuff lightly around the bell. FO, weave in ends.
- Base of Hat:
- With Red yarn, ch 12. With Black yarn, ch 12. Join Red yarn to first Red ch to form a loop [24].
- R1: sc in each ch around (12 Red, 12 Black) [24]
- R2-R3: sc around, maintaining color split (12 Red, 12 Black) [24]
- Sew Point 1 (Red with pompom) to the Red half of the base. Sew Point 2 (Black with bell) to the Black half of the base. Ensure points face outwards and are secured. FO, leaving a long tail for sewing to the head.
Assembly and Details
- Attach Hair: Pin the blonde hairpiece to the head, centering the part. Sew securely around the edges.
- Attach Body: Sew the neck opening of the body to the bottom of the head.
- Attach Arms: Sew the arms to the sides of the body at the shoulder level, matching the red arm to the red side and the black arm to the black side.
- Attach Collar: Place the white collar around the doll’s neck and sew in place.
- Attach Hat: Center the jester hat on top of the head and sew securely.
- Facial Details:
- Using black yarn, embroider the mask shape around the eyes.
- Using light blue yarn, embroider a small circle around the doll’s left safety eye.
- Using red yarn, embroider a small circle around the doll’s right safety eye.
- Using red yarn, embroider a small V-shaped mouth below the nose area.
- Using pink yarn, embroider two small circles for cheeks below the eyes.
- Outfit Details:
- On the red parts of the outfit (torso and doll’s left leg), embroider small black diamond shapes.
- On the black parts of the outfit (torso and doll’s right leg), embroider small red diamond shapes.
- On the feet of each leg, embroider a small white circle (or attach small white felt circles).