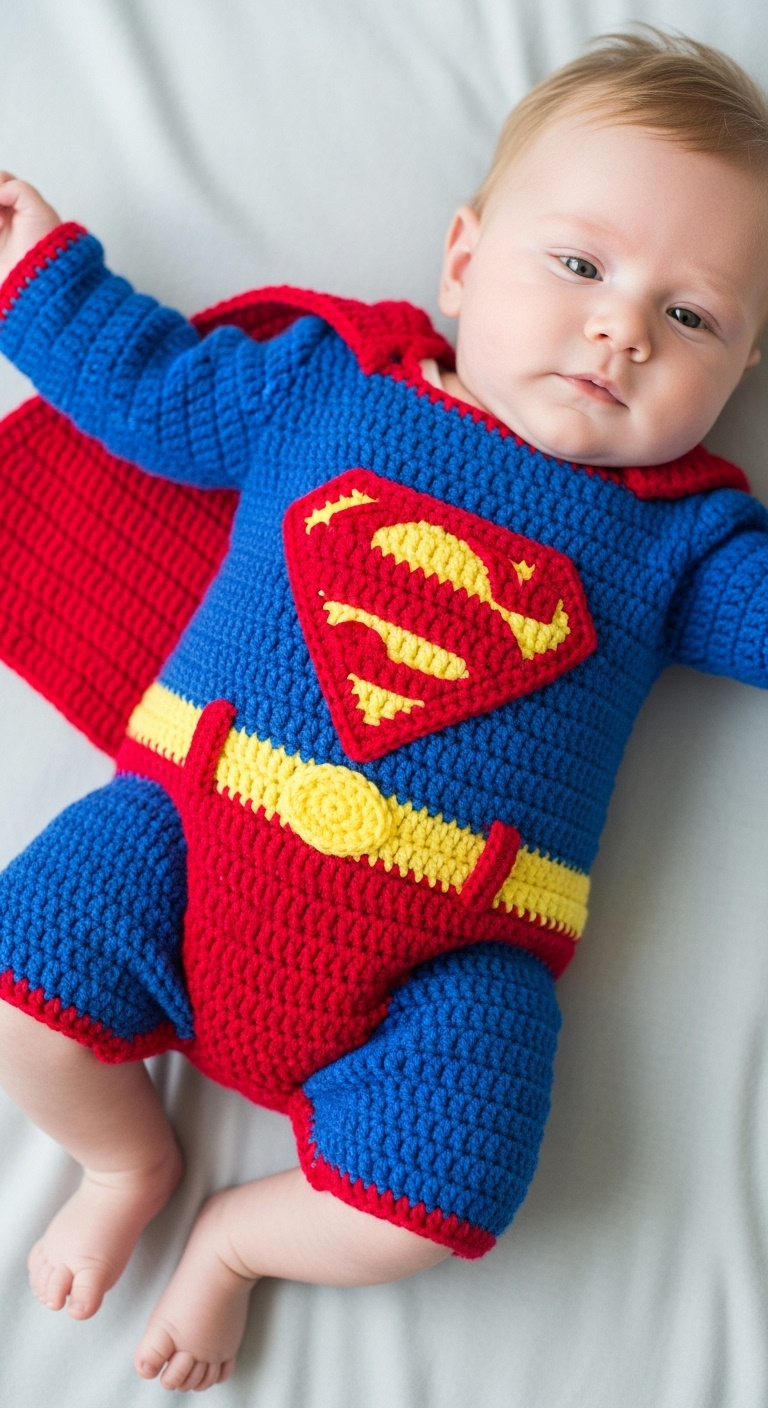
Transform your little one into the Man of Steel with this adorable crochet Superman baby romper pattern! Perfect for photoshoots, comic-con events, or simply everyday super-powered cuteness, this outfit combines comfort with iconic superhero style. Create a cherished handmade piece that celebrates your baby’s heroic charm.
Unleash Your Little One’s Inner Superhero
There’s nothing quite like seeing your baby dressed as a tiny superhero, and this crochet romper makes that dream a reality. Handmade with love, it’s not just an outfit; it’s a keepsake. Imagine the priceless photos and memories you’ll create with this unique, comfortable, and undeniably cute Superman costume.
Crochet Pattern: Crochet Superman Baby Romper Pattern: Your Little Hero’s First Outfit
Materials
- Worsted weight yarn in Royal Blue (approx. 200 yds)
- Worsted weight yarn in Bright Red (approx. 150 yds)
- Worsted weight yarn in Golden Yellow (approx. 50 yds)
- 3.5mm (E) crochet hook
- Yarn needle
- Scissors
- Stitch markers
- Small buttons or snaps for closure (optional, at back neck)
Abbreviations
- ch – chain
- sl st – slip stitch
- sc – single crochet
- hdc – half double crochet
- dc – double crochet
- inc – increase (2 stitches in one stitch)
- dec – decrease (sc2tog or hdc2tog)
- st – stitch
- sts – stitches
- rnd – round
- row – row
- FO – fasten off
- rep – repeat
Instructions
This pattern is designed for a 3-6 month baby. Adjust hook size or yarn weight for different sizes.
PATTERN INSTRUCTIONS
LEG (Make 2 – Royal Blue)
Using Royal Blue yarn:
- Rnd 1: Ch 30, join with sl st to first ch to form a ring. Ch 1, hdc in each ch around. (30 hdc)
- Rnd 2-10: Ch 1, hdc in each st around. Join with sl st. (30 hdc)
- FO one leg, do NOT FO the second leg.
BODY (Royal Blue & Bright Red)
After completing the second leg, you will join it to the first leg.
- Rnd 11: Ch 3, join to any st on the first leg with a sl st. Ch 1, hdc in each of the 30 sts of the first leg, hdc in each of the 3 chs, hdc in each of the 30 sts of the second leg, hdc in each of the 3 chs. Join with sl st. (66 hdc)
- Rnd 12-16: Ch 1, hdc in each st around. Join with sl st. (66 hdc)
- Rnd 17 (Red Shorts/Diaper): Switch to Bright Red yarn. Ch 1, hdc in each st around. Join with sl st. (66 hdc)
- Rnd 18-26: Ch 1, hdc in each st around. Join with sl st. (66 hdc)
- Rnd 27 (Blue Upper Body): Switch to Royal Blue yarn. Ch 1, hdc in each st around. Join with sl st. (66 hdc)
- Rnd 28-32: Ch 1, hdc in each st around. Join with sl st. (66 hdc)
UPPER BODY – SPLIT FOR ARMHOLES
You will now work in rows for the front and back panels. Place stitch markers for armholes.
- Row 33 (Front Panel): Ch 1, hdc in first 33 sts. Turn. (33 hdc)
- Row 34-40: Ch 1, hdc in each st across. Turn. (33 hdc)
- Row 41 (Neck shaping): Ch 1, hdc in first 10 sts, dec, hdc until 12 sts remain, dec, hdc in last 10 sts. Turn. (29 hdc)
- Row 42-43: Ch 1, hdc in each st across. Turn. (29 hdc)
- Row 44 (Shoulder shaping): Ch 1, hdc in first 9 sts. Leave remaining sts unworked. Turn. (9 hdc)
- Row 45: Ch 1, hdc in each st across. FO.
- Join yarn to the other side of the neck opening, skipping the center sts.
- Row 44 (Second Shoulder): Ch 1, hdc in next 9 sts. Turn. (9 hdc)
- Row 45: Ch 1, hdc in each st across. FO.
- Back Panel: Join Royal Blue yarn to the remaining 33 sts from Rnd 32.
- Row 33-45: Work same as Front Panel, but for Row 41-43, work straight across (no neck shaping). For Row 44-45, work shoulders directly (9 hdc each side). You may add a button placket by working a few extra rows for one side’s shoulder strap.
SLEEVE (Make 2 – Royal Blue)
Using Royal Blue yarn.
- Rnd 1: Ch 28, join with sl st to first ch to form a ring. Ch 1, hdc in each ch around. (28 hdc)
- Rnd 2-15: Ch 1, hdc in each st around. Join with sl st. (28 hdc)
- Rnd 16 (Cuff): Switch to Bright Red yarn. Ch 1, sc in each st around. Join with sl st. (28 sc)
- FO, leaving a long tail for sewing.
CAPE (Bright Red)
Using Bright Red yarn. Ch 2 for turning at the beginning of each row (counts as 1st hdc).
- Row 1: Ch 40. Hdc in 3rd ch from hook and in each ch across. Turn. (38 hdc)
- Row 2-25: Ch 2, hdc in each st across. Turn. (38 hdc)
- Edging: Ch 1, sc evenly around the entire cape, placing 3 sc in each corner. Sl st to join.
- FO, leaving a long tail for sewing.
SUPERMAN ‘S’ SHIELD (Bright Red & Golden Yellow)
Red Shield Base: Using Bright Red yarn.
- Rnd 1: Ch 2, 6 sc in 2nd ch from hook. (6 sc)
- Rnd 2: Inc in each st around. (12 sc)
- Rnd 3: (Sc in next st, inc) rep 6 times. (18 sc)
- Continue shaping a diamond/shield shape by increasing at corners and working straight for sides. It’s often easier to make two large red triangles and sew them together or work flat in rows, increasing to widen and then decreasing to narrow. For a simpler approach:
- Row 1: Ch 2, sc in 2nd ch. (1 sc)
- Row 2: Ch 1, inc. (2 sc)
- Row 3: Ch 1, sc in each st. (2 sc)
- Row 4: Ch 1, inc, sc in next st. (3 sc)
- Row 5: Ch 1, sc in each st. (3 sc)
- Continue increasing at the beginning and end of rows until desired width (approx. 15-20 sts), then work straight for a few rows, then decrease to form the bottom point.
- Alternatively, find a separate ‘S’ shield applique pattern for accuracy.
Yellow ‘S’: Using Golden Yellow yarn.
- Crochet a flat ‘S’ shape to fit onto the red shield using sc stitches. This is often done freehand or with a very specific graph pattern.
- Sew the yellow ‘S’ onto the red shield base.
BELT (Golden Yellow)
Using Golden Yellow yarn.
- Row 1: Ch 5. Sc in 2nd ch from hook and in each ch across. Turn. (4 sc)
- Row 2-40 (or until desired length around waist): Ch 1, sc in each st across. Turn. (4 sc)
- FO, leaving a long tail for sewing.
BUCKLE (Golden Yellow)
Using Golden Yellow yarn.
- Rnd 1: Ch 2, 6 sc in 2nd ch from hook. Join with sl st. (6 sc)
- FO, leaving a long tail for sewing.
ASSEMBLY
- Shoulders: With Royal Blue yarn, sl st or sc the shoulders of the front and back panels together.
- Sleeves: Sew the open edges of the sleeves to the armholes of the romper.
- Cape: Sew the top edge of the red cape to the back neck/shoulder seam of the romper.
- Superman Shield: Sew the completed ‘S’ shield applique onto the center front of the blue upper body.
- Belt: Position the yellow belt around the red ‘shorts’ section and sew securely in place.
- Buckle: Sew the yellow buckle onto the center front of the yellow belt.
- Edging: Using Bright Red yarn, add a single crochet border around the neck opening and along any unedged raw seams for a neat finish.
- Weave in all loose ends.