Get ready to crochet a hero for the holidays! This adorable Christmas Wonder Woman Amigurumi pattern brings a festive twist to your favorite Amazonian princess. Perfect for gifting or adding a touch of superhero cheer to your holiday decor, this detailed pattern will guide you through creating your very own festive Wonder Woman doll. She’s ready to spread joy, complete with her Santa hat, striped scarf, and a tiny gift!
Craft a Unique Holiday Gift or Decoration
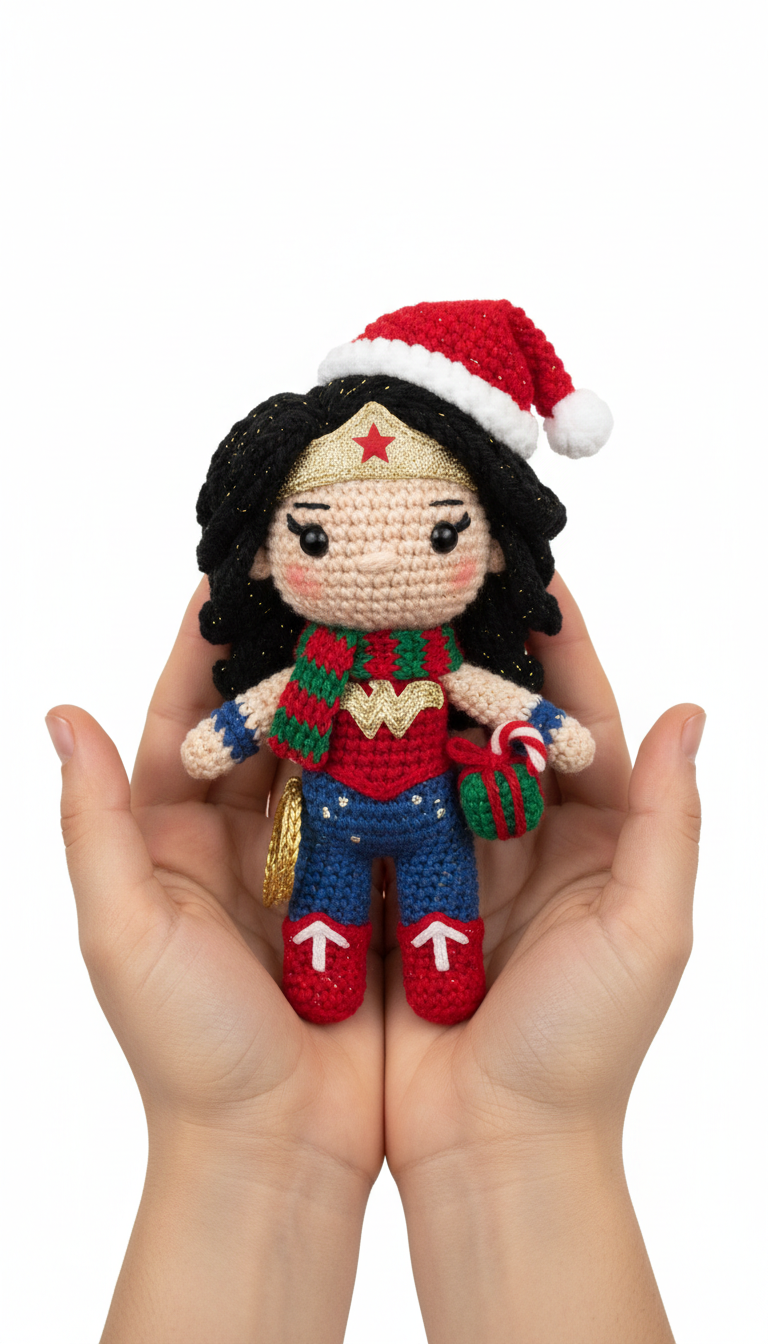
Imagine the delight on a superhero fan’s face receiving this handmade Christmas Wonder Woman Amigurumi. Beyond being a thoughtful present, this doll makes a fantastic unique decoration for mantels or Christmas trees. Crafting this charming amigurumi allows you to personalize a beloved character, making it a truly special addition to any holiday celebration or collection. It’s a project that combines fun, challenge, and festive spirit.
Crochet Pattern: Crochet Your Own Festive Hero: Christmas Wonder Woman Amigurumi Pattern
Materials
- Worsted weight yarn in: Light Peach (skin tone), Black (hair), Gold (tiara, lasso, belt detail), Red (top, hat, boots, star, scarf, gift ribbon), Blue (pants, cuffs), Green (scarf, gift), White (hat trim, pompom, boot arrows, candy cane)
- Small amount of gold metallic thread (to be worked with black yarn for hair sparkle)
- 2.5mm or 3.0mm crochet hook (or size suitable for your yarn to achieve tight stitches)
- Polyester fiberfill for stuffing
- Yarn needle for weaving in ends and assembly
- Stitch markers
- Embroidery floss in Black (eyes, eyelashes), Pink (blush, mouth), White (boot arrows, candy cane)
- Small red bead or button for tiara star (optional, can be embroidered)
- Small plastic candy cane charm or red/white embroidery floss to create one
Abbreviations
- MR: Magic Ring
- sc: Single Crochet
- inc: Increase (2 sc in one stitch)
- dec: Decrease (sc two stitches together)
- sl st: Slip Stitch
- ch: Chain
- FO: Finish Off
- BLO: Back Loop Only
- st(s): Stitch(es)
- () x N: Repeat instructions in parentheses N times
- […]: Stitch count at the end of the round/row
Instructions
Work in continuous rounds unless otherwise specified. Use a stitch marker to mark the first stitch of each round.
Head (Light Peach yarn)
- R1: 6 sc in MR [6]
- R2: inc in each st [12]
- R3: (sc, inc) x 6 [18]
- R4: (2 sc, inc) x 6 [24]
- R5: (3 sc, inc) x 6 [30]
- R6: (4 sc, inc) x 6 [36]
- R7-12: sc around (6 rounds) [36]
- R13: (4 sc, dec) x 6 [30]
- R14: (3 sc, dec) x 6 [24]
- R15: (2 sc, dec) x 6 [18] (Start stuffing firmly)
- R16: (sc, dec) x 6 [12]
- R17: dec x 6 [6]
- FO, leaving a long tail. Thread tail through front loop of remaining 6 stitches and pull tight to close. Weave in end.
Hair Cap (Black yarn held with gold metallic thread)
- R1: 6 sc in MR [6]
- R2: inc in each st [12]
- R3: (sc, inc) x 6 [18]
- R4: (2 sc, inc) x 6 [24]
- R5: (3 sc, inc) x 6 [30]
- R6: (4 sc, inc) x 6 [36]
- R7-8: sc around (2 rounds) [36]
- FO, leaving a long tail for sewing. Place hair cap on head, positioning it to frame the face. Secure with pins and sew in place.
- Hair Strands/Curls: Cut several 6-inch pieces of black/gold metallic thread yarn. Attach them evenly around the bottom edge of the hair cap and style as desired (e.g., in small loops or loosely curling).
Tiara (Gold yarn)
- Ch 20. Sl st into first ch to form a ring (adjust length for head circumference).
- R1: Sc in each ch around [20]
- R2: Sc around [20]
- FO, leaving a tail. Sew the tiara onto the hair cap, centered on the forehead.
- Embroider a red star onto the front center of the tiara.
Santa Hat (Red yarn, then White)
- R1 (Red): 6 sc in MR [6]
- R2: (sc, inc) x 3 [9]
- R3: (2 sc, inc) x 3 [12]
- R4: sc around [12]
- R5: (3 sc, inc) x 3 [15]
- R6: sc around [15]
- R7: (4 sc, inc) x 3 [18]
- R8: sc around [18]
- R9: (5 sc, inc) x 3 [21]
- R10: sc around [21]
- R11: (6 sc, inc) x 3 [24]
- R12: sc around [24]
- Change to White yarn.
- R13: sc around [24]
- FO, weave in ends. Create a small white pompom and sew it to the tip of the hat. Place hat on head and lightly secure with a few stitches.
Body (Red yarn, then Blue)
- R1 (Red): 6 sc in MR [6]
- R2: inc in each st [12]
- R3: (sc, inc) x 6 [18]
- R4: (2 sc, inc) x 6 [24]
- R5: (3 sc, inc) x 6 [30]
- R6: (4 sc, inc) x 6 [36]
- R7-10: sc around (4 rounds) [36]
- R11: (4 sc, dec) x 6 [30]
- R12: sc around [30]
- R13: (3 sc, dec) x 6 [24]
- Change to Blue yarn for pants.
- R14: sc around in BLO [24] (Stuff body firmly as you go)
- R15-18: sc around (4 rounds) [24]
- Now, split for legs: Work 12 sc. Ch 2. Sl st into the first sc of the round. This creates two 12-stitch openings for the legs.
Legs (Make 2 – Blue yarn, then Red)
- Work in continuous rounds on one of the 12-stitch openings.
- R19-21 (Blue): sc around (3 rounds) [12]
- Change to Red yarn for boots.
- R22 (Red): sc around [12]
- R23: (sc, dec) x 4 [8] (Continue stuffing leg firmly)
- R24: dec x 4 [4]
- FO, leaving a tail. Thread tail through front loop of remaining 4 stitches and pull tight to close. Weave in end.
- Repeat for the second leg.
- Embroider a small gold “W” on the center of the red top with gold yarn. Embroider a white upward arrow design on the front of each red boot.
Arms (Make 2 – Light Peach yarn)
- R1: 6 sc in MR [6]
- R2-8: sc around (7 rounds) [6]
- FO, leaving a long tail for sewing. Lightly stuff the arms.
- Cuffs: For one arm, use Blue yarn. Ch 6, sc in 2nd ch from hook and next 4 sts [5]. FO. Sew around wrist. For the other arm, use Red yarn. Ch 6, sc in 2nd ch from hook and next 4 sts [5]. FO. Sew around wrist. Embroider a white stripe onto the red cuff.
Scarf (Red and Green yarn)
- With Red yarn, ch 40 (adjust for desired length).
- Row 1: Sc in 2nd ch from hook and across [39]. Ch 1, turn.
- Row 2 (Green): Sc across [39]. Ch 1, turn.
- Row 3 (Red): Sc across [39]. Ch 1, turn.
- Repeat Rows 2-3 two more times for a total of 7 rows (Red, Green, Red, Green, Red, Green, Red).
- FO, weave in ends.
Lasso (Gold yarn)
- R1: 6 sc in MR [6]
- R2: inc in each st [12]
- R3: (sc, inc) x 6 [18]
- FO, leaving a tail. This creates a small flat disc.
- For the ‘rope’ part, make a separate ch 15 with gold yarn.
- Sew the chain to the disc, creating a small coiled lasso.
Gift (Green yarn)
- R1: Ch 8, sl st to first ch to form a loop.
- R2-5: Sc in each ch/st around (4 rounds) [8]
- FO, leaving a tail. Stuff lightly, then flatten the top and bottom edges and sew together to create a small cube shape.
- Embroider a red ribbon around the gift with red yarn. Attach a small candy cane (made from red and white embroidery floss or a charm) to the top.
Assembly and Finishing Touches
- Sew the head securely to the body.
- Sew the arms to the sides of the body, just below the neck.
- Wrap the scarf around Wonder Woman’s neck.
- Attach the lasso to her hip/side (as shown in the image, often with a small gold ring or coin attached).
- Place the small gift in one of her hands or next to her.
- Facial Features: With black embroidery floss, embroider small oval eyes with eyelashes. Embroider thin eyebrows. With pink embroidery floss, embroider a small ‘V’ or slight curve for the mouth. Using a tiny amount of pink blush (from makeup or fabric paint), apply lightly to cheeks for a rosy effect.
- Weave in all remaining ends securely.