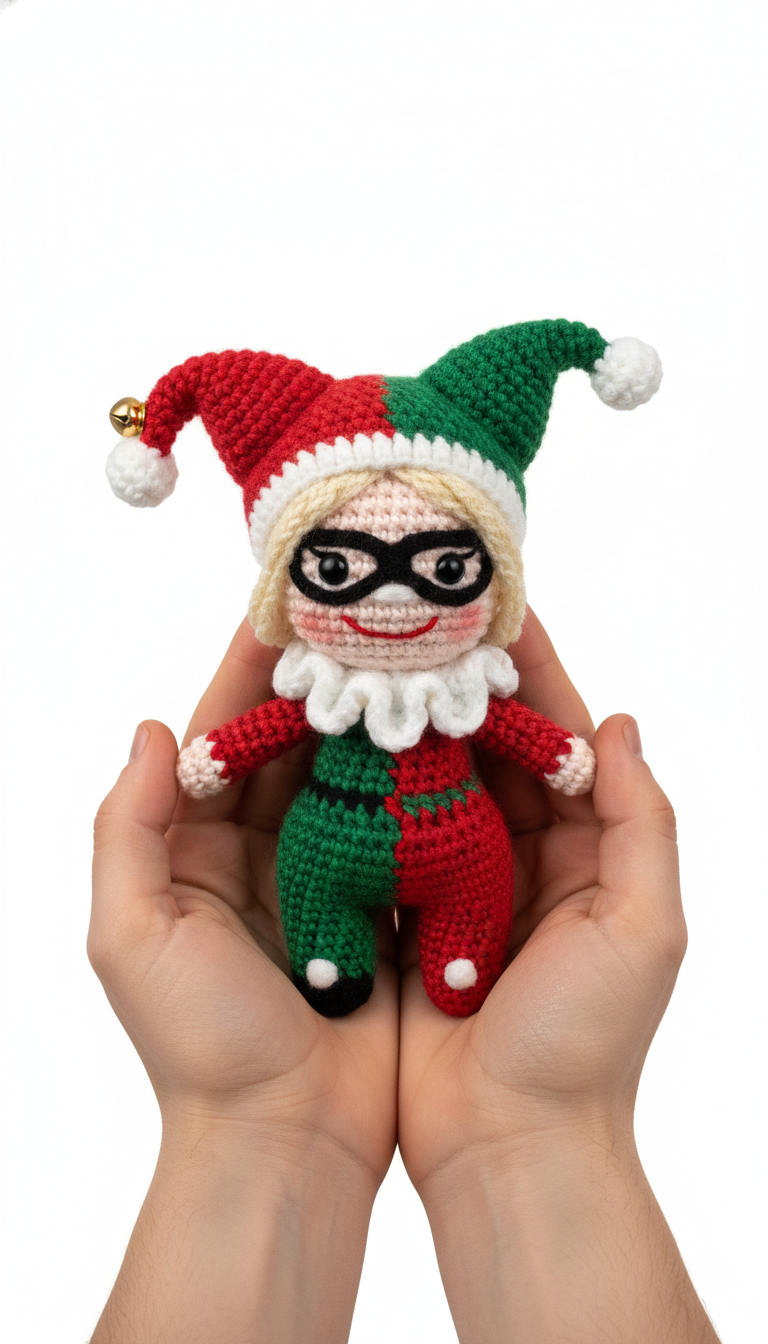
Bring a touch of playful whimsy to your collection with this charming Jester Amigurumi Doll! This detailed crochet pattern will guide you through creating a unique, festive character, complete with a classic two-toned outfit and mischievous smile. Perfect for adding a personalized, handmade gift to any special occasion or decorating your home with a splash of color.
Craft a Unique Gift or Delightful Decor Piece
Handmade gifts carry a special sentiment, and this Jester Amigurumi Doll is no exception. Its distinctive design makes it a memorable present for loved ones or a standout addition to your own collection. Enjoy the creative process of bringing this cheerful character to life, and watch as it sparks joy and conversation wherever it goes.
Crochet Pattern: Crochet Your Own Whimsical Jester Amigurumi Doll Pattern
Materials
- Worsted weight yarn in Red
- Worsted weight yarn in Green
- Worsted weight yarn in White
- Worsted weight yarn in Black
- Worsted weight yarn in Light Peach (Skin Tone)
- Worsted weight yarn in Light Blonde (Hair)
- 3.0mm crochet hook
- 6mm or 8mm black safety eyes
- Polyester fiberfill for stuffing
- Tapestry needle
- Stitch markers
- Small jingle bell (for hat)
- Embroidery floss in Red (for mouth)
- Pink blush (optional, for cheeks)
Abbreviations
- MR: Magic Ring
- sc: single crochet
- inc: increase (2 sc in next stitch)
- dec: decrease (sc 2 together)
- sl st: slip stitch
- ch: chain
- FO: Fasten off
- BLO: Back Loop Only
- FLO: Front Loop Only
- CC: Change Color
Instructions
General Notes: Work in continuous rounds unless otherwise specified. Use a stitch marker to mark the beginning of each round. Stuff firmly as you go.
HEAD (Light Peach Yarn)
- R1: 6 sc in MR (6)
- R2: (inc) x6 (12)
- R3: (sc, inc) x6 (18)
- R4: (2 sc, inc) x6 (24)
- R5: (3 sc, inc) x6 (30)
- R6: (4 sc, inc) x6 (36)
- R7-R13: sc around (36) (7 rounds)
- Place safety eyes between R10 and R11, about 6-7 stitches apart.
- R14: (4 sc, dec) x6 (30)
- R15: (3 sc, dec) x6 (24)
- R16: (2 sc, dec) x6 (18)
- Stuff head firmly.
- R17: (sc, dec) x6 (12)
- FO, leaving a long tail for sewing.
LEGS (Make 2)
Leg 1 (Green Side)
- Start with Black Yarn:
- R1: 6 sc in MR (6)
- R2: (inc) x6 (12)
- R3: sc around in BLO (12)
- CC to White Yarn:
- R4: sc around (12)
- CC to Green Yarn:
- R5-R10: sc around (12) (6 rounds)
- FO, leaving a long tail for sewing for the first leg only. Do not cut yarn for the second leg.
Leg 2 (Red Side)
- Follow Leg 1 instructions, but CC to Red Yarn for R5-R10.
- Do not FO. Continue to Body.
BODY (Green and Red Yarn)
- R11: (Still on Leg 2) Ch 3, join to R10 of Leg 1 with sc. Sc 12 around Leg 1, sc 3 along one side of ch, sc 12 around Leg 2, sc 3 along other side of ch (30)
- From this point, you will work half the stitches in Green and half in Red, changing color precisely at the center front and center back. Ensure the Green section aligns with Leg 1 and Red with Leg 2.
- R12-R18: (15 sc in Green, 15 sc in Red) x1 (30) (7 rounds)
- Stuff legs and body as you go.
- R19: (3 sc, dec) x2 in Green, (3 sc, dec) x2 in Red, (3 sc, dec) in Green, (3 sc, dec) in Red (24)
- R20: (2 sc, dec) x2 in Green, (2 sc, dec) x2 in Red, (2 sc, dec) in Green, (2 sc, dec) in Red (18)
- R21: (sc, dec) x3 in Green, (sc, dec) x3 in Red (12)
- FO, leaving a long tail for sewing to the head.
ARMS (Make 2)
Arm 1 (Red Side)
- Start with White Yarn:
- R1: 5 sc in MR (5)
- R2: (inc) x5 (10)
- R3: sc around (10)
- CC to Red Yarn:
- R4: sc around in BLO (10)
- R5-R10: sc around (10) (6 rounds)
- Stuff lightly. Flatten opening and sc across to close. FO, leaving a long tail for sewing.
Arm 2 (Green Side)
- Follow Arm 1 instructions, but CC to Green Yarn for R4-R10.
- Stuff lightly. Flatten opening and sc across to close. FO, leaving a long tail for sewing.
HAT
Point 1 (Red Yarn)
- R1: 4 sc in MR (4)
- R2: (sc, inc) x2 (6)
- R3: sc around (6)
- R4: (2 sc, inc) x2 (8)
- R5: sc around (8)
- R6: (3 sc, inc) x2 (10)
- R7-R8: sc around (10)
- Stuff lightly. Add small jingle bell to tip. FO.
Point 2 (Green Yarn)
- R1-R8: Follow instructions for Point 1.
- Stuff lightly. Attach a small white pom-pom to the tip. Do not FO, continue to Hat Base.
Hat Base (White Yarn, then Red/Green)
- Attach White Yarn to the base of Point 1 with a sl st. Ch 1, sc 10 around Point 1. Ch 1, sc 10 around Point 2. (22)
- R1: sc around (22) (Join with sl st, ch 1)
- R2: sc around (22) (Join with sl st, ch 1)
- CC to Red and Green Yarn: You will now work half the stitches in Red and half in Green, similar to the body, ensuring the red point aligns with the red section and green point with green.
- R3: (sc, inc) x5 in Red, (sc, inc) x5 in Green (30)
- R4: (2 sc, inc) x5 in Red, (2 sc, inc) x5 in Green (40)
- R5-R6: (20 sc in Red, 20 sc in Green) x1 (40)
- FO, leaving a long tail for sewing.
HAIR (Light Blonde Yarn)
Hair Cap
- R1: 6 sc in MR (6)
- R2: (inc) x6 (12)
- R3: (sc, inc) x6 (18)
- R4: (2 sc, inc) x6 (24)
- R5: (3 sc, inc) x6 (30)
- R6: (4 sc, inc) x6 (36)
- R7-R9: sc around (36)
- FO, leaving a long tail for sewing.
Pigtails (Make 2)
- Attach Light Blonde yarn to the side of the hair cap, about R7.
- Ch 15, starting from 2nd ch from hook, sc in each ch back to cap (14 sc). Sl st into cap.
- Repeat creating strands until you have a full pigtail (approx. 8-10 strands per pigtail).
- Repeat for the second pigtail on the opposite side.
COLLAR (White Yarn)
- Ch 20. Sl st to first ch to form a ring.
- R1: Ch 2 (does not count as st), dc in each ch around (20 dc). Join with sl st.
- R2: Ch 1, (sc, ch 2, sc) in each dc around (20 ruffles). Join with sl st.
- FO, leaving a long tail for sewing.
MASK (Black Yarn)
- Ch 10.
- R1: Sc in 2nd ch from hook, sc 7, 3 sc in last ch. Continue on other side of ch: sc 8. (18)
- R2: Sc, ch 2, skip 2 sts (eye hole), sc 6, ch 2, skip 2 sts (eye hole), sc 5. (12 sc, 2 ch-2 spaces)
- R3: Sc in each st and ch around. (18)
- FO, leaving a long tail for sewing. Adjust eye holes as needed for safety eyes.
ASSEMBLY
- Sew the head to the body.
- Sew the arms to the sides of the body.
- Sew the hair cap onto the head, positioning the pigtails on either side.
- Place the hat on top of the head and sew securely.
- Sew the ruffled collar around the neck.
- Sew the black mask onto the face, carefully positioning it over the safety eyes.
- Embroider a small red smile below the mask.
- Optionally, add a touch of pink blush to the cheeks.
- Weave in all remaining ends.