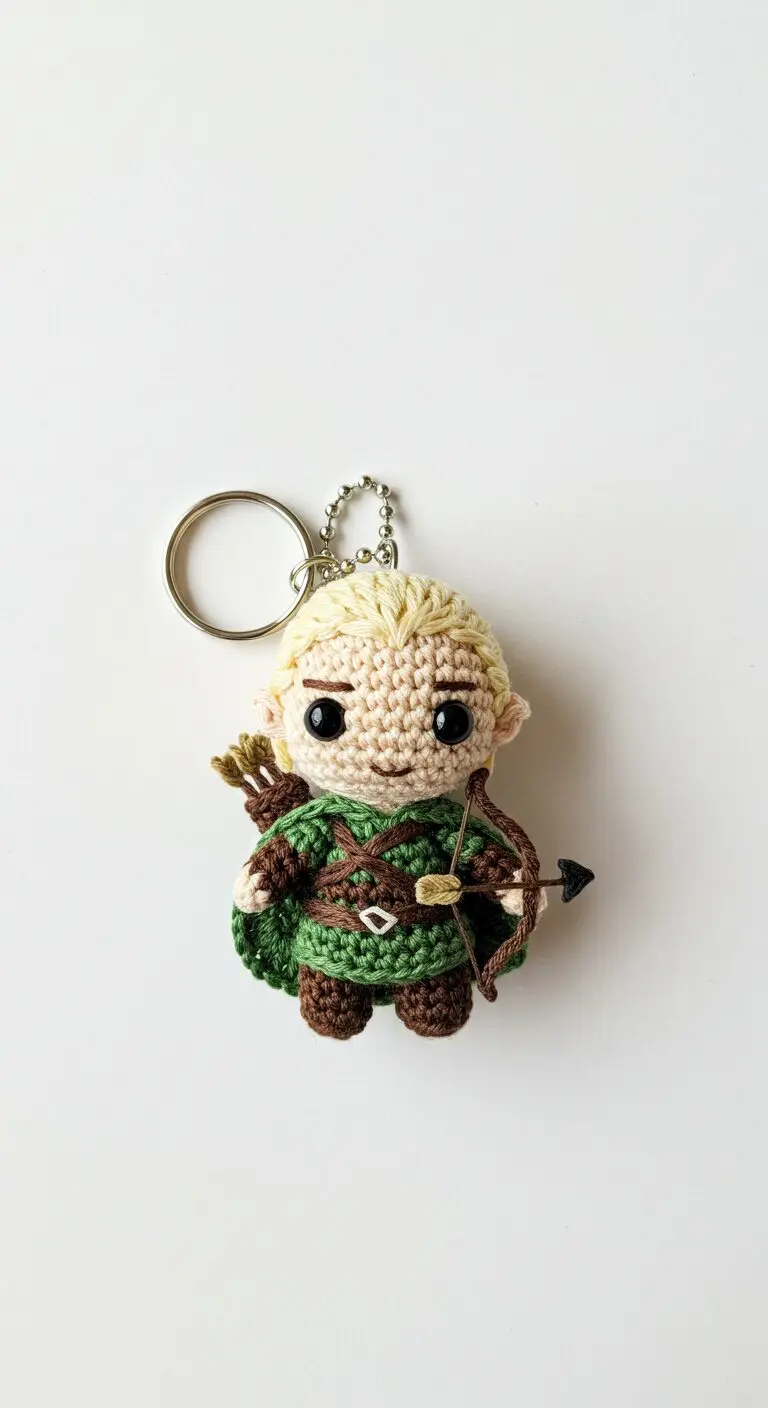
Discover the enchanting world of handmade crafts with this delightful crochet keychain. This intricately designed amigurumi figure, resembling a skilled elf archer, adds a touch of fantasy to your everyday essentials. It’s not just an accessory; it’s a miniature work of art that can personalize your keys, bag, or backpack. The detailed craftsmanship makes this crochet keychain a truly unique item, perfect for fans of fantasy tales.
Handcrafted Amigurumi Crochet Keychain for Fantasy Lovers
This particular amigurumi crochet keychain captures the essence of a heroic archer, complete with a tiny bow and arrow, and blonde hair, reminiscent of popular fantasy characters. Handcrafted with care, each stitch contributes to the endearing personality of this miniature figure, showcasing the artistry of crochet. Such a charming crochet keychain makes an excellent gift for fantasy enthusiasts, cosplayers, or anyone who appreciates the unique charm of handmade items. It serves as a constant whimsical companion, bringing joy and a touch of adventure to its owner.
Here is a detailed crochet pattern to create an amigurumi elf archer keychain, inspired by the image provided.

---

**Amigurumi Elf Archer Keychain Pattern**

This pattern will guide you through creating a charming elf archer, perfect as a keychain. It's designed for an intermediate crocheter familiar with amigurumi techniques.

**Finished Size:** Approximately 4-5 inches tall (excluding keychain ring), depending on yarn and hook size.

**Materials:**

*   **Yarn:** Worsted weight (or DK for a smaller toy) acrylic yarn in the following colors:
    *   Skin Color (e.g., Light Peach/Beige)
    *   Blonde (for hair)
    *   Forest Green (main tunic color)
    *   Dark Green (for belt details or darker tunic shade if desired)
    *   Dark Brown (for boots, straps, bow, quiver, arrows)
    *   Light Brown/Tan (for arrow fletching)
    *   Small amount of White (for buckle, or a tiny white bead)
*   **Crochet Hook:** 2.5mm or 3.0mm (adjust to your yarn choice to ensure tight stitches)
*   **Safety Eyes:** 8mm black safety eyes
*   **Stuffing:** Polyester fiberfill
*   **Tapestry Needle:** For sewing parts and weaving in ends
*   **Stitch Markers:** Essential for working in continuous rounds
*   **Scissors**
*   **Keychain Ring & Chain:** Metal keychain ring with a short chain (ball chain or link chain)
*   **Optional:** Black embroidery floss for mouth, white embroidery floss or fabric paint for eye highlights.

**Abbreviations (US Terms):**

*   **MR:** Magic Ring
*   **ch:** Chain
*   **sc:** Single Crochet
*   **inc:** Increase (2 sc in one stitch)
*   **dec:** Decrease (sc 2 stitches together)
*   **sl st:** Slip Stitch
*   **FO:** Fasten Off
*   **( ) x N:** Repeat instructions in parentheses N times
*   **[ ]:** Total number of stitches at the end of the round/row

---

**Pattern Instructions**

Work in continuous rounds unless otherwise specified. Use a stitch marker to mark the beginning of each round.

---

**Head (Skin Color)**

1.  MR, 6 sc [6]
2.  inc x 6 [12]
3.  (sc, inc) x 6 [18]
4.  (2 sc, inc) x 6 [24]
5.  (3 sc, inc) x 6 [30]
6.  (4 sc, inc) x 6 [36]
7.  (5 sc, inc) x 6 [42]
8.  sc around [42]
9.  sc around [42]
10. sc around [42]
11. sc around [42]
12. sc around [42]
13. sc around [42]
    *   *Insert safety eyes between R11 and R12, approximately 8-9 stitches apart. You can adjust placement later with the hair on.*
14. (5 sc, dec) x 6 [36]
15. (4 sc, dec) x 6 [30]
    *   Start stuffing the head firmly, shaping as you go.
16. (3 sc, dec) x 6 [24]
17. (2 sc, dec) x 6 [18]
18. (sc, dec) x 6 [12]
19. dec x 6 [6]
    *   FO, leave a long tail for sewing. Finish stuffing and close the hole.

---

**Ears (x2, Skin Color)**

1.  MR, 4 sc [4]
2.  (sc, inc) x 2 [6]
3.  sc around [6]
    *   Sl st, FO, leave a long tail for sewing. Do not stuff. Pinch the base to give it a slight fold.
    *   *Sew the ears to the sides of the head, above the eyes, around R11-13.*

---

**Hair Cap (Blonde)**

1.  MR, 6 sc [6]
2.  inc x 6 [12]
3.  (sc, inc) x 6 [18]
4.  (2 sc, inc) x 6 [24]
5.  (3 sc, inc) x 6 [30]
6.  (4 sc, inc) x 6 [36]
7.  (5 sc, inc) x 6 [42]
8.  sc around [42]
9.  sc around [42]
    *   Sl st, FO, leave a long tail for sewing.
    *   *Place the hair cap on the head, aligning the front edge slightly above the eyes. Pin in place.*

**Hair Fringe/Sideburns (Blonde)**
*   After the hair cap is sewn onto the head, you can add strands.
*   **Fringe (optional, or rely on the cap texture):** With the hair cap on, use a tapestry needle and blonde yarn to create small horizontal stitches on the front edge of the cap to mimic bangs.
*   **Sideburns (x2):** Attach blonde yarn just below the edge of the hair cap on each side, near the ears. Ch 3, sl st into the 2nd ch from hook, sl st into the next ch, sl st back into the original stitch where you attached the yarn. FO, weave in ends.

---

**Body (Forest Green)**

1.  MR, 6 sc [6]
2.  inc x 6 [12]
3.  (sc, inc) x 6 [18]
4.  (2 sc, inc) x 6 [24]
5.  (3 sc, inc) x 6 [30]
6.  (4 sc, inc) x 6 [36]
7.  sc around [36]
8.  sc around [36]
9.  (4 sc, dec) x 6 [30]
10. sc around [30]
11. (3 sc, dec) x 6 [24]
12. sc around [24]
13. (2 sc, dec) x 6 [18]
14. sc around [18]
15. (sc, dec) x 6 [12]
    *   Start stuffing the body. Continue stuffing as you go.
16. sc around [12]
    *   FO, leave a long tail for sewing. Finish stuffing.

---

**Arms (x2)**

Start with Skin Color:
1.  MR, 5 sc [5]
2.  sc around [5]
    *   Change to Forest Green.
3.  sc around [5]
4.  sc around [5]
5.  sc around [5]
6.  sc around [5]
7.  sc around [5]
    *   Sl st, FO, leave a long tail for sewing. Lightly stuff the end of the arm.
    *   *Sew arms to the sides of the body, just below the neck opening, around R14 of the body.*

---

**Legs (x2)**

Start with Dark Brown (for boots):
1.  MR, 6 sc [6]
2.  inc x 6 [12]
3.  sc around [12] (work in back loops only for this round, then normally)
4.  sc around [12]
5.  sc around [12]
    *   Change to Forest Green.
6.  sc around [12]
7.  sc around [12]
8.  sc around [12]
    *   Sl st, FO, leave a long tail for sewing. Lightly stuff the legs.
    *   *Sew the legs to the bottom of the body, centered, close together.*

---

**Accessories & Details**

**1. Belts/Straps (Dark Brown)**
*   Chain a length of dark brown yarn for the main criss-cross straps (approx. ch 25-30, depending on tension and desired fit). Do not cut yet.
*   Drape the chain across the front of the body, crossing at the chest.
*   **Buckle:**
    *   With white yarn (or a small white bead), ch 3. Sc in 2nd ch from hook, sc in next ch [2]. Ch 1, turn.
    *   Sc in each st across [2]. Ch 1, turn.
    *   Repeat the last row 1-2 more times to form a small rectangle.
    *   FO, leave a tail. Sew this buckle to the center of the criss-cross straps on the chest.
*   Once the buckle is sewn, adjust the chains and sew the ends securely to the sides and back of the body to form the criss-cross.
*   Create another chain (approx. ch 15-20) for the quiver strap. Sew one end to the right shoulder area (character's right), wrap it around to the back, and sew the other end to the back near the waist, ready for the quiver.

**2. Quiver (Dark Brown)**
1.  MR, 6 sc [6]
2.  sc around [6]
3.  sc around [6]
4.  sc around [6]
5.  sc around [6]
    *   Sl st, FO, leave a short tail. Do not stuff.
    *   *Sew the quiver to the back of the body, underneath the quiver strap you just made, so it looks like it's hanging from it.*

**3. Arrows (x3-4)**
*   **Arrow Shaft:** Take a length of dark brown yarn (approx. 4-5 inches).
*   **Fletching:** Take a small piece of light brown/tan yarn, knot it around one end of the dark brown yarn. Trim it short to resemble feathers.
*   **Arrowhead (optional):** You can use a tiny piece of black felt or yarn to create a small arrowhead shape and glue it to the other end. For simplicity, the image shows a black tip. A small knot or a few stitches with black yarn at the tip can also work.
*   *Insert 2-3 arrows into the quiver.*

**4. Bow (Dark Brown)**
*   Take a longer piece of dark brown yarn (approx. 6-8 inches).
*   Carefully shape it into a gentle curve. Use a tapestry needle to stitch the ends securely to the character's right hand (our left).
*   **Bow String:** Take a very thin piece of dark brown yarn (or embroidery floss). Tie one end to the top tip of the bow, bring it down to the bottom tip, and tie it securely. Trim ends.

---

**Assembly & Finishing**

1.  **Sew Head to Body:** Carefully align the head onto the body opening and sew securely all around.
2.  **Facial Details:**
    *   Embroider eyebrows above the safety eyes using dark brown yarn or embroidery floss.
    *   Embroider a small smile below the eyes using black embroidery floss.
    *   Optional: Use a tiny dot of white fabric paint or white embroidery floss to add a sparkle highlight to each safety eye.
3.  **Secure Hair Cap:** Stitch the hair cap securely onto the head, shaping it around the face.
4.  **Finalize Straps:** Ensure all straps are securely sewn down.
5.  **Keychain Attachment:** Using the tapestry needle, thread the metal chain from the keychain ring through the very top center of the head. Secure the keychain ring.

---

**Congratulations!** Your Amigurumi Elf Archer Keychain is complete! Enjoy your miniature hero.