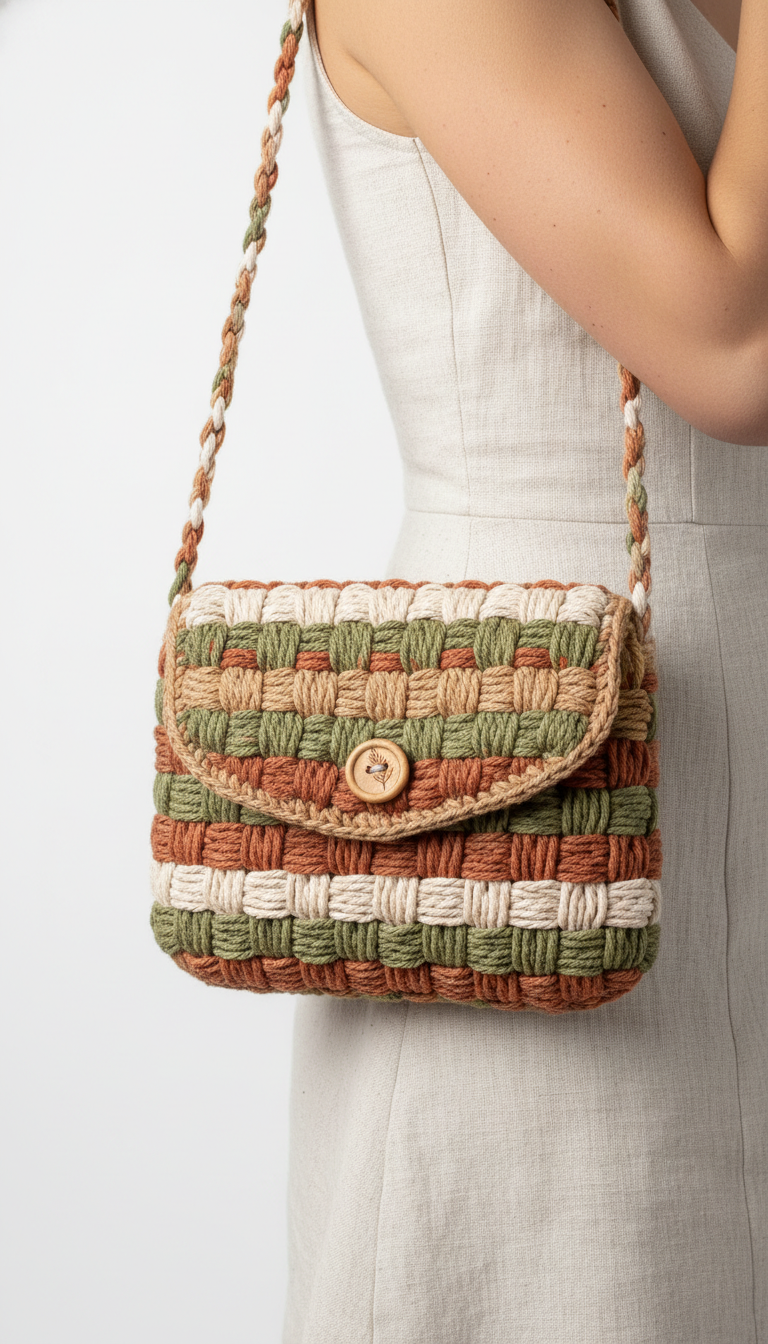
Step into sustainable style with our Earth Tone Weave Crossbody Bag! This charming crochet project features a captivating checkerboard pattern, blending rustic terracotta, fresh olive green, and creamy beige yarns into a unique textured accessory. Perfect for adding a touch of handmade elegance to your everyday ensemble, this bag is as practical as it is beautiful.
Craft a Unique and Stylish Everyday Accessory
This crossbody bag isn’t just a pattern; it’s an opportunity to create a statement piece that reflects your personal style. Its compact size is ideal for carrying essentials, while the rich, earthy color palette and distinctive woven texture make it a versatile addition to any wardrobe. Enjoy the therapeutic process of crochet as you bring this beautiful and functional piece to life.
Crochet Pattern: Earth Tone Weave Crossbody Bag
Materials
- Worsted weight cotton yarn, Color A (Terracotta): approx 100g
- Worsted weight cotton yarn, Color B (Olive Green): approx 100g
- Worsted weight cotton yarn, Color C (Cream): approx 100g
- Worsted weight cotton yarn, Color D (Light Tan): approx 50g
- Crochet Hook: 4.5mm (G/7)
- Wooden button: approx 1 inch diameter
- Tapestry needle
- Scissors
Abbreviations
- ch: chain
- st(s): stitch(es)
- sl st: slip stitch
- sc: single crochet
- Bo: Bobble Stitch (Special Stitch, see below)
- RS: Right Side
- WS: Wrong Side
- FO: fasten off
- rep: repeat
- sk: skip
Instructions
Special Stitch: Bobble Stitch (Bo): YO, insert hook into st, YO, pull up loop, YO, pull through 2 loops (2 loops on hook). [YO, insert hook into same st, YO, pull up loop, YO, pull through 2 loops] 3 more times (5 loops on hook). YO, pull through all 5 loops on hook.
Gauge: 16 sc and 18 rows = 4 inches (adjust hook size if necessary).
Note on Color Changes: When working Bobble Stitch rows, you will be changing colors frequently. To achieve clean color blocks, carry the unused yarn loosely behind your work for short segments (up to 3 Bobble stitches of a different color), or cut the yarn and rejoin when needed. For this pattern, cutting and rejoining for each 3-stitch block is recommended for the neatest finish, weaving in ends as you go.
Bag Front Panel (Make 1)
Using Color D (Light Tan), ch 24.
Row 1 (RS – Setup): Sc in 2nd ch from hook and in each ch across. (23 sc). Ch 1, turn.
Row 2 (WS – Setup): Sc in each st across. (23 sc). Ch 1, turn. (This row provides a base for the bobbles to pop on the RS).
Bobble Pattern Rows (Work 10 Bobble Rows total for Front Panel):
- Bobble Row 1 (RS): With Color A (Terracotta), Bo in first 3 sts. Join Color B (Olive Green), Bo in next 3 sts. Join Color C (Cream), Bo in next 3 sts. Rep sequence (3 Bo in Color A, 3 Bo in Color B, 3 Bo in Color C) two more times. Finish the row with 3 Bo in Color A. (Total 21 Bo sts in 7 blocks). Ch 1, turn.
- Row 4 (WS): Using Color A, sc in each Bo st across. (21 sc). Ch 1, turn.
- Bobble Row 2 (RS): With Color B (Olive Green), Bo in first 3 sts. Join Color C (Cream), Bo in next 3 sts. Join Color A (Terracotta), Bo in next 3 sts. Rep sequence (3 Bo in Color B, 3 Bo in Color C, 3 Bo in Color A) two more times. Finish the row with 3 Bo in Color B. (Total 21 Bo sts in 7 blocks). Ch 1, turn.
- Row 6 (WS): Using Color B, sc in each Bo st across. (21 sc). Ch 1, turn.
- Bobble Row 3 (RS): With Color C (Cream), Bo in first 3 sts. Join Color A (Terracotta), Bo in next 3 sts. Join Color B (Olive Green), Bo in next 3 sts. Rep sequence (3 Bo in Color C, 3 Bo in Color A, 3 Bo in Color B) two more times. Finish the row with 3 Bo in Color C. (Total 21 Bo sts in 7 blocks). Ch 1, turn.
- Row 8 (WS): Using Color C, sc in each Bo st across. (21 sc). Ch 1, turn.
Repeat Bobble Rows 1-3 and their subsequent SC rows (Rows 3-8) for a total of 10 Bobble Rows (ending with Bobble Row 1 after a full repeat of 3 Bobble Rows). You will have a total of 22 rows including setup. FO.
Bag Back Panel & Flap (Make 1)
Work exactly as the Front Panel for the first 10 Bobble Rows. After completing the 10th Bobble Row and its corresponding SC row (total 22 rows), continue with the flap:
Flap Bobble Pattern Rows (Work 5 Bobble Rows total for Flap):
- Continue the Bobble Row sequence (A, B, C shifts) for 5 more Bobble Rows (10 rows total including sc rows). This will bring your total Bobble Rows to 15 (32 rows total).
- Shaping the Flap (Decreases): After completing all 15 Bobble Rows, continue with Color D (Light Tan).
- Row 1 (RS): Sc in first st, Bo in next 3 sts, [sk 1 st, Bo in next 3 sts] rep to last 2 sts, Bo in last st, sc in last st. Ch 1, turn. (This will reduce the width slightly, creating a slight curve).
- Row 2 (WS): Sc in each st across. Ch 1, turn.
- Repeat these two rows 2 more times, decreasing the number of Bobble blocks gradually to achieve the curved flap seen in the image. You may need to adjust by doing a single decrease at each end of the Bobble Rows, working into Bo sts and their closing chains.
- Alternatively for a simpler curve: After all 15 Bobble Rows, work 3 rows of sc with Color D, decreasing 1 sc at each end of the row. Then, work a final row of sc, decreasing more dramatically at the corners to create the rounded look.
FO, leaving a long tail for seaming.
Side & Bottom Gusset Panel (Make 1)
Using Color D (Light Tan), ch 9 (for approx 2-inch depth).
Row 1: Sc in 2nd ch from hook and in each ch across. (8 sc). Ch 1, turn.
Row 2: Sc in each st across. (8 sc). Ch 1, turn.
Repeat Row 2 until the panel is long enough to go around three sides of the bag (approximately the length of the Front Panel + twice the depth). For a bag with 10 Bobble Rows height (approx 10 inches) and 2 inch depth, the length would be roughly 10 + 2 + 10 = 22 inches. FO, leaving a long tail for seaming.
Assembly
- Attach Gusset: With tapestry needle and long tail from gusset, sew the gusset panel to the three sides (bottom and two sides) of the Bag Front Panel, using whipstitch or preferred seaming method.
- Attach Back Panel: Align the Bag Back Panel (the longer piece with the flap) with the gusset and sew it to the remaining edge of the gusset. Ensure the bobble pattern aligns neatly.
- Edging: With Color D, sc around the entire opening of the bag and the flap edge for a neat finish. Create a small loop (ch 10-15 and sl st back into starting point) under the flap for the button closure, securing it firmly.
- Strap: Cut 4 strands of each main color yarn (Color A, B, C, D) to your desired strap length (e.g., 60 inches each). Gather all 16 strands, knot one end, and braid them together. Secure the other end with a knot. Attach the braided strap securely to the side seams of the bag using a tapestry needle.
- Button: Sew the wooden button onto the front of the bag, aligning it with the button loop on the flap.
Weave in any remaining loose ends. Enjoy your new Earth Tone Weave Crossbody Bag!