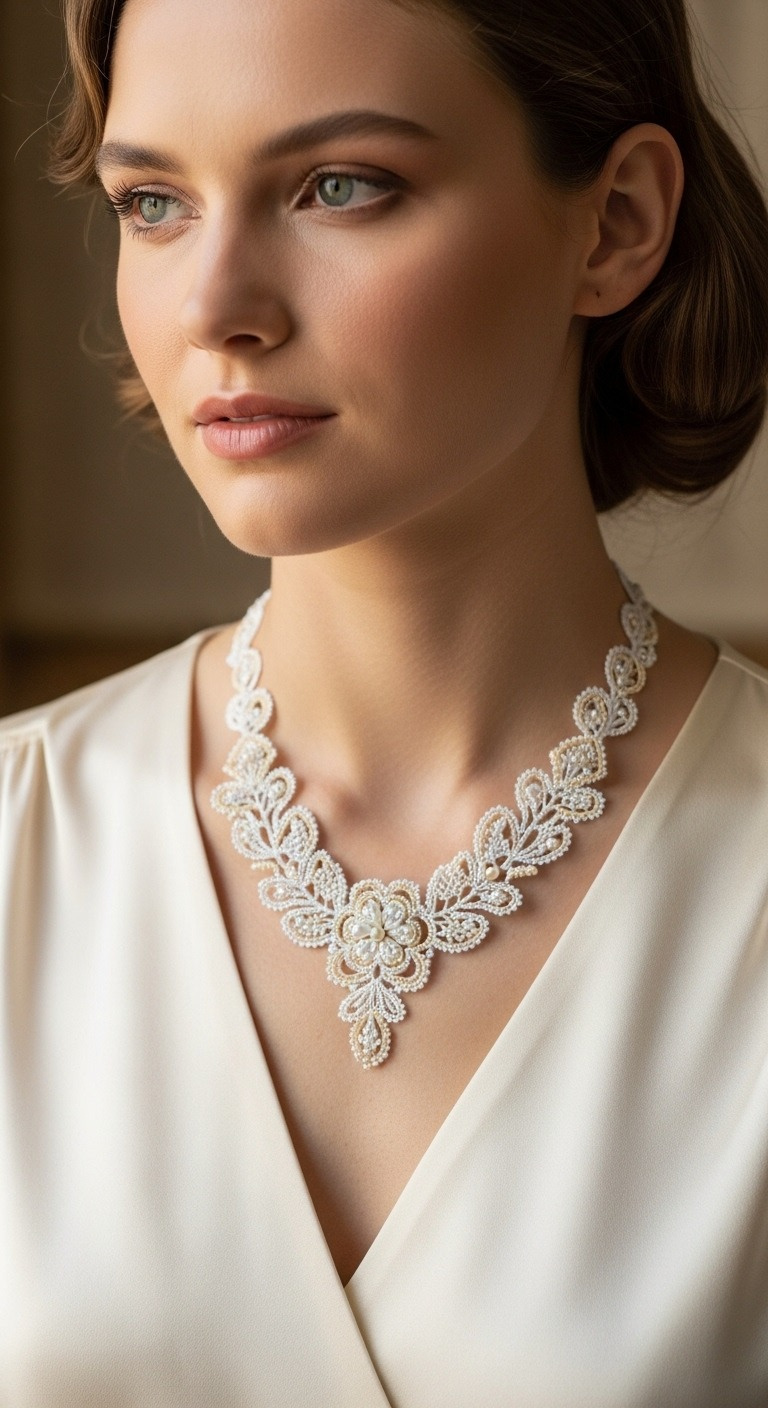
Adorn your neckline with timeless grace! This exquisite Beaded Crochet Lace Choker Necklace pattern allows you to craft a stunning, intricate piece perfect for weddings, special occasions, or adding a touch of vintage elegance to your everyday wear. Its delicate design and shimmering beads will make you feel truly radiant.
Crafting Timeless Elegance: Your Own Beaded Lace Choker
There’s immense satisfaction in creating a beautiful piece of jewelry with your own hands. This pattern guides you through the process of crocheting a unique, heirloom-quality necklace that embodies sophistication. Imagine the compliments you’ll receive, knowing you poured your creativity into this wearable work of art and created a truly unique statement piece.
Crochet Pattern: Elegant Beaded Crochet Lace Choker Necklace Pattern
Materials
- Crochet Thread: Size 80 or 100, in Cream or Off-White (approx. 200-300 yards)
- Crochet Hook: Steel hook 0.6mm or 0.75mm (appropriate for chosen thread size)
- Seed Beads: Miyuki 15/0 or 11/0, Cream/Pearl White (approx. 800-1000 beads)
- Seed Beads: Miyuki 15/0 or 11/0, Pale Gold/Champagne (approx. 200-300 beads for accents)
- Pearl Beads: One 4mm pearl (center), six 3mm pearls (surrounding center), twelve 2mm pearls (for accents on leaves)
- Beading Needle (for pre-stringing beads)
- Jewelry Clasp: Small lobster clasp and jump ring, or a decorative button clasp
- Thread snips
- Fabric Stiffener (optional, for shaping and durability)
Abbreviations
- Ch: Chain
- Sc: Single Crochet
- Sl St: Slip Stitch
- Picot: (Ch 3, sl st into first ch)
- BPS: Beaded Picot Stitch (Ch 2, slide 1 pre-strung seed bead close to hook, ch 1, sl st into first ch of BPS)
- AB: Add Bead (slide 1 pre-strung seed bead close to hook before working the next stitch)
Instructions
Important Note: Before starting, you must pre-string ALL your seed beads and small pearl beads onto your working thread. It is advisable to string them in approximate order of use, or string a large quantity of each color/size.
Central Floral Medallion (Make 1)
- Base Ring: Ch 4, sl st to first ch to form a ring.
- Round 1 (Securing Main Pearl): Ch 1, work 6 sc into the ring. Insert the 4mm pearl into the center; work 2-3 sl sts through the center of the sc ring and around the pearl to secure it tightly.
- Round 2 (Petal Bases): *Ch 4, sl st into next sc* repeat 6 times. (6 ch-4 loops)
- Round 3 (Inner Petals with 3mm Pearls): For each ch-4 loop, work (1 sc, AB, attach 1 x 3mm pearl with a sl st, AB, 1 sc, BPS). Sl st into the base of the next ch-4 loop to begin the next petal. Repeat for all 6 loops. This creates 6 beaded petals with a 3mm pearl at their base, radiating from the center.
- Round 4 (Outer Edging/Attachment Points): Ch 1, *Work 2 sc into the tip of a BPS from the previous round, Ch 5, work 2 sc into the next BPS tip.* Repeat around, joining with a sl st to the first sc. (This creates 6 attachment points for the larger side motifs).
Symmetrical Side Motifs (Left & Right – Work Continuously from Central Medallion)
You will now work two large, intricate ‘wing’ sections, one on each side, extending from the central medallion. These sections are mirror images of each other. Use the ch-5 loops from Round 4 of the Central Floral Medallion as starting points.
First Side Motif (e.g., Right Side)
- Initiating the First Leaf: From one of the ch-5 attachment loops (e.g., the rightmost one for the right motif), Ch 8.
- First Branch: Working back along the Ch 8: (Sl st into 2nd ch from hook, sc into next ch, BPS with cream bead, 2 sc, BPS with pale gold bead, 2 sc, BPS with cream bead, sl st into last ch). Sl st into the same ch-5 attachment loop on the Central Medallion to secure.
- Building a New Branching Point: Ch 6. Skip 1 BPS from the previous branch, sl st into the next BPS (pale gold). Ch 6.
- Second Leaf Cluster: Working into the second Ch 6: (Sl st, sc, BPS with cream bead, 3 sc, BPS with 2mm pearl, 3 sc, BPS with cream bead, sc, sl st). Sl st into the previous ch-6 loop to connect.
- Continuing Intricate Design: From here, continue to build outwards, always creating new chain loops and working into them with a combination of sc, sl st, and BPS.
- Key techniques: Create ch-3 to ch-7 loops. Work into these loops with various combinations of sc, sl st, and BPS.
- Shaping: Vary chain lengths and stitch counts to create curves and ‘leaf’ shapes. Use BPS (Beaded Picot Stitches) along the outer edges of these shapes to create the delicate, beaded lace look.
- Bead Placement: Integrate 2mm pearl beads at prominent ‘tips’ or ‘junctions’ of larger leaf components. Use pale gold seed beads for accent BPS stitches, especially near the center or at points where a ‘branch’ forks.
- Symmetry: Keep a mental note of the desired overall shape and replicate it on the opposite side to maintain symmetry. The design should gently widen and then taper.
- Repeat until desired length for the front of the necklace is achieved (before the simpler back strap begins). The image suggests roughly 3-4 main ‘leaf’ clusters extending out on each side from the central medallion.
Second Side Motif (Left Side)
- Work identically to the First Side Motif, but in mirror image, starting from the corresponding ch-5 attachment loop on the opposite side of the Central Medallion. Ensure it mirrors the first side in shape and bead placement.
Neckline Band and Finishing
Once both left and right side motifs are completed, you will connect them with a simpler band to form the back of the necklace.
- Connecting Arch: From the outermost point of one side motif, Ch 15-20 (adjust based on desired length and neck size). Sl st to the outermost point of the other side motif. This creates a foundational bridge.
- Reinforcing the Band: Sl st along this Ch 15-20 bridge to create a sturdier band.
- Back Strap Extension: From one end of the reinforced band, Ch 50-70 (adjust for desired necklace length around the back of the neck). Work sc or sl st back along this chain to reinforce it.
- Clasp Loop: At the end of the extended back strap, Ch 10, sl st into the 5th ch from the hook to create a secure loop for your clasp. Fasten off.
- Attaching Clasp: On the other end of the back strap (where it joins the side motif), attach your chosen lobster clasp or button.
- Weave in all ends meticulously. Trim excess thread closely.
- Stiffening (Optional): Gently block the entire necklace to shape. If desired, apply fabric stiffener (following product instructions) to help maintain the intricate lace shape and provide durability. Allow to dry completely.