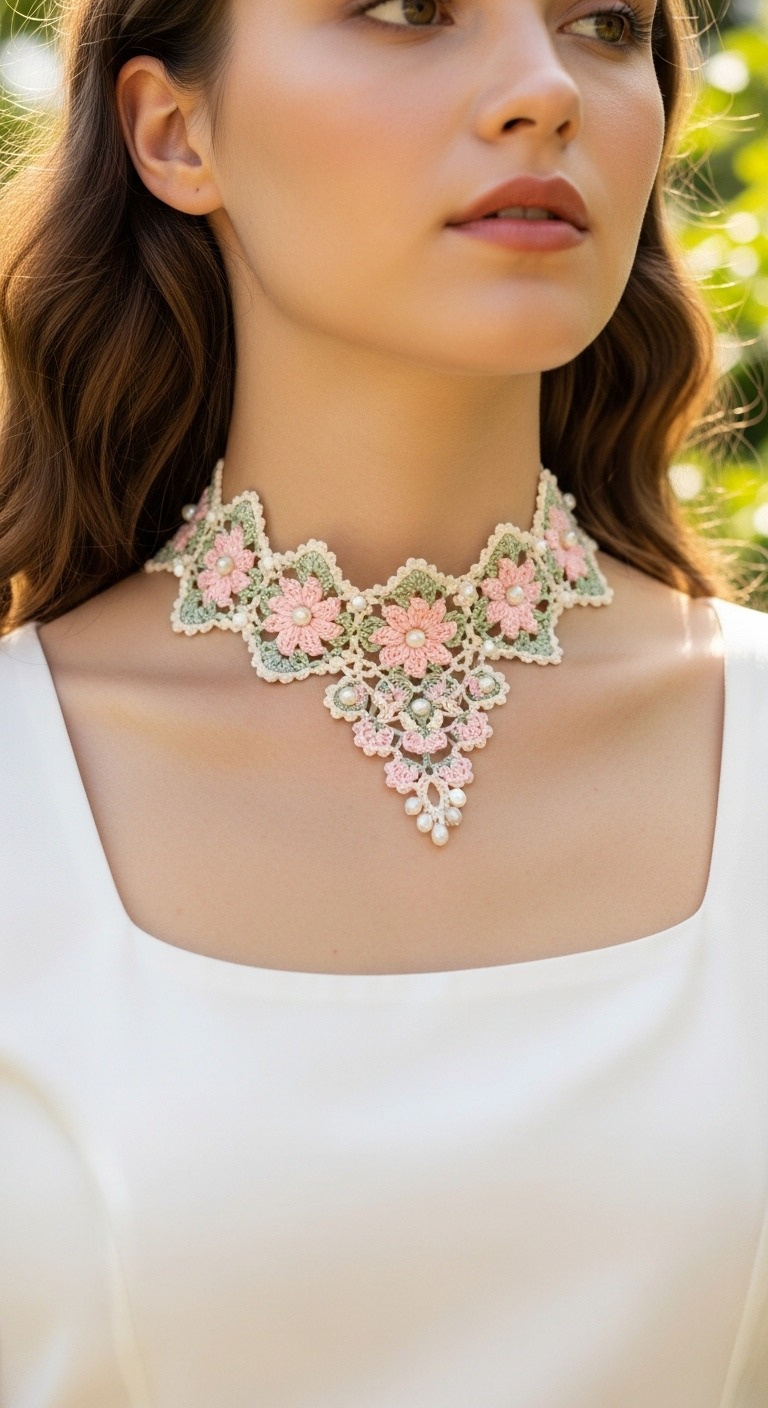
Adorn your neckline with this exquisite crochet lace floral choker, a stunning accessory perfect for special occasions or adding a touch of vintage charm to your everyday look. Featuring delicate pink flowers, sage green leaves, and lustrous pearl embellishments, this pattern guides you through creating your own unique and elegant piece of wearable art.
Craft Your Own Timeless Accessory
There’s a special joy in creating something beautiful with your own hands. This pattern offers the opportunity to craft a truly unique and sophisticated choker. The intricate lace, soft floral hues, and shimmering pearls combine to form a piece that is both delicate and eye-catching. Personalize it further by choosing your favorite color palette to match your style.
Crochet Pattern: Elegant Crochet Lace Floral Choker with Pearls – Free Pattern
Materials
- Crochet thread size 10 (approx. 50g each of Cream, Light Pink, Sage Green)
- Steel crochet hook 1.75mm
- Small pearls (approx. 3-4mm for flower centers, 5-6mm for drops)
- Sewing needle
- Matching sewing thread
- Small lobster clasp and jump ring (or button)
Abbreviations
- Ch: Chain
- Sl st: Slip stitch
- Sc: Single crochet
- Hdc: Half double crochet
- Dc: Double crochet
- Tr: Treble crochet
- Picot: Ch 3, sl st into first ch
- St(s): Stitch(es)
- FO: Fasten off
Instructions
This pattern creates a delicate lace choker with a central V-point and repeating floral-leaf segments. The instructions focus on creating the individual motifs and a base lace structure, then assembling them.
- <strong>Part 1: Individual Motifs</strong>
<strong>Pink Flower Motif (Make 5-7, depending on desired choker length):</strong>
- Using Light Pink Yarn:
- Ch 4, join with sl st to first ch to form a ring.
- Round 1: Ch 1, 10 sc in ring, join with sl st to first sc. (10 sc)
- Round 2 (Petals): *Ch 3, 2 dc in same st, ch 3, sl st into next st.* Repeat from * to * 5 times. You will have 5 petals. Sl st to join.
- FO, weave in ends. Set aside.
<strong>Green Leaf Motif (Make 10-14, two for each flower segment):</strong>
- Using Sage Green Yarn:
- Ch 8.
- Row 1: Sc in 2nd ch from hook, hdc in next ch, dc in next 3 ch, hdc in next ch, sc in last ch. (7 sts). Ch 1, turn.
- Row 2: Sc in first st, hdc in next, dc in next 3 st, hdc in next, sc in last st. (7 sts).
- FO, weave in ends. Set aside.
- <strong>Part 2: Cream Lace Main Body</strong>
The choker is created by making a central V-point, then adding repeating scalloped segments to either side. Adjust the number of repeating segments to fit your neck circumference.
<strong>Central V-Point (Cream Yarn):</strong>
- Ch 6, join with sl st to first ch to form a ring.
- Round 1: Ch 3 (counts as 1st dc), 15 dc in ring, join with sl st to top of ch 3. (16 dc)
- Round 2: Ch 1, sc in first dc, *ch 5, skip 3 dc, sc in next dc*. Repeat from * to * 3 more times. (4 ch-5 loops). Sl st to first sc.
- Round 3: Sl st into first ch-5 loop, (ch 3, 2 dc, ch 3, 3 dc) in same loop (forms first ‘corner’ of the V). *Ch 1, (3 dc, ch 3, 3 dc) in next ch-5 loop.* Repeat from * to * 2 more times (you’ll have 4 such clusters). Ch 1, sl st to top of starting Ch 3. FO, weave in ends.
<strong>Side Scallop Segments (Cream Yarn, Make 2-3 for each side):</strong>
- Each segment will connect to the previous one and provide spaces for flowers and leaves.
- Ch 15.
- Row 1: Sc in 2nd ch from hook, hdc in next ch, dc in next 2 ch, tr in next 2 ch, dc in next 2 ch, hdc in next ch, sc in last ch. (9 sts, creates a peak). Ch 1, turn.
- Row 2: Sc in first st, hdc in next 2, dc in next 3, hdc in next 2, sc in last st. (9 sts). Ch 1, turn.
- Row 3 (Valley formation): Sl st in first sc, sl st in next hdc, sc in next dc, hdc in next, sc in next dc, sl st in next hdc, sl st in next sc. (5 sts in valley). Ch 1, turn.
- Row 4 (Next Peak start): Sc in first sl st, hdc in next sl st, dc in next 3, hdc in next sl st, sc in last sl st. (7 sts). Ch 1, turn. FO, leaving a long tail for joining.
<strong>Joining Segments:</strong>
- Lay out your Central V-Point. This will be the absolute front bottom of your choker.
- Take one Side Scallop Segment. Using the long tail and your sewing needle, sew the ‘valley’ part of the segment to one of the ch-1 spaces on the outer edge of the Central V-Point (from Round 3). Ensure the ‘peak’ of the segment points outwards.
- Repeat with another Side Scallop Segment for the other side of the Central V-Point.
- Continue joining Side Scallop Segments to each other (valley to peak, peak to valley) until the desired decorative length is reached for the front of the choker. Ensure the bottom edge forms a continuous scalloped line.
<strong>Back Straps (Cream Yarn):</strong>
- Attach cream yarn to the outermost ‘peak’ of your assembled lace on one side.
- Ch 40 (adjust length as needed for your neck and clasp).
- Row 1: Sc in 2nd ch from hook and in each ch across. (39 sc). Ch 1, turn.
- Row 2-3: Sc in each sc across. FO, weave in ends.
- Repeat for the other side strap.
- <strong>Part 3: Embellishment and Finishing</strong>
<strong>Attaching Flowers and Leaves:</strong>
- Sew one small pearl to the center of each pink flower motif.
- Carefully position and sew one pink flower into each ‘valley’ created by the joined Side Scallop Segments and the center of the Central V-Point.
- Sew two green leaves onto the cream lace, flanking each pink flower, typically on the ‘peaks’ or sides of the lace segments. Refer to the image for placement.
<strong>Picot Edging (Cream Yarn):</strong>
- Attach cream yarn to the beginning of one back strap.
- Work sc stitches evenly around the entire outer edge of the choker (top and bottom), making sure to space them correctly to avoid ruffling or pulling.
- As you work along the bottom scalloped edge, create a picot (ch 3, sl st into first ch) at the tip of each ‘peak’ and at intervals between segments to create a delicate border.
- When you reach a point where a dangling pearl should be attached (e.g., at the very bottom point of the central V and other prominent lower points), *Ch 5, thread a 5-6mm pearl onto the hook, sl st into the 5th ch from hook (securing the pearl), sl st into the original picot/edge stitch.* Continue with picots and sc along the edge.
- Work sc stitches along the other back strap. FO, weave in all remaining ends.
<strong>Attaching Clasp:</strong>
- Sew the lobster clasp to one end of the back strap.
- Sew the jump ring (or a small button for a buttonhole clasp) to the other end of the back strap.