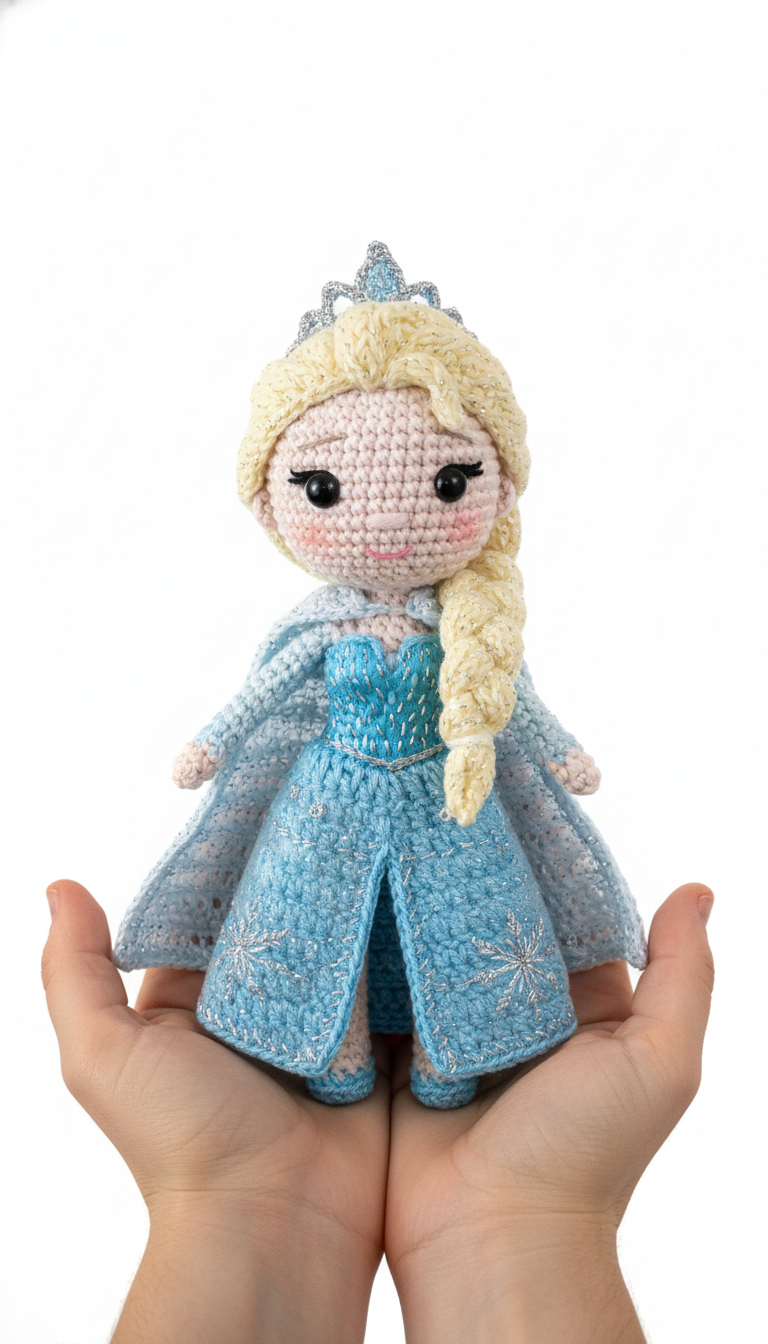
Bring the magic of a beloved snow queen to life with this detailed crochet Elsa doll pattern! Perfect for fans of animated princesses, this amigurumi project allows you to craft a charming, handheld companion. Her iconic braided hair, sparkling blue dress, and regal crown are captured in every stitch, making her a truly special creation for gifting or display.
Craft Your Own Frozen Fantasy with Amigurumi
There’s something uniquely rewarding about creating a beloved character with your own hands. This Elsa amigurumi pattern offers not just a fun crafting experience but also the joy of seeing a cherished figure come to life. The finished doll is ideal for imaginative play, a beautiful nursery decoration, or a treasured keepsake that captures the essence of winter wonder.
Crochet Pattern: Enchanting Amigurumi Ice Queen: Crochet Elsa Doll Pattern
Materials
- Light Peach/Skin Tone Yarn (Worsted Weight)
- Light Blonde/Yellow Yarn (Worsted Weight with Silver Sparkle)
- Light Blue Yarn (Worsted Weight with Silver Sparkle)
- Silver Metallic Thread or Thin Yarn
- Black Embroidery Floss or Thin Yarn
- Pink Embroidery Floss or Thin Yarn
- 2.5mm or 3.0mm Crochet Hook (or size to achieve tight fabric)
- 6mm or 8mm Safety Eyes
- Polyester Fiberfill for stuffing
- Tapestry Needle
- Stitch Markers
- Scissors
Abbreviations
- MR: Magic Ring
- ch: chain
- sl st: slip stitch
- sc: single crochet
- inc: increase (2 sc in one stitch)
- dec: decrease (sc 2 stitches together)
- BLO: back loop only
- FO: fasten off
- st(s): stitch(es)
- rnd(s): round(s)
Instructions
Gauge: Not critical for this project, just ensure stitches are tight enough so stuffing doesn’t show through.
Note: Work in continuous rounds unless otherwise specified. Use a stitch marker to mark the beginning of each round.
Head (Light Peach Yarn)
- Rnd 1: MR, 6 sc (6)
- Rnd 2: 6 inc (12)
- Rnd 3: (1 sc, 1 inc) x6 (18)
- Rnd 4: (2 sc, 1 inc) x6 (24)
- Rnd 5: (3 sc, 1 inc) x6 (30)
- Rnd 6: (4 sc, 1 inc) x6 (36)
- Rnd 7-14: Sc in each st around (36) (8 rounds)
- Place safety eyes between Rnd 11 and 12, about 7-8 sts apart.
- Rnd 15: (4 sc, 1 dec) x6 (30)
- Rnd 16: (3 sc, 1 dec) x6 (24)
- Start stuffing the head firmly.
- Rnd 17: (2 sc, 1 dec) x6 (18)
- Rnd 18: (1 sc, 1 dec) x6 (12)
- Finish stuffing.
- Rnd 19: 6 dec (6)
- FO, leaving a long tail for sewing. Close the opening.
Body (Light Peach & Light Blue Yarn)
- Rnd 1: MR, 6 sc in Light Peach yarn (6)
- Rnd 2: 6 inc (12)
- Rnd 3: (1 sc, 1 inc) x6 (18)
- Rnd 4: (2 sc, 1 inc) x6 (24)
- Rnd 5: Sc in each st around (24)
- Change to Light Blue Yarn (with silver sparkle).
- Rnd 6: Sc in BLO around (24)
- Rnd 7-8: Sc in each st around (24) (2 rounds)
- Rnd 9: (3 sc, 1 dec) x6 (18)
- Rnd 10-12: Sc in each st around (18) (3 rounds)
- Start stuffing the body.
- Rnd 13: (4 sc, 1 dec) x3 (15)
- Rnd 14: Sc in each st around (15)
- FO, leaving a long tail for sewing. Continue to stuff firmly as you attach to the head.
Arms (Make 2) (Light Peach Yarn)
- Rnd 1: MR, 6 sc (6)
- Rnd 2: (2 sc, 1 inc) x2 (8)
- Rnd 3-10: Sc in each st around (8) (8 rounds)
- Stuff lightly. Flatten the opening and sc across to close.
- FO, leaving a long tail for sewing.
Legs (Make 2) (Light Blue with Silver Sparkle & Light Peach Yarn)
- Rnd 1: With Light Blue yarn, ch 6. Sc in 2nd ch from hook, 3 sc, 3 sc in last ch. Continue on other side of chain: 3 sc, 2 sc in last st (12)
- Rnd 2: 1 inc, 3 sc, 3 inc, 3 sc, 2 inc (18)
- Rnd 3: Sc in BLO around (18)
- Rnd 4: 3 sc, 6 dec, 3 sc (12)
- Rnd 5: 3 sc, 3 dec, 3 sc (9)
- Stuff the foot part.
- Change to Light Peach Yarn.
- Rnd 6-15: Sc in each st around (9) (10 rounds)
- Stuff lightly. Flatten the opening and sc across to close.
- FO, leaving a long tail for sewing.
Hair (Light Blonde Yarn with Silver Sparkle)
- Rnd 1: MR, 6 sc (6)
- Rnd 2: 6 inc (12)
- Rnd 3: (1 sc, 1 inc) x6 (18)
- Rnd 4: (2 sc, 1 inc) x6 (24)
- Rnd 5: (3 sc, 1 inc) x6 (30)
- Rnd 6: (4 sc, 1 inc) x6 (36)
- Rnd 7-10: Sc in each st around (36)
- FO, leaving a long tail for sewing.
- Attach hair cap to the head, positioning the front edge slightly above the eyes to create bangs.
- For Braid: Cut strands of blonde yarn (with sparkle) to desired length (approx. 20-25cm), about 20-30 strands. Fold each strand in half, attach to the side/back of the head using a crochet hook. Once all strands are attached, divide into three sections and braid securely. Tie off with a piece of yarn.
Dress Skirt (Light Blue Yarn with Silver Sparkle)
- Attach Light Blue yarn to the front loops of Rnd 5 of the Body.
- Rnd 1: Ch 2, hdc in each FL around (24), join with sl st to first hdc. (Ch 2 does not count as a stitch)
- Rnd 2: Ch 2, (3 hdc, 1 inc hdc) x6 (30), join.
- Rnd 3: Ch 2, hdc in each st around (30), join.
- Rnd 4: Ch 2, (4 hdc, 1 inc hdc) x6 (36), join.
- Rnd 5-10: Ch 2, hdc in each st around (36), join.
- To create the slit:
- Rnd 11: Ch 2, 18 hdc, then turn. (This creates a back panel)
- Rnd 12-15: Ch 2, 18 hdc, turn.
- FO. Join yarn to the unworked stitches of Rnd 10.
- Rnd 11 (Front Panel): Ch 2, 18 hdc, turn.
- Rnd 12-15: Ch 2, 18 hdc, turn.
- FO.
- Embellishment: Using silver metallic thread, embroider snowflake patterns onto the front panels of the dress skirt. Add a thin line of silver around the waist (Rnd 6 BLO of the body).
Cape (Light Blue Yarn with Silver Sparkle)
- Row 1: Ch 25. Sc in 2nd ch from hook, sc in next 23 sts (24). Ch 1, turn.
- Row 2: (3 sc, 1 inc) x6 (30). Ch 1, turn.
- Row 3: Sc in each st across (30). Ch 1, turn.
- Row 4: (4 sc, 1 inc) x6 (36). Ch 1, turn.
- Row 5: Sc in each st across (36). Ch 1, turn.
- Row 6: (5 sc, 1 inc) x6 (42). Ch 1, turn.
- Row 7-10: Sc in each st across (42). Ch 1, turn.
- FO, leaving a long tail for sewing. Attach the top edge of the cape to the back of the doll’s neck/shoulders.
Crown (Silver Metallic Thread & Light Blue Yarn)
- Using Silver Metallic Thread:
- Rnd 1: MR, 6 sc (6)
- Rnd 2: (1 sc, 1 inc) x3 (9)
- Rnd 3: Sc in each st around (9)
- For points: (Ch 2, sc in 2nd ch from hook, sl st in next st) x4-5.
- FO. Weave in ends. Add a small light blue bead or embroidered dot in the center if desired.
Assembly & Details
- Sew the head to the body.
- Sew the arms to the sides of the body, just below the neck.
- Sew the legs to the bottom of the body.
- Sew the hair cap onto the head.
- Attach the cape to the shoulders/back of the neck.
- Sew the crown onto the top of the head.
- Facial features: Embroider a small pink mouth below the eyes. Using pink embroidery floss, make small stitches to create rosy cheeks on either side of the eyes.
- Weave in all remaining ends securely.