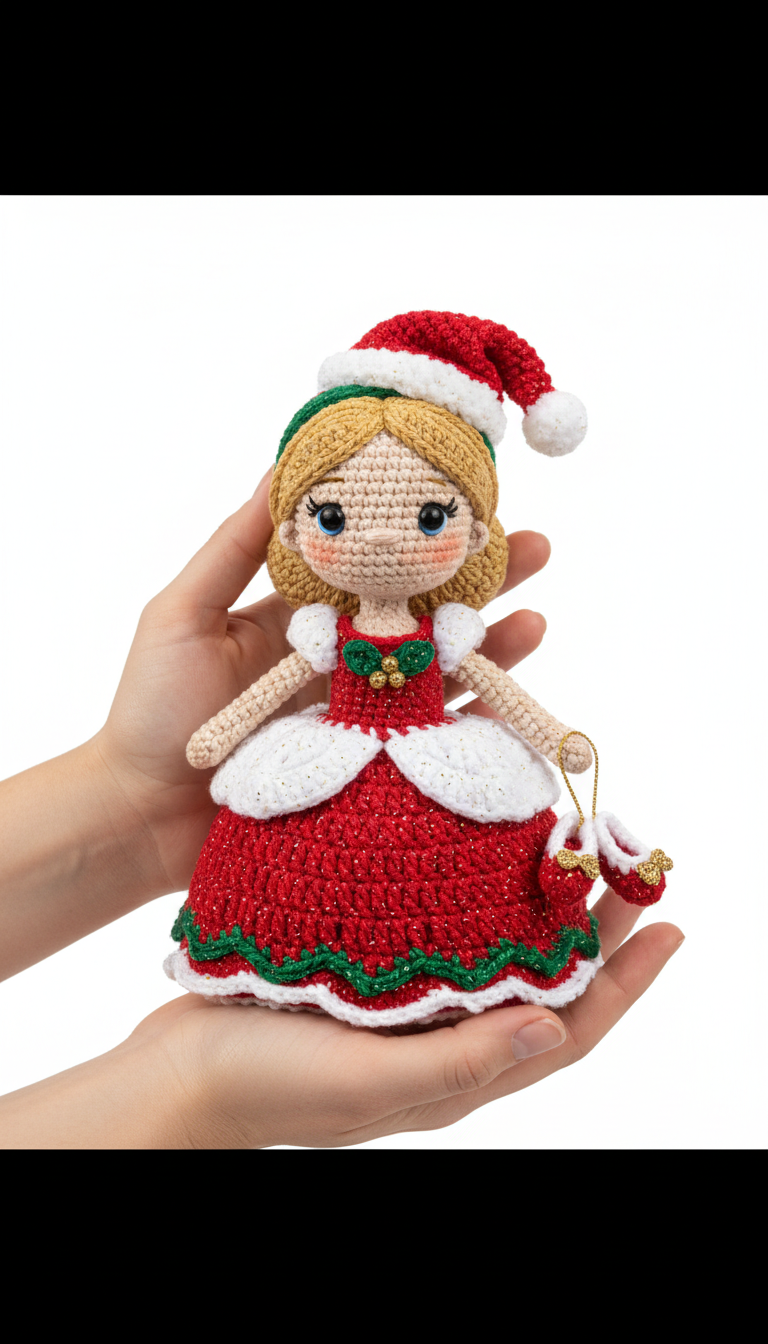
Capture the magic of the holidays with your very own handcrafted Christmas Princess Amigurumi Doll! This delightful crochet pattern guides you through creating a charming festive doll, complete with a sparkling red dress, a Santa hat, and adorable little ballet slippers. Perfect for gifting or adding a touch of handmade cheer to your seasonal decor, she’s sure to become a cherished part of your celebrations.
Crafting Holiday Magic: The Joy of Handmade Gifts
There’s something uniquely special about a handmade gift, especially during the holidays. This Christmas Princess doll isn’t just a toy; she’s a heartfelt expression of creativity and warmth. Imagine the joy on a loved one’s face as they receive a doll crafted with your own hands, carrying all the spirit and love of the festive season. She’s a timeless keepsake, ready to inspire smiles for years to come.
Crochet Pattern: Enchanting Christmas Princess Amigurumi Doll: Free Crochet Pattern
Materials
- DK weight yarn in: Skin Tone (beige/peach), Blonde (light brown), Red Sparkle (dark red with metallic thread), White Sparkle (white with metallic thread), Green Sparkle (dark green with metallic thread), Small amount of Gold/Yellow yarn or embroidery thread, Pink embroidery floss
- 2.5mm crochet hook (or size suitable for your yarn)
- 6mm or 8mm black safety eyes
- Polyester fiberfill for stuffing
- Yarn needle
- Stitch markers
- Scissors
- Blush or pink pastels for cheeks
- Small gold beads (optional, for holly berries)
- Gold string or thin ribbon (for shoes)
Abbreviations
- MR: Magic Ring
- ch: Chain
- sl st: Slip Stitch
- sc: Single Crochet
- inc: Increase (2 sc in next st)
- dec: Decrease (sc2tog)
- dc: Double Crochet
- FLO: Front Loop Only
- BLO: Back Loop Only
- F.O.: Fasten Off
- (): Repeat instructions in parentheses for the specified number of times
Instructions
Gauge: Not critical for this project, just ensure stitches are tight enough so stuffing doesn’t show through.
Head & Body (Skin Tone & Red Sparkle)
Start with Skin Tone yarn.
- R1: 6 sc in MR (6)
- R2: (inc) x6 (12)
- R3: (sc, inc) x6 (18)
- R4: (2 sc, inc) x6 (24)
- R5: (3 sc, inc) x6 (30)
- R6: (4 sc, inc) x6 (36)
- R7-14: sc around (36) (8 rounds)
- Place safety eyes between R10 and R11, about 6-7 stitches apart. Embroider eyelashes with black yarn/floss and eyebrows with blonde yarn/floss.
- R15: (4 sc, dec) x6 (30)
- R16: (3 sc, dec) x6 (24)
- R17: (2 sc, dec) x6 (18)
- Stuff head firmly.
- R18: (sc, dec) x6 (12)
- R19: sc around (12) (Neck)
- R20: (sc, inc) x6 (18) (Body start)
- R21: (2 sc, inc) x6 (24)
- R22: sc around (24)
- R23: In BLO, sc around (24) (This creates a ridge for the first skirt ruffle)
- R24-25: sc around (24)
- Change to Red Sparkle yarn.
- R26-28: sc around (24) (Red Bodice)
- R29: In BLO, (3 sc, inc) x6 (30) (This creates a ridge for the second skirt ruffle)
- R30: sc around (30)
- R31: (4 sc, inc) x6 (36)
- R32: sc around (36)
- R33: (5 sc, inc) x6 (42)
- R34-36: sc around (42)
- F.O., weave in ends.
Hair (Blonde)
- Wig Cap:
- R1: 6 sc in MR (6)
- R2: (inc) x6 (12)
- R3: (sc, inc) x6 (18)
- R4: (2 sc, inc) x6 (24)
- R5: (3 sc, inc) x6 (30)
- R6: (4 sc, inc) x6 (36)
- Fringe (bangs): From the edge of R6, ch 5, sl st into next st. Repeat 5-7 times for bangs.
- Side Strands: ch 15-20, sl st into next st. Repeat on both sides for 2-3 strands each.
- F.O., leave a long tail for sewing. Place on head and sew into desired position.
Legs (x2 – Skin Tone)
- R1: 6 sc in MR (6)
- R2: (inc) x6 (12)
- R3: (sc, inc) x6 (18)
- R4-5: sc around (18)
- R6: (sc, dec) x6 (12)
- Stuff foot firmly.
- R7-18: sc around (12) (12 rounds)
- Stuff leg lightly. F.O., leave a long tail for sewing.
Arms (x2 – Skin Tone)
- R1: 6 sc in MR (6)
- R2-12: sc around (6) (11 rounds)
- Stuff lightly. F.O., leave a long tail for sewing.
Dress Skirt Ruffles
Using White Sparkle yarn.
- First Ruffle (Top): Join White Sparkle yarn to the FLO of R23 of the Body.
- R1 (Ruffle): (ch 3, 2 dc in same st, 3 dc in next st) around. Sl st to first ch 3. F.O.
- Second Ruffle (Middle): Join White Sparkle yarn to the FLO of R29 of the Body.
- R1 (Ruffle): (ch 3, 2 dc in same st, 3 dc in next st) around. Sl st to first ch 3. F.O.
- Green Ruffle (Bottom): Join Green Sparkle yarn to the last round (R36) of the dress.
- R1 (Ruffle): (ch 3, 2 dc in same st, 3 dc in next st) around. Sl st to first ch 3. F.O.
Sleeves (x2 – White Sparkle)
- R1: 6 sc in MR (6)
- R2: (inc) x6 (12)
- R3: (sc, inc) x6 (18)
- R4: sc around (18)
- R5: (sc, dec) x6 (12)
- F.O., leave a long tail for sewing. No stuffing needed.
Santa Hat (Red Sparkle & White Sparkle)
- Start with Red Sparkle yarn.
- R1: 6 sc in MR (6)
- R2: (sc, inc) x3 (9)
- R3-4: sc around (9)
- R5: (2 sc, inc) x3 (12)
- R6-7: sc around (12)
- R8: (3 sc, inc) x3 (15)
- R9-10: sc around (15)
- R11: (4 sc, inc) x3 (18)
- R12: sc around (18)
- Change to White Sparkle yarn.
- R13: (sc, inc) x9 (27) (Brim)
- R14: sc around (27)
- F.O., leave a tail for sewing.
- Pom-pom: Make a small white pom-pom (yarn or faux fur) and sew to the top of the hat.
Holly Embellishment (Green Sparkle & Gold/Yellow)
- Leaves (x2): With Green Sparkle yarn, ch 4. Sc in 2nd ch from hook, hdc in next, (dc, ch 2, sl st) in last ch. Turn. Sl st in dc, (ch 2, dc) in hdc, sc in sc, sl st in ch 1. F.O.
- Sew leaves together at the base. Embroider small gold dots (French knots) or sew on tiny gold beads for berries. Attach to the front of the red bodice.
Shoes (x2 – Red Sparkle & White Sparkle, Gold)
- Start with Red Sparkle yarn.
- Base: Ch 6. Sc in 2nd ch from hook, 3 sc, 3 sc in last ch. Continue on other side of chain: 3 sc, 2 sc in last ch (12)
- R1: sc around (12) (Work in BLO for a defined edge)
- R2: sc in next 4 st, 2 dec, sc in next 4 st (10)
- R3: sc in next 3 st, 2 dec, sc in next 3 st (8)
- Change to White Sparkle yarn.
- R4: sc around (8) (Trim)
- F.O., weave in ends.
- Embroider a small ‘V’ shape or buckle in gold thread on the front of each shoe. Attach a loop of gold string to each shoe.
Assembly & Finishing
- Sew the arms to the sides of the body, just below the neck.
- Sew the legs to the bottom of the body.
- Sew the white sparkle sleeves onto the shoulders/arm attachment points.
- Sew the hair wig cap onto the head, positioning the fringe and side strands as desired.
- Place the Santa hat on the head.
- Attach the holly embellishment to the front of the red bodice.
- Use pink embroidery floss to sew a small smile onto the face.
- Apply a small amount of blush or pink pastel to the cheeks for a rosy glow.
- Add white highlights to the safety eyes with white embroidery floss or acrylic paint (optional).
- Drape the gold string with the two shoes around one of the doll’s hands, as shown in the image.