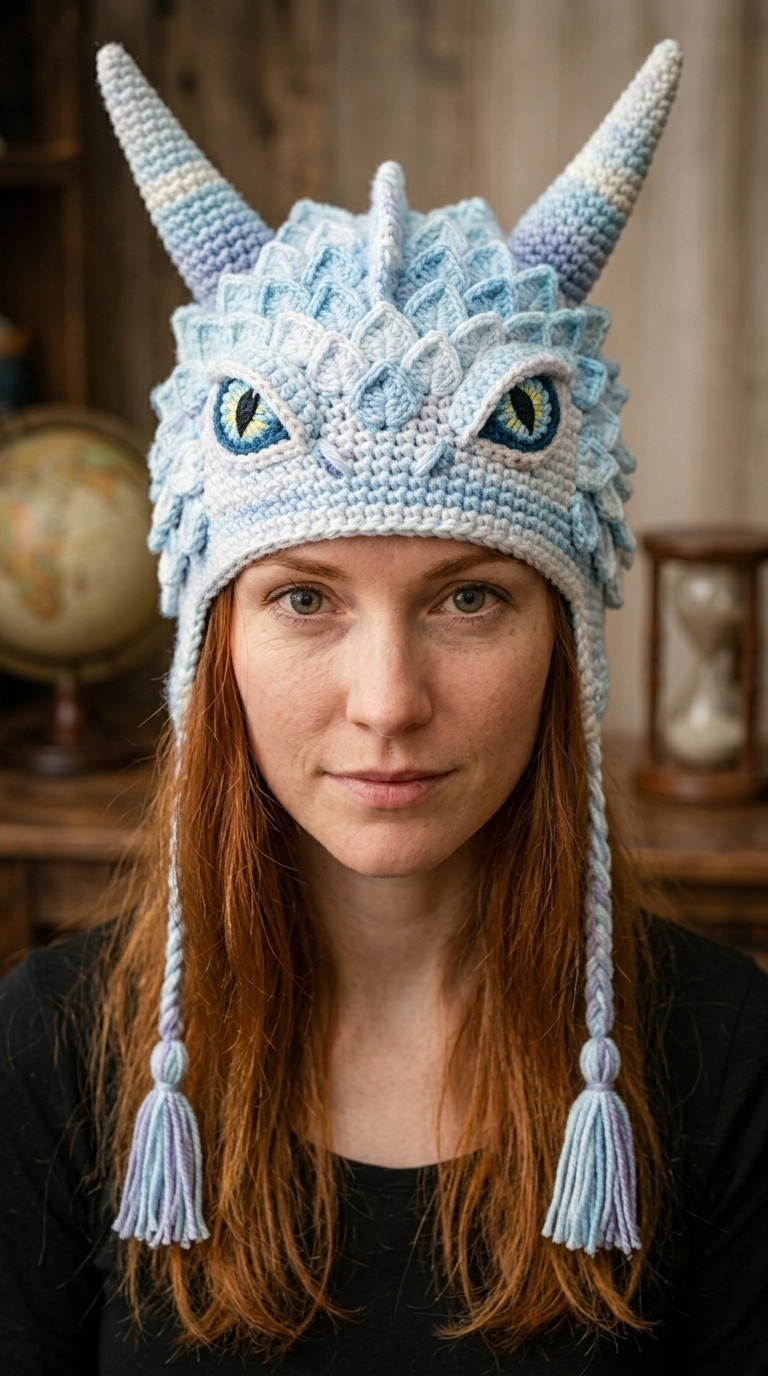
Unleash your inner dragon with this whimsical Ice Dragon Crochet Hat! Featuring shimmering scales, majestic horns, and captivating eyes, this pattern will guide you to create a truly unique and enchanting wearable. Perfect for fantasy lovers or anyone looking for a playful and warm accessory, this hat promises to be a show-stopping conversation starter. Embrace the magic and get ready to hook your own mythical creature!
Craft Your Own Mythical Masterpiece
This detailed crochet pattern allows you to bring a fantastic ice dragon to life, right on your head! Each element, from the textured scales to the expressive eyes and spiraling horns, is designed to be approachable for intermediate crocheters. Imagine the joy of wearing a hat that not only keeps you warm but also embodies the spirit of ancient legends. Dive into this creative journey and craft a wearable piece of fantasy.
Crochet Pattern: Enchanting Ice Dragon Crochet Hat Pattern with Scales & Horns
Materials
- Worsted weight yarn in Light Blue (MC) – approx 200 yards
- Worsted weight yarn in White (CC1) – approx 50 yards
- Worsted weight yarn in Pale Purple/Lavender (CC2) – approx 30 yards
- Worsted weight yarn in Yellow (AC1) – small amount for iris
- Worsted weight yarn in Dark Blue (AC2) – small amount for eye outline
- Worsted weight yarn in Black (AC3) – small amount for pupil
- Crochet hook H/8 (5.0mm)
- Yarn needle
- Stitch markers
- Scissors
- Polyester fiberfill (for horns)
Abbreviations
- ch: chain
- sl st: slip stitch
- sc: single crochet
- hdc: half double crochet
- dc: double crochet
- inc: increase (2 sc in one st)
- dec: decrease (sc2tog)
- BLO: back loop only
- FO: finish off
- Rnd: Round
- st(s): stitch(es)
- MC: Main Color (Light Blue)
- CC1: Contrast Color 1 (White)
- CC2: Contrast Color 2 (Pale Purple/Lavender)
- AC1: Accent Color 1 (Yellow)
- AC2: Accent Color 2 (Dark Blue)
- AC3: Accent Color 3 (Black)
Instructions
Hat Base (in MC)
- Rnd 1: Magic Ring, ch 1, 8 sc in ring. Join with sl st to first sc (8 sts).
- Rnd 2: Ch 1, inc in each st around. Join (16 sts).
- Rnd 3: Ch 1, *sc in next st, inc in next st* around. Join (24 sts).
- Rnd 4: Ch 1, *sc in next 2 sts, inc in next st* around. Join (32 sts).
- Rnd 5: Ch 1, *sc in next 3 sts, inc in next st* around. Join (40 sts).
- Rnd 6: Ch 1, *sc in next 4 sts, inc in next st* around. Join (48 sts).
- Rnd 7: Ch 1, *sc in next 5 sts, inc in next st* around. Join (56 sts).
- Rnd 8: Ch 1, *sc in next 6 sts, inc in next st* around. Join (64 sts).
- Rnd 9: Ch 1, *sc in next 7 sts, inc in next st* around. Join (72 sts).
- Rnd 10: Ch 1, *sc in next 8 sts, inc in next st* around. Join (80 sts).
- Rnd 11-20: Ch 1, sc in each st around. Join. (80 sts). (Adjust number of rounds for desired hat height).
- FO. Weave in ends.
Horns (Make 2)
Start with CC2. Stripe with MC and CC1 at various intervals for a variegated look.
- Rnd 1: Magic Ring, ch 1, 6 sc in ring. Join with sl st to first sc (6 sts).
- Rnd 2: Ch 1, sc in each st around. Join (6 sts).
- Rnd 3: Ch 1, *sc in next st, inc in next st* around. Join (9 sts).
- Rnd 4-5: Ch 1, sc in each st around. Join (9 sts).
- Rnd 6: Ch 1, *sc in next 2 sts, inc in next st* around. Join (12 sts).
- Rnd 7-8: Ch 1, sc in each st around. Join (12 sts).
- Rnd 9: Ch 1, *sc in next 3 sts, inc in next st* around. Join (15 sts).
- Rnd 10-11: Ch 1, sc in each st around. Join (15 sts).
- Rnd 12: Ch 1, *sc in next 4 sts, inc in next st* around. Join (18 sts).
- Rnd 13-14: Ch 1, sc in each st around. Join (18 sts).
- Lightly stuff the horn. Continue stuffing as you go.
- Rnd 15: Ch 1, *sc in next st, dec* around (12 sts).
- Rnd 16: Ch 1, dec around (6 sts).
- FO, leaving a long tail for sewing. Finish stuffing and sew opening shut.
Scales (worked directly onto Hat Base)
These scales are worked in horizontal rows around the hat, creating an overlapping effect. The first row of scales is worked slightly above the brim, and subsequent rows are worked above the previous, slightly offset.
Scale Unit (SU): (ch 1, 3 hdc in next st, ch 1, sl st) into the same stitch. This forms a small, raised bump.
Row 1 (around Rnd 18-19 of Hat Base, using CC1)
- Attach CC1 yarn with sl st at the back of the hat (center).
- *Skip 2 stitches on the hat base, work SU in next st*. Repeat around. You may need to adjust spacing slightly to evenly distribute scales. Join with sl st to first ch 1 space of SU. FO.
Row 2 (using MC)
- Attach MC yarn to a stitch on the hat base *between* two scales from Row 1.
- *Work SU in next st, skipping stitches on hat base to align with gaps in Row 1 scales*. Repeat around, ensuring scales are offset from Row 1. Join with sl st. FO.
Row 3 (using CC1)
- Attach CC1 yarn as in Row 2, offsetting scales from Row 2. Repeat around. Join with sl st. FO.
Row 4 (using MC)
- Attach MC yarn as in Row 3, offsetting scales from Row 3. Repeat around. Join with sl st. FO.
Continue adding rows of scales in alternating colors (MC and CC1) up towards the crown, staggering them for a natural, overlapping effect, until the desired scaled area is covered.
Eyes (Make 2)
Pupil (AC3 – Black)
- Rnd 1: Magic Ring, ch 1, 6 sc in ring. Join with sl st. FO, leaving a tail.
Iris (AC1 – Yellow)
- Rnd 1: Join AC1 to any st of Pupil, ch 1, sc in each st around (6 sc). Join.
- Rnd 2: Ch 1, inc in each st around (12 sc). Join. FO, leaving a tail.
Sclera (CC1 – White)
- Rnd 1: Join CC1 to any st of Iris, ch 1, sc in each st around (12 sc). Join.
- Rnd 2: Ch 1, *sc in next st, inc in next st* around (18 sc). Join. FO, leaving a tail.
Eye Outline (AC2 – Dark Blue)
- Rnd 1: Join AC2 to any st of Sclera, ch 1, sc in each st around (18 sc). Join.
- Rnd 2: Ch 1, *sc in next 2 sts, inc in next st* around (24 sc). Join. FO, leaving a long tail for sewing.
Assembly of Eyes: Layer the Pupil on top of the Iris, then the Iris on top of the Sclera, then the Sclera on top of the Eye Outline. Use the tails to sew each layer securely together. You can add a small white embroidered highlight to the pupil for extra sparkle.
Earflaps (Make 2 – in MC)
Starting about 10 stitches in from the eye placement on the Hat Base.
- Row 1: Join MC with sl st to the edge of the hat. Ch 1, sc in next 15 sts. Turn (15 sts).
- Row 2: Ch 1, sc in each st across. Turn (15 sts).
- Row 3: Ch 1, sc2tog, sc in next 11 sts, sc2tog. Turn (13 sts).
- Row 4-5: Ch 1, sc in each st across. Turn (13 sts).
- Row 6: Ch 1, sc2tog, sc in next 9 sts, sc2tog. Turn (11 sts).
- Row 7-8: Ch 1, sc in each st across. Turn (11 sts).
- Row 9: Ch 1, sc2tog, sc in next 7 sts, sc2tog. Turn (9 sts).
- Row 10-11: Ch 1, sc in each st across. Turn (9 sts).
- Continue decreasing 2 stitches every 2-3 rows until 3 stitches remain.
- Work 2-3 rows even with 3 stitches. FO.
Braids: Cut 6 strands of yarn, each approx. 24 inches long (2x MC, 2x CC1, 2x CC2). Fold in half and attach to the end of each earflap with a lark’s head knot. Divide into three sections and braid. Tie a knot at the end of the braid and trim to create a tassel effect.
Finishing and Assembly
- Position the horns on top of the hat, slightly forward from the center. Sew securely using the long tails.
- Position the eyes on the front sides of the hat, below the first few rows of scales, referencing the image for placement. Sew securely.
- Weave in any remaining loose ends.