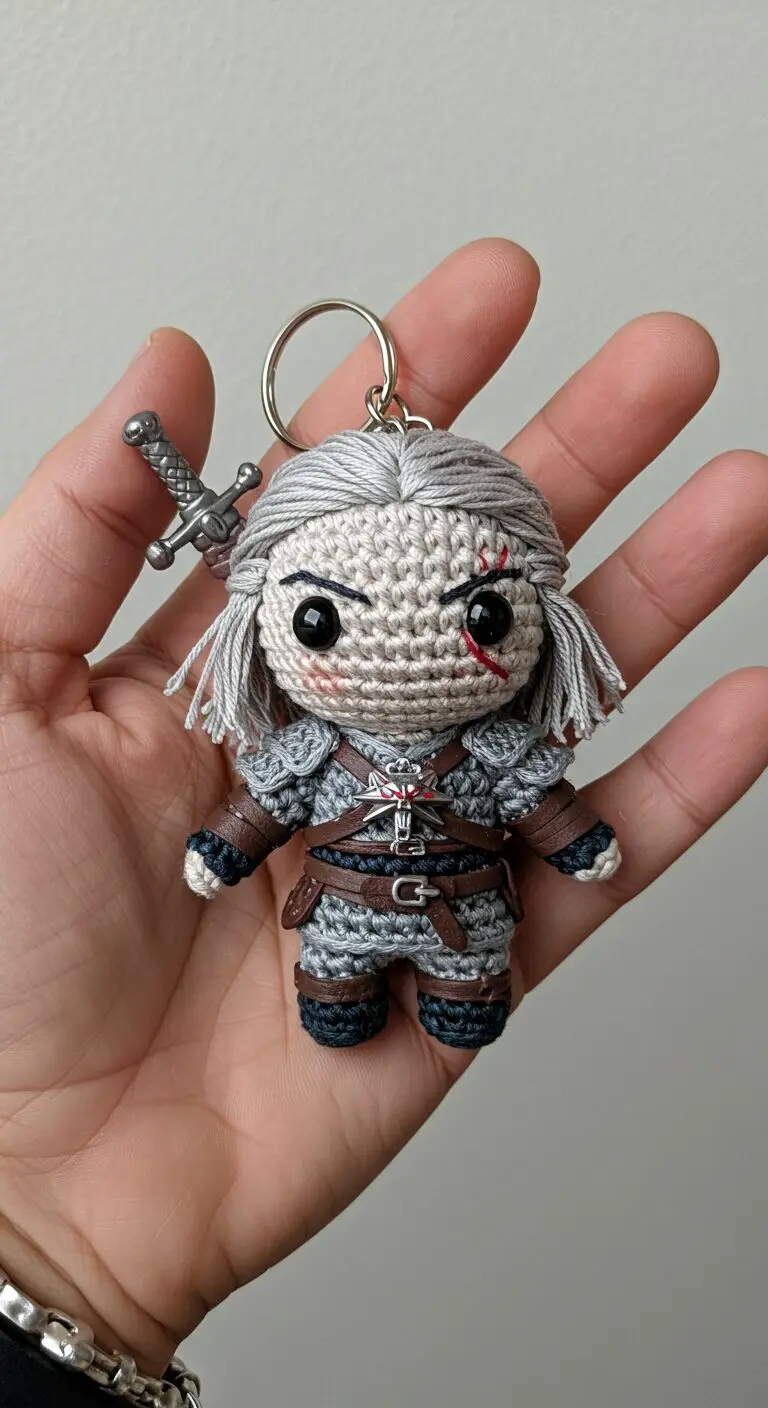
Step into the world of monster-slaying and intricate craftsmanship with this stunning Geralt amigurumi keychain. This miniature, meticulously crocheted figure captures the essence of the beloved Witcher, complete with his iconic white hair, battle scar, and even a tiny sword. It’s more than just a keychain; it’s a testament to the artistry of amigurumi and a perfect way to show off your fandom. Imagine having a pint-sized Geralt accompanying you on all your adventures.
The Allure of the Geralt Amigurumi Collectible
The attention to detail in this handcrafted piece is truly remarkable, from the texture of his armor to the fierce expression on his face. Such a unique item makes a fantastic gift for any Witcher enthusiast or a treasured addition to your own collection of gaming memorabilia. Owning a Geralt amigurumi not only celebrates your love for the series but also supports the incredible talent behind custom crochet creations. Carry a piece of Rivia with you wherever you go.
This pattern will guide you in creating an amigurumi version of Geralt of Rivia, complete with his signature hair, armor details, and scar. This project is suitable for an intermediate crocheter.

**Finished Size:** Approximately 10-12 cm (4-5 inches) tall, depending on yarn and hook size.

---

### Geralt of Rivia Amigurumi Pattern

**Materials:**

*   **Yarn:** (DK or light worsted weight recommended)
    *   **Skin Tone:** Light beige/cream (approx. 20g)
    *   **Light Grey:** For hair and shoulder pads (approx. 15g)
    *   **Medium Grey:** For body and pants (approx. 25g)
    *   **Dark Brown:** For gauntlets (approx. 5g)
    *   **Dark Teal/Blue-Grey:** For boots (approx. 5g)
*   **Crochet Hook:** 2.5mm or 3.0mm (or size suitable for your chosen yarn)
*   **Safety Eyes:** 6mm or 8mm black
*   **Stuffing:** Polyester fiberfill
*   **Embroidery Floss:**
    *   Black (for eyebrows)
    *   Red (for scar)
*   **For Straps:** Thin strips of dark brown felt or faux leather (approx. 3-4mm wide)
*   **Accessories:**
    *   Small silver Wolf Medallion charm
    *   Small metal sword charm with keychain ring
*   **Tools:** Yarn needle, scissors, stitch markers

---

**Abbreviations:**

*   **MR:** Magic Ring
*   **ch:** Chain
*   **sc:** Single Crochet
*   **inc:** Increase (2 sc in one stitch)
*   **dec:** Decrease (sc 2 together)
*   **sl st:** Slip Stitch
*   **FO:** Fasten Off
*   **( )**: Number in parentheses indicates the total number of stitches at the end of the round/row.
*   **[ ] xN**: Repeat the instructions in the brackets N times.

---

**Notes:**

*   Work in continuous rounds unless otherwise stated. Use a stitch marker to keep track of the beginning of each round.
*   Stuff pieces firmly as you go, especially the head.
*   The straps are made from non-crochet material for a realistic look as depicted in the image.
*   For a cleaner finish, use the invisible decrease method (insert hook into front loop of first stitch, then front loop of second stitch, yarn over and pull through both front loops, yarn over and pull through remaining two loops on hook).

---

### **Pattern Instructions**

**1. Head (Skin Tone Yarn)**

*   **R1:** MR, 6 sc (6)
*   **R2:** [inc] x6 (12)
*   **R3:** [sc, inc] x6 (18)
*   **R4:** [2 sc, inc] x6 (24)
*   **R5:** [3 sc, inc] x6 (30)
*   **R6:** [4 sc, inc] x6 (36)
*   **R7-R13:** sc in each stitch around (36) (7 rounds)
*   *Insert safety eyes between R10 and R11, about 6 stitches apart.*
*   **R14:** [4 sc, dec] x6 (30)
*   **R15:** [3 sc, dec] x6 (24)
*   *Begin stuffing the head firmly.*
*   **R16:** [2 sc, dec] x6 (18)
*   **R17:** [sc, dec] x6 (12)
*   **R18:** [dec] x6 (6)
*   FO, leaving a long tail for sewing if attaching to body later, or continue directly to body.

**2. Body (Medium Grey Yarn)**

*   *If continuing from head, use the 6 stitches from R18 of the head and work into them with grey yarn to directly attach the body. Otherwise, start new.*
*   **If starting new body:**
    *   **R1:** MR, 6 sc (6)
    *   **R2:** [inc] x6 (12)
    *   **R3:** [sc, inc] x6 (18)
*   **If attaching to head directly (skip R1-R3 above):**
    *   **R1:** (Join Medium Grey yarn to one of the 6 stitches of R18 of the head) [inc] x6 (12)
    *   **R2:** [sc, inc] x6 (18)
*   **R3:** [2 sc, inc] x6 (24)
*   **R4-R10:** sc in each stitch around (24) (7 rounds)
*   **R11:** [2 sc, dec] x6 (18)
*   **R12-R14:** sc in each stitch around (18) (3 rounds)
*   *Stuff the body firmly.*
*   FO, leaving a long tail for sewing if made separately.

**3. Legs (Make 2)**

*   **Start with Dark Teal/Blue-Grey Yarn (for boots):**
    *   **R1:** MR, 6 sc (6)
    *   **R2:** [sc, inc] x3 (9)
    *   **R3:** sc in each stitch around (9)
    *   **R4:** [2 sc, inc] x3 (12)
    *   **R5:** sc in each stitch around (12)
*   **Change to Medium Grey Yarn (for pants):**
    *   **R6-R9:** sc in each stitch around (12) (4 rounds)
*   *Stuff the leg lightly. Ensure the boot area is well-shaped.*
*   FO, leaving a long tail for sewing to the body.

**4. Arms (Make 2)**

*   **Start with Skin Tone Yarn (for hand):**
    *   **R1:** MR, 5 sc (5)
    *   **R2:** sc in each stitch around (5)
*   **Change to Dark Brown Yarn (for gauntlet):**
    *   **R3-R4:** sc in each stitch around (5) (2 rounds)
*   **Change to Medium Grey Yarn (for upper arm):**
    *   **R5-R7:** sc in each stitch around (5) (3 rounds)
*   *Lightly stuff the arm. Do not overstuff, keep it slightly flat.*
*   FO, leaving a long tail for sewing to the body.

**5. Hair Cap (Light Grey Yarn)**

*   **R1:** MR, 6 sc (6)
*   **R2:** [inc] x6 (12)
*   **R3:** [sc, inc] x6 (18)
*   **R4:** [2 sc, inc] x6 (24)
*   **R5:** [3 sc, inc] x6 (30)
*   **R6:** [4 sc, inc] x6 (36)
*   **R7-R9:** sc in each stitch around (36) (3 rounds)
*   FO, leaving a long tail for sewing. This forms the base cap for the hair.

**6. Hair Strands (Light Grey Yarn)**

*   **Bangs (approx. 5-7 strands):**
    *   Attach yarn to the front edge of the hair cap.
    *   [ch 4, sc in 2nd ch from hook, sc in next 2 ch, skip 1 st on cap, sl st in next st on cap] Repeat for desired number of bangs.
*   **Side Strands (approx. 2-3 strands per side):**
    *   Attach yarn to the side edge of the hair cap, near where the ear would be.
    *   [ch 6, sc in 2nd ch from hook, sc in next 4 ch, skip 1 st on cap, sl st in next st on cap] Repeat for desired number of side strands.
    *   Make some slightly longer (ch 8-10).
*   *Adjust length and number of strands to match the image, ensuring a windswewept, layered look around the face.*

**7. Shoulder Pads (Make 2) (Light Grey Yarn)**

*   **R1:** MR, 6 sc (6)
*   **R2:** [sc, inc] x3 (9)
*   **R3:** sc in each stitch around (9)
*   FO, leaving a long tail for sewing. *These are small, almost flat pieces.*

---

### **Assembly**

1.  **Sew Head to Body:** If you made them separately, sew the head to the body firmly. Ensure the head is centered and sits securely.
2.  **Sew Legs to Body:** Sew the tops of the legs to the bottom of the body, side-by-side, leaving a small gap in the middle if desired, but making sure Geralt can sit or stand balanced.
3.  **Sew Arms to Body:** Sew the tops of the arms to the sides of the body, just below the neck.
4.  **Attach Hair Cap:** Place the hair cap on the head, aligning the front edge with the forehead. Pin in place, then sew around the edge of the cap to secure it to the head.
5.  **Embroider Facial Details:**
    *   **Eyebrows:** Using black embroidery floss, embroider thick, slightly angled eyebrows above each safety eye to give him a stern expression, as shown in the image.
    *   **Scar:** Using red embroidery floss, embroider a distinct vertical scar over his left eye (viewer's right eye) as seen in the reference.
6.  **Attach Shoulder Pads:** Sew one shoulder pad onto each shoulder of the body, slightly overlapping the arm joint.
7.  **Attach Faux Leather/Felt Straps:**
    *   **Chest Straps:** Cut two thin strips of dark brown felt/faux leather. Cross them over Geralt's chest, mimicking an 'X' shape. You can secure them with a dab of fabric glue or tiny stitches on the back.
    *   **Waist Belt:** Cut a longer strip for the waist belt. Wrap it around Geralt's waist. You can cut a small buckle shape from felt or use a tiny metal charm for a buckle. Secure in place.
    *   **Side Leg Straps:** Cut two short strips and attach one to each outer thigh, just below the waist belt, for the leg armor straps.
8.  **Attach Wolf Medallion:** Attach the silver Wolf Medallion charm to the center of the chest straps. You might need a small jump ring to attach it to the intersection of the straps.
9.  **Attach Keychain and Sword:** Attach the keychain ring to the top of Geralt's head. Thread the sword charm onto the keychain ring.

---

Your Amigurumi Geralt of Rivia is now complete! Enjoy your Witcher companion.