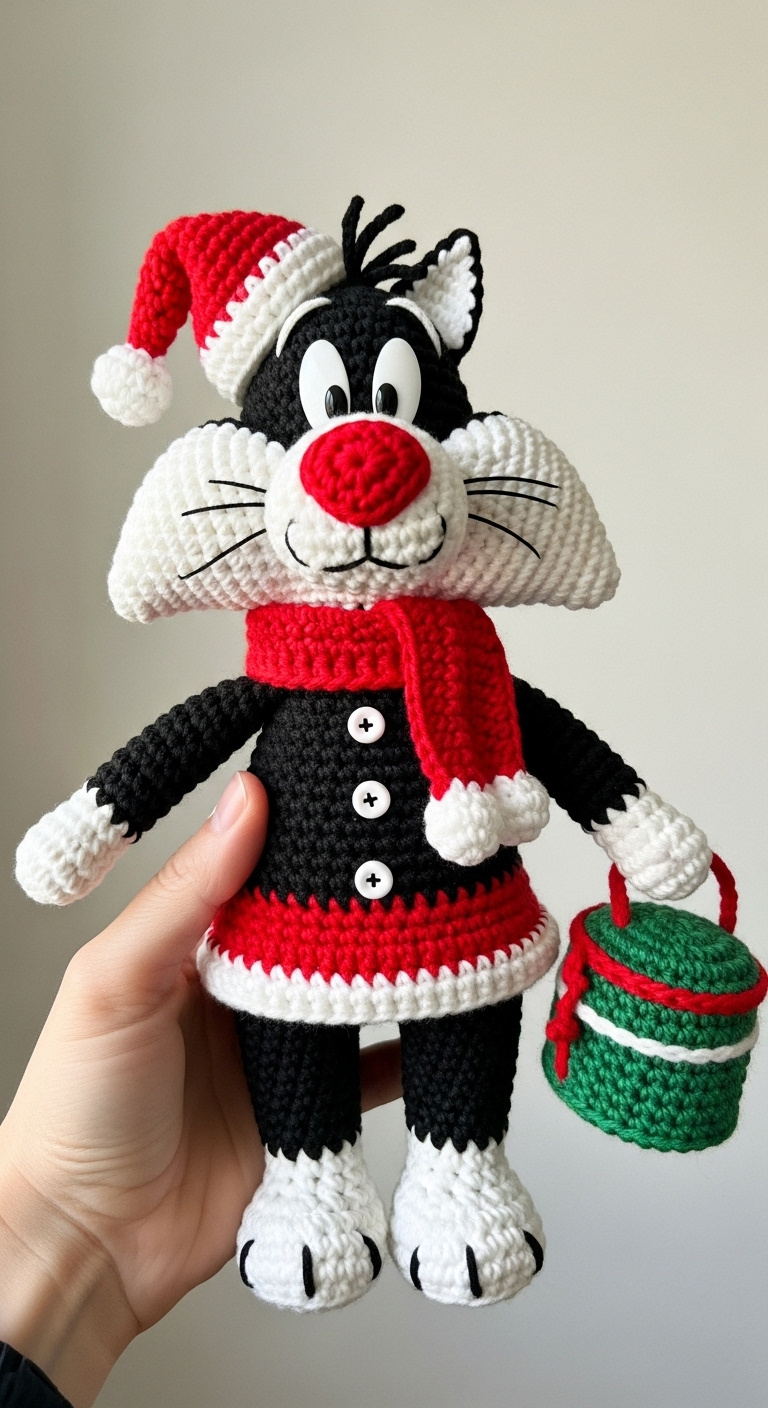
The image features a charming Crochet Sylvester Cat, perfectly capturing the holiday spirit. Dressed in a Santa hat, a cozy red scarf, and a festive red and white coat, this amigurumi figure is ready for Christmas. Its intricate details showcase the artistry involved in creating such a beloved character through crochet. This handmade item brings joy and a touch of nostalgia to any fan of classic cartoons.
Crafting a Festive Crochet Sylvester Cat for the Holidays
Whether as a unique gift or a decorative piece, a Crochet Sylvester Cat like this adds character to any setting. The impressive craftsmanship highlights the durability and inherent charm of handmade toys and collectibles. Its instantly recognizable features, combined with the adorable holiday attire, make it a truly delightful collectible. Such carefully crafted amigurumi figures often become cherished keepsakes, proudly displayed during the festive season.
Crochet Pattern: Christmas Sylvester the Cat Amigurumi
Materials
- Worsted weight yarn (approx. 50g each) in: Black, White, Red, Green
- Crochet hook (e.g., 2.5mm or 3.0mm, or size to achieve a tight gauge)
- Cartoon safety eyes (approx. 12-14mm, with white oval and black pupil)
- Polyester fiberfill stuffing
- Yarn needle
- Stitch markers
- Scissors
- Three small white buttons (approx. 6-8mm)
- Black embroidery floss (for whiskers and paw details)
Abbreviations
- MR: Magic Ring
- ch: Chain
- sc: Single Crochet
- inc: Increase (2 sc in one stitch)
- dec: Decrease (sc2tog)
- sl st: Slip Stitch
- FO: Fasten Off
- BLO: Back Loop Only
- hdc: Half Double Crochet
- st(s): Stitch(es)
- rnd(s): Round(s)
- rep: Repeat
- ( ) x N: Repeat instructions in parentheses N times
Instructions
Notes: Work in continuous rounds unless otherwise specified. Use a stitch marker to keep track of the beginning of each round. Stuff firmly as you go.
Head (Black Yarn):
Rnd 1: MR 6 sc (6)
Rnd 2: 6 inc (12)
Rnd 3: (1 sc, inc) x 6 (18)
Rnd 4: (2 sc, inc) x 6 (24)
Rnd 5: (3 sc, inc) x 6 (30)
Rnd 6: (4 sc, inc) x 6 (36)
Rnd 7: (5 sc, inc) x 6 (42)
Rnd 8-15: 42 sc (8 rounds)
Insert safety eyes between Rnd 11-12, approximately 8-10 stitches apart. Ensure they are positioned well for the snout to be attached later.
Rnd 16: (5 sc, dec) x 6 (36)
Rnd 17: (4 sc, dec) x 6 (30)
Start stuffing firmly.
Rnd 18: (3 sc, dec) x 6 (24)
Rnd 19: (2 sc, dec) x 6 (18)
Rnd 20: (1 sc, dec) x 6 (12)
Rnd 21: 6 dec (6)
FO, close hole with a yarn needle, leave long tail for sewing.
Snout (White Yarn):
Ch 5
Rnd 1: Sc in 2nd ch from hook, 2 sc, 3 sc in last ch. Working on the other side of the chain: 3 sc, inc (10)
Rnd 2: Inc, 2 sc, 3 inc, 2 sc, 2 inc (16)
Rnd 3: (1 sc, inc) x 2, 3 sc, (inc, 1 sc) x 2, inc, 3 sc, inc (22)
Rnd 4: 22 sc BLO (22) – *This creates a defined edge for the snout.*
Rnd 5: 22 sc (22)
Sl st, FO, leave long tail for sewing. Lightly stuff before sewing to the head, centering it below the eyes.
Nose (Red Yarn):
Rnd 1: MR 6 sc (6)
Rnd 2: 6 inc (12)
Rnd 3: 12 sc (12)
Sl st, FO, leave long tail for sewing. Stuff lightly. Sew to the top center of the snout.
Ears (Make 2, Black Yarn):
Rnd 1: MR 4 sc (4)
Rnd 2: (1 sc, inc) x 2 (6)
Rnd 3: (2 sc, inc) x 2 (8)
Rnd 4: (3 sc, inc) x 2 (10)
Rnd 5: (4 sc, inc) x 2 (12)
Fold flat and sc through both layers 6 times to close. FO, leave long tail for sewing.
Inner Ear (Make 2, White Yarn):
Ch 3
Row 1: Sc in 2nd ch from hook, sc in next ch. (2)
FO, leaving a short tail. Sew the white inner ear piece onto the black ear piece.
Body (Black Yarn):
Rnd 1: MR 6 sc (6)
Rnd 2: 6 inc (12)
Rnd 3: (1 sc, inc) x 6 (18)
Rnd 4: (2 sc, inc) x 6 (24)
Rnd 5: (3 sc, inc) x 6 (30)
Rnd 6: (4 sc, inc) x 6 (36)
Rnd 7: (5 sc, inc) x 6 (42)
Rnd 8-15: 42 sc (8 rounds)
Rnd 16: (5 sc, dec) x 6 (36)
Rnd 17: (4 sc, dec) x 6 (30)
Start stuffing firmly.
Rnd 18: (3 sc, dec) x 6 (24)
Rnd 19: (2 sc, dec) x 6 (18)
Rnd 20: (1 sc, dec) x 6 (12)
FO, leaving long tail for sewing. Continue stuffing firmly.
Arms (Make 2, Black Yarn then White Yarn):
Start with Black yarn:
Rnd 1: MR 6 sc (6)
Rnd 2: 6 inc (12)
Rnd 3-5: 12 sc (3 rounds)
Change to White yarn:
Rnd 6-8: 12 sc (3 rounds)
Stuff lightly. Flatten the opening and sc through both sides 6 times to close. FO, leave long tail for sewing.
Legs (Make 2, Black Yarn then White Yarn):
Start with Black yarn:
Rnd 1: MR 6 sc (6)
Rnd 2: 6 inc (12)
Rnd 3: (1 sc, inc) x 6 (18)
Rnd 4-6: 18 sc (3 rounds)
Change to White yarn:
Rnd 7-11: 18 sc (5 rounds)
Rnd 12: (1 sc, dec) x 6 (12)
Stuff firmly.
Rnd 13: 6 dec (6)
FO, close hole, leave long tail for sewing.
Tail (Black Yarn then White Yarn):
Start with Black yarn:
Rnd 1: MR 6 sc (6)
Rnd 2-8: 6 sc (7 rounds)
Change to White yarn:
Rnd 9-10: 6 sc (2 rounds)
Sl st, FO, leave long tail for sewing. Stuff the base lightly, leave the tip unstuffed for flexibility.
Santa Hat (Red Yarn then White Yarn):
Start with Red yarn:
Rnd 1: MR 4 sc (4)
Rnd 2: (1 sc, inc) x 2 (6)
Rnd 3: 6 sc (6)
Rnd 4: (2 sc, inc) x 2 (8)
Rnd 5: 8 sc (8)
Rnd 6: (3 sc, inc) x 2 (10)
Rnd 7: 10 sc (10)
Rnd 8: (4 sc, inc) x 2 (12)
Rnd 9: 12 sc (12)
Rnd 10: (5 sc, inc) x 2 (14)
Rnd 11: 14 sc (14)
Rnd 12: (6 sc, inc) x 2 (16)
Rnd 13: 16 sc (16)
Change to White yarn:
Rnd 14: 16 sc (16)
Sl st, FO, weave in ends.
Pompom (White Yarn):
Make a small yarn pompom (approx. 2cm diameter) or crochet a small sphere:
MR 6 sc, 6 inc, 12 sc, 6 dec, FO.
Sew pompom to the tip of the hat.
Scarf (Red Yarn):
Ch 40 (adjust length as desired)
Row 1: Hdc in 3rd ch from hook, hdc in each ch across. (38 hdc)
Row 2: Ch 2 (does not count as st), turn, hdc in each st across. (38 hdc)
FO, weave in ends.
Present (Green Yarn, with Red and White details):
Bottom/Top (Make 2, Green Yarn):
Rnd 1: MR 6 sc (6)
Rnd 2: 6 inc (12)
Rnd 3: (1 sc, inc) x 6 (18)
Rnd 4: (2 sc, inc) x 6 (24)
For the first piece, sl st and FO. For the second piece, do NOT FO, continue to Side section.
Side (Green Yarn):
Continuing from the second bottom/top piece:
Rnd 5: Ch 1, BLO 24 sc (24) – *This creates a crisp edge for the side of the cylinder.*
Rnd 6-10: 24 sc (5 rounds for height)
Sl st, FO, leave long tail. Sew the first Bottom/Top piece to the open end of the cylinder. Lightly stuff before fully closing.
Ribbon (Red and White Yarn):
Using thin strips of red and white yarn, or crocheted chains, wrap them around the cylinder to resemble ribbons and secure with a yarn needle or fabric glue.
Handle (Red Yarn):
Ch 10, sl st into the first ch to form a loop. FO, leave a short tail. Sew the handle to the top of the present.
Assembly:
- Sew the Snout to the Head, positioning it just below the eyes. Stuff lightly before completely sewing shut.
- Sew the Nose to the top center of the Snout.
- Using black embroidery floss, embroider small lines for whiskers on each side of the snout and a small mouth line below the nose.
- Sew the ears to the top of the head, slightly to the sides, referring to the reference image for placement. Embroider small black tufts on top of the head between the ears, if desired, using short strands of black yarn.
- Sew the Head to the Body, ensuring it is centered and secure.
- Sew the Arms to the sides of the Body, just below the neck.
- Sew the Legs to the bottom of the Body. Using black embroidery floss, embroider three small lines on the front of each white foot to represent claws.
- Sew the Tail to the back of the Body.
- Sew the Santa Hat onto Sylvester’s head, slightly tilted as shown in the image.
- Tie the Red Scarf around Sylvester’s neck.
- Sew the three small white buttons down the front of Sylvester’s body, representing his coat.
- Attach the Present to one of Sylvester’s hands, securing it firmly.
- Weave in any remaining loose ends.
Your Christmas Sylvester the Cat Amigurumi is now complete!