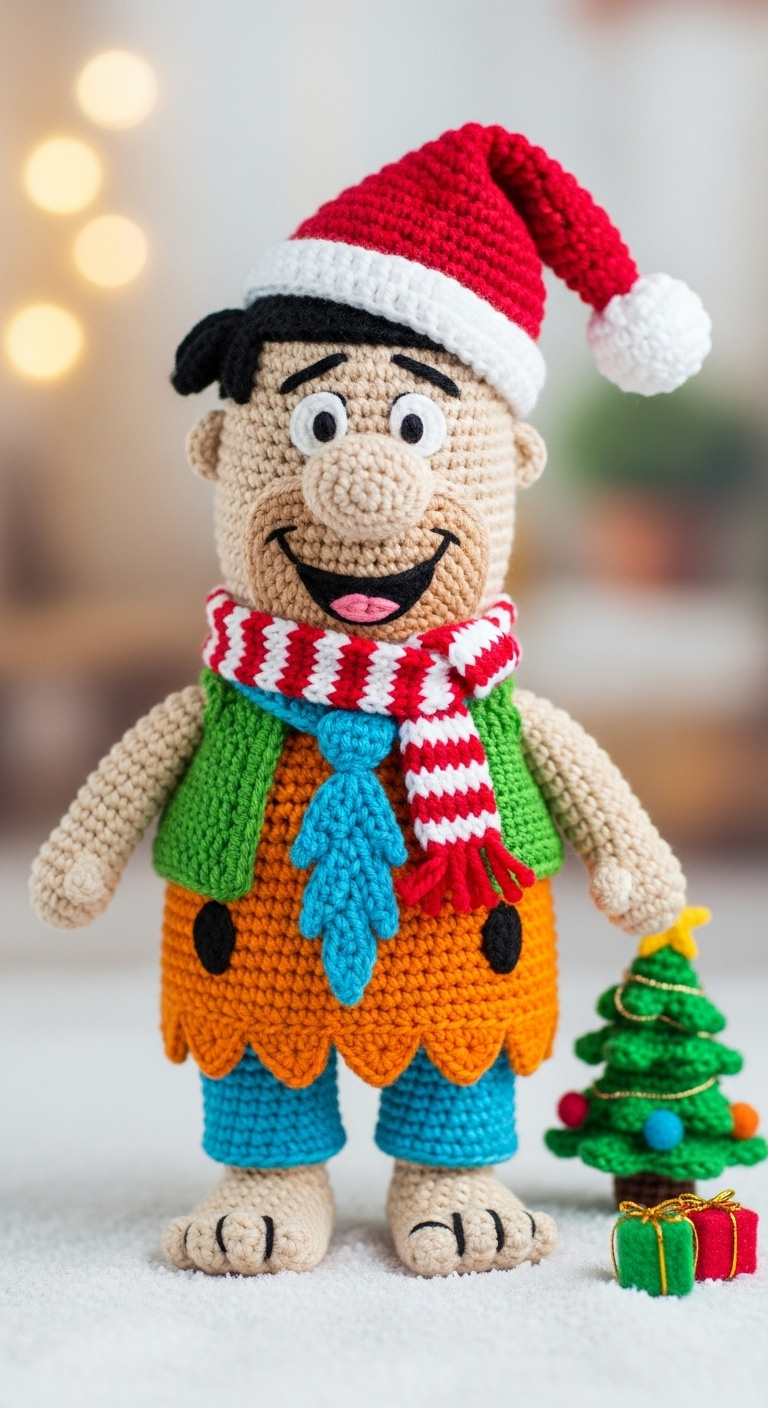
Step into a prehistoric holiday season with this delightful Flintstones Christmas crochet figure. This charming amigurumi captures the iconic character in festive attire, complete with a Santa hat and a striped scarf. It’s a perfect blend of nostalgic fun and holiday cheer, bringing a unique touch to seasonal decor. Such intricate Flintstones Christmas crochet creations showcase the artistry of handmade crafts. Discover the joy of these unique holiday decorations.
Crafting Joy: The Flintstones Christmas Crochet Character
This beautifully detailed crochet character not only serves as a wonderful decorative piece but also evokes fond memories for fans of all ages. Its cheerful expression and festive accessories make it an ideal gift for collectors or anyone who appreciates unique, handmade items. The craftsmanship truly brings this beloved animated character to life in a new, festive way. Consider adding this special Flintstones Christmas crochet item to your holiday collection for a touch of whimsy and warmth. It’s a timeless piece that bridges generations with its charm.
Crochet Pattern: Festive Fred Flintstone Amigurumi
Materials
- Worsted weight yarn in: Beige (Skin Tone), Red, White, Green, Orange, Blue, Black, Yellow (for tree star).
- 3.5mm crochet hook (or size suitable for your yarn to achieve tight stitches)
- Stuffing (polyester fiberfill)
- 9mm safety eyes (or embroidery thread for eyes)
- Tapestry needle
- Stitch markers
- Scissors
- Optional: Small beads/pom-poms for tree decorations, thin gold cord for gift boxes.
Abbreviations
- MR: Magic Ring
- ch: Chain
- sc: Single Crochet
- inc: Increase (2 sc in one stitch)
- dec: Decrease (sc 2 together)
- sl st: Slip Stitch
- FO: Fasten Off
- BLO: Back Loop Only
- FLO: Front Loop Only
- (…): Repeat instructions in parentheses for the specified number of times
- […]: Total number of stitches at the end of the round
Instructions
Head (Beige Yarn):
R1: 6 sc in MR [6]
R2: (inc) x6 [12]
R3: (sc, inc) x6 [18]
R4: (2 sc, inc) x6 [24]
R5: (3 sc, inc) x6 [30]
R6: (4 sc, inc) x6 [36]
R7-R13: sc around (7 rounds) [36]
R14: (4 sc, dec) x6 [30]
R15: (3 sc, dec) x6 [24]
Insert safety eyes between R12 and R13, about 6-7 stitches apart. Start stuffing.
R16: (2 sc, dec) x6 [18]
R17: (sc, dec) x6 [12]
Finish stuffing firmly. FO, leaving a long tail for sewing.
Nose (Beige Yarn):
R1: 6 sc in MR [6]
R2: (sc, inc) x3 [9]
R3: sc around [9]
Stuff lightly. FO, leaving a long tail for sewing. Sew onto the head between the eyes.
Hair (Black Yarn):
R1: 6 sc in MR [6]
R2: (inc) x6 [12]
R3: (sc, inc) x6 [18]
R4: (2 sc, inc) x6 [24]
R5: (3 sc, inc) x6 [30]
R6: sc in next 10 st, then (ch 3, sc in 2nd ch from hook, sc in next ch, sk 1 st on R5, sl st in next st) x3 (for sideburns and front hair piece). Finish with sc in remaining stitches around R5. [30 sc, 3 hair pieces]
FO, leaving a long tail for sewing. Sew to the top front of the head.
Embroider eyebrows and a wide smile with black yarn, and a small pink tongue.
Body (Orange & Green Yarn):
Start with Orange yarn.
R1: 6 sc in MR [6]
R2: (inc) x6 [12]
R3: (sc, inc) x6 [18]
R4: (2 sc, inc) x6 [24]
R5: (3 sc, inc) x6 [30]
R6: (4 sc, inc) x6 [36]
R7: (5 sc, inc) x6 [42]
R8-R13: sc around (6 rounds) [42]
R14 (Tunic Edge – FLO): (sc, ch 2, sl st) repeatedly around to create jagged edge. FO Orange yarn.
Join Green yarn to the BLO of R13.
R15: sc around in BLO of R13 [42]
R16-R20: sc around (5 rounds) [42]
R21: (5 sc, dec) x6 [36]
Start stuffing firmly. Continue stuffing as you go.
R22: (4 sc, dec) x6 [30]
R23: (3 sc, dec) x6 [24]
R24: (2 sc, dec) x6 [18]
FO, leaving a long tail for sewing. Finish stuffing.
Arms (Beige Yarn) – Make 2:
R1: 6 sc in MR [6]
R2: (sc, inc) x3 [9]
R3-R10: sc around (8 rounds) [9]
Stuff lightly. FO, leaving a long tail for sewing.
Legs & Feet (Blue & Beige Yarn) – Make 2:
Start with Blue yarn.
R1: 6 sc in MR [6]
R2: (inc) x6 [12]
R3-R6: sc around (4 rounds) [12]
Change to Beige yarn.
R7: In BLO, (sc, dec) x4 [8]
R8-R9: sc around (2 rounds) [8]
Stuff lightly. For toes, use needle and yarn to create definition (wrap yarn between stitches on the foot to create divots). FO, leaving a long tail for sewing.
Santa Hat (Red & White Yarn):
Start with Red yarn.
R1: 4 sc in MR [4]
R2: (sc, inc) x2 [6]
R3: sc around [6]
R4: (2 sc, inc) x2 [8]
R5: sc around [8]
R6: (3 sc, inc) x2 [10]
R7: sc around [10]
R8: (4 sc, inc) x2 [12]
R9: sc around [12]
R10: (5 sc, inc) x2 [14]
R11: sc around [14]
R12: (6 sc, inc) x2 [16]
R13: sc around [16]
R14: (7 sc, inc) x2 [18]
R15: sc around [18]
Change to White yarn.
R16: sc around [18]
R17: sc around, sl st to join. FO. Create a small white pom-pom and sew to the tip of the hat.
Scarf (Red & White Yarn):
Using Red yarn, ch 46.
Row 1: sc in 2nd ch from hook and across (45 sc). Ch 1, turn. [45]
Row 2: sc across. Ch 1, turn. [45]
Change to White yarn.
Row 3-4: sc across. Ch 1, turn. [45]
Change to Red yarn.
Row 5-6: sc across. Ch 1, turn. [45]
Change to White yarn.
Row 7-8: sc across. Ch 1, turn. [45]
Change to Red yarn.
Row 9-10: sc across. FO. Weave in ends. Add small red fringe to the ends if desired.
Bone Tie (Blue Yarn):
Make a short chain (e.g., ch 5). Starting in 2nd ch from hook, sc in each (4 sc). Ch 1, turn. Repeat for a few rows to form the main “bone” shape. For the ends, work (sc, ch 2, sc) into the corners to create the bulbous bone ends. Adjust as needed to get the desired shape. This is more freeform based on the image.
FO, leaving a tail for sewing. Shape and sew to the front of the body, just under the scarf.
Tunic Spots (Black Yarn) – Make 3:
R1: 6 sc in MR. Sl st to join. [6]
FO, leaving a tail for sewing. Sew these irregularly onto the orange tunic part of the body.
Christmas Tree (Green & Yellow Yarn):
Start with Green yarn.
Base: 6 sc in MR [6]
R1: (inc) x6 [12]
R2: (sc, inc) x6 [18]
R3: (2 sc, inc) x6 [24]
R4: (3 sc, inc) x6 [30] – sl st, FO. This is the bottom layer.
Make a slightly smaller version for the middle layer (e.g., stop at [24] stitches). Sl st, FO.
Make a smaller version for the top layer (e.g., stop at [18] stitches). Sl st, FO.
Stack and sew layers together, stuffing lightly between layers as you assemble to give it shape. You can also crochet individual “branches” and sew them on. For a simpler version: make a cone shape.
Cone Tree (Green Yarn – alternative):
R1: 4 sc in MR [4]
R2: sc around [4]
R3: (sc, inc) x2 [6]
R4: sc around [6]
R5: (2 sc, inc) x2 [8]
Continue increasing every 2-3 rounds, then working straight rounds, until desired height and width, stuffing lightly. Create a small brown base if desired. Decorate with beads or embroidered spots.
Star (Yellow Yarn):
Ch 5, sl st to first ch to form a ring. *(ch 3, dc, ch 3, sl st) into ring.* Repeat * to * 4 more times for 5 points. FO, leaving tail for sewing. Sew to top of tree.
Gift Boxes (Red & Green Yarn) – Make 2:
(Each box is 6 squares, or crocheted as a solid cube if preferred)
Square: Ch 4, sc in 2nd ch from hook and in next 2 ch (3 sc). Ch 1, turn. Repeat for 3 rows. [3×3 sc square]
Make 6 squares for each color. Whipstitch them together to form a cube. Alternatively, for a solid cube:
Solid Cube (e.g., Red Yarn):
R1: Ch 8, sc in 2nd ch from hook, sc in next 5 ch, 3 sc in last ch. Working down other side of ch: sc in next 5 ch, 2 sc in last ch. [16]
R2-R3: sc around. [16]
R4: (sc, dec) x 5, sc, dec. [10]
Stuff lightly and sew closed. For the ribbons, wrap thin gold cord around and tie a tiny bow.
Assembly:
- Sew the head to the body. Ensure it is centered and secure.
- Sew the arms to the sides of the green vest portion of the body.
- Sew the legs to the bottom of the orange tunic, ensuring Fred can stand (or sit).
- Place the Santa hat on Fred’s head and stitch lightly to secure.
- Drape the scarf around Fred’s neck and stitch in place.
- Sew the blue bone tie below the scarf.
- Arrange the Christmas tree and gift boxes near Fred’s feet. You can stitch them lightly to the base or a small crocheted ground piece if you want them attached.