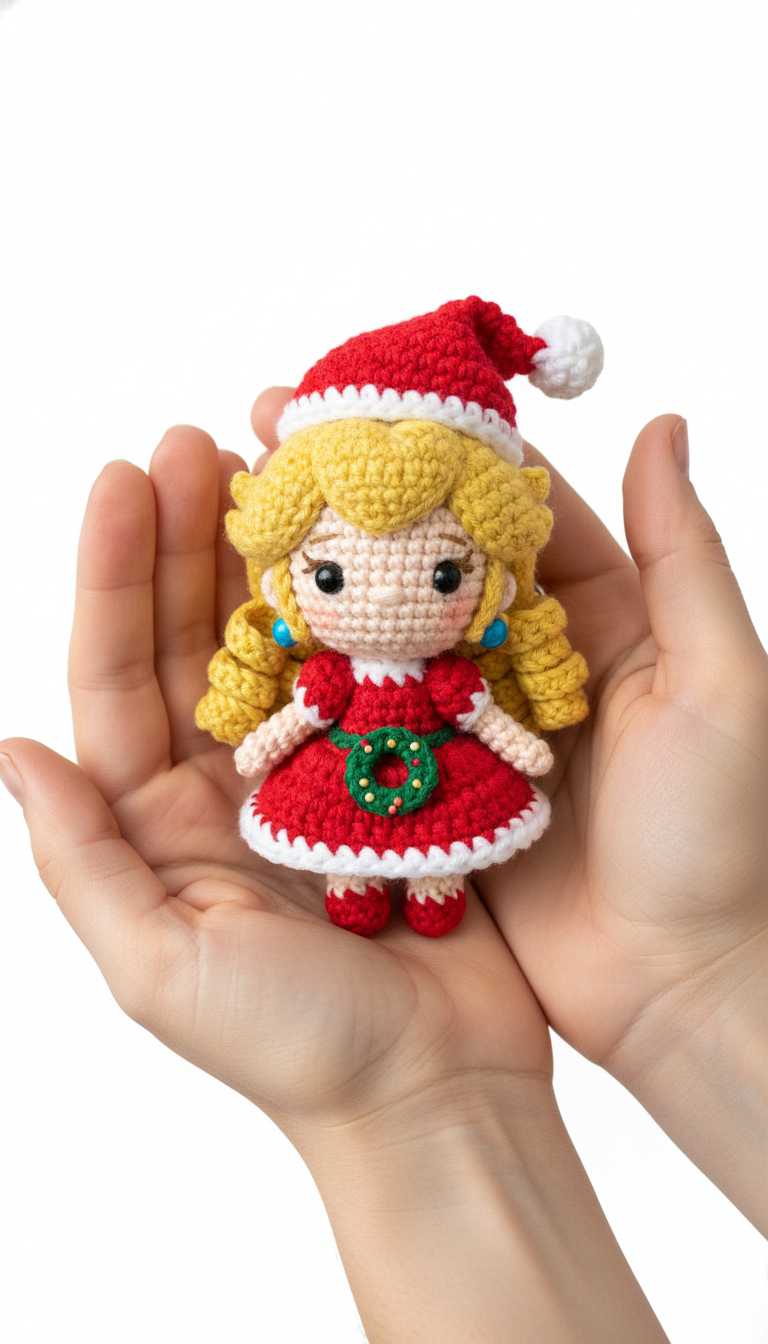
Step into a winter wonderland with our enchanting Festive Princess Peach Amigurumi pattern! This adorable crochet doll, dressed in her holiday finest, is the perfect project to bring joy and cheer to your Christmas decor or to give as a heartwarming handmade gift. Get ready to crochet your way to a magical holiday season!
Craft Your Own Enchanting Holiday Princess
This pattern is designed to guide you through creating a charming, unique piece that captures the spirit of the holidays. Whether you’re an experienced crocheter or looking for a delightful challenge, crafting this festive princess will fill your home with warmth and personalized charm. It’s more than a doll; it’s a treasured memory in the making.
Crochet Pattern: Festive Princess Peach Amigurumi: Your DIY Christmas Crochet Doll
Materials
- Worsted weight yarn in: Light Beige (skin tone)
- Bright Yellow (hair)
- Christmas Red (dress, hat, shoes)
- White (trim, pom-pom)
- Light Blue (earrings)
- Dark Green (wreath)
- 2.5mm crochet hook (or size appropriate for your yarn)
- 6mm black safety eyes
- Polyester fiberfill for stuffing
- Tapestry needle
- Stitch markers
- Pink embroidery floss (for cheeks)
Abbreviations
- MR: Magic Ring
- ch: Chain
- sc: Single Crochet
- inc: Increase (2 sc in one stitch)
- dec: Decrease (sc2tog)
- sl st: Slip Stitch
- FO: Fasten Off
- BLO: Back Loop Only
- () x N: Repeat instructions in parentheses N times
- []: Total number of stitches in the round
Instructions
Get ready to bring this festive character to life! This pattern is worked in continuous rounds unless otherwise specified. Use a stitch marker to keep track of the first stitch of each round.
Head (Skin Tone Yarn)
- Round 1: MR, 6 sc [6]
- Round 2: (inc) x 6 [12]
- Round 3: (sc, inc) x 6 [18]
- Round 4: (2 sc, inc) x 6 [24]
- Round 5: (3 sc, inc) x 6 [30]
- Round 6: (4 sc, inc) x 6 [36]
- Rounds 7-12: sc in each st around (6 rounds) [36]
- Insert safety eyes between Rds 9 and 10, approx. 6-7 stitches apart.
- Round 13: (4 sc, dec) x 6 [30]
- Round 14: (3 sc, dec) x 6 [24]
- Start stuffing firmly.
- Round 15: (2 sc, dec) x 6 [18]
- Round 16: (sc, dec) x 6 [12]
- Round 17: (dec) x 6 [6]
- FO, weave in end, close opening.
Body (Skin Tone, then Red Yarn)
- Start with Skin Tone yarn.
- Round 1: MR, 6 sc [6]
- Round 2: (inc) x 6 [12]
- Round 3: (sc, inc) x 6 [18]
- Round 4: (2 sc, inc) x 6 [24]
- Round 5: sc in each st around [24] (This is the torso/waist)
- Change to Red yarn.
- Round 6: sc in BLO in each st around [24] (This creates a ridge for the dress top)
- Round 7: (3 sc, inc) x 6 [30]
- Rounds 8-12: sc in each st around (5 rounds) [30]
- Round 13: (3 sc, dec) x 6 [24]
- Round 14: (2 sc, dec) x 6 [18]
- Stuff the body firmly.
- Do NOT FO. Change to White yarn.
- Round 15: sc in each st around [18].
- FO, leaving a long tail for sewing.
Arms (Make 2 – Skin Tone, then Red, then White Yarn)
- Start with Skin Tone yarn.
- Round 1: MR, 6 sc [6]
- Rounds 2-3: sc in each st around [6] (Hand)
- Change to Red yarn.
- Round 4: (inc) x 6 [12] (This makes it wide for the puff)
- Round 5: sc in each st around [12]
- Round 6: (dec) x 6 [6] (Closes it for the cuff)
- Change to White yarn.
- Round 7: sc in each st around [6] (Cuff)
- FO, leaving a long tail for sewing. Do not stuff.
Legs & Shoes (Make 2 – Red, then Skin Tone Yarn)
- Start with Red yarn.
- Round 1: MR, 6 sc [6]
- Round 2: (inc) x 6 [12]
- Round 3: sc in BLO in each st around [12]
- Round 4: (2 sc, dec) x 3 [9]
- Stuff foot firmly.
- Change to Skin Tone yarn.
- Rounds 5-8: sc in each st around (4 rounds) [9]
- Stuff leg.
- FO, leaving a long tail for sewing.
Hair Cap (Yellow Yarn)
- Round 1: MR, 6 sc [6]
- Round 2: (inc) x 6 [12]
- Round 3: (sc, inc) x 6 [18]
- Round 4: (2 sc, inc) x 6 [24]
- Round 5: (3 sc, inc) x 6 [30]
- Round 6: (4 sc, inc) x 6 [36]
- Rounds 7-9: sc in each st around [36]
- FO, leaving a long tail for sewing to the head.
Hair Curls (Make 8-10 – Yellow Yarn)
- Ch 15. Starting in 2nd ch from hook, work 3 sc in each chain across [42 sc].
- FO, leaving a long tail for sewing. The chain will naturally curl.
Santa Hat (Red, then White Yarn)
- Start with Red yarn.
- Round 1: MR, 4 sc [4]
- Round 2: (sc, inc) x 2 [6]
- Round 3: sc in each st around [6]
- Round 4: (2 sc, inc) x 2 [8]
- Round 5: sc in each st around [8]
- Round 6: (3 sc, inc) x 2 [10]
- Round 7: sc in each st around [10]
- Round 8: (4 sc, inc) x 2 [12]
- Rounds 9-10: sc in each st around [12]
- Change to White yarn.
- Round 11: sc in each st around [12]
- FO, leaving a tail.
- Pom-pom (White Yarn): Wrap white yarn around two fingers multiple times, tie off tightly in the middle, cut loops, and trim to a small ball. Sew to the tip of the hat.
Wreath (Dark Green Yarn)
- Ch 15, sl st to first ch to form a ring.
- Sc in each ch around [15]. Sl st to join.
- FO, leaving a tail for sewing.
- Using Red yarn and a tapestry needle, embroider small French knots or small stitches around the green ring to represent berries.
Assembly
- Sew the Head to the top of the Body.
- Sew the Legs to the bottom of the body.
- Sew the Arms to the sides of the red dress portion of the body.
- Position the Hair Cap on the head and sew securely.
- Sew the Hair Curls around the edge of the hair cap and on top to create the desired hairstyle.
- Sew the Santa Hat onto the head.
- Sew the Wreath to the front of the red dress.
- Using Pink embroidery floss, embroider small blush lines or circles on the cheeks below the eyes.
- For Earrings: Use a small piece of Light Blue yarn, tie a knot, and sew onto the side of the head below the hair.
Your Festive Princess Peach Amigurumi is complete! Enjoy your adorable holiday creation!