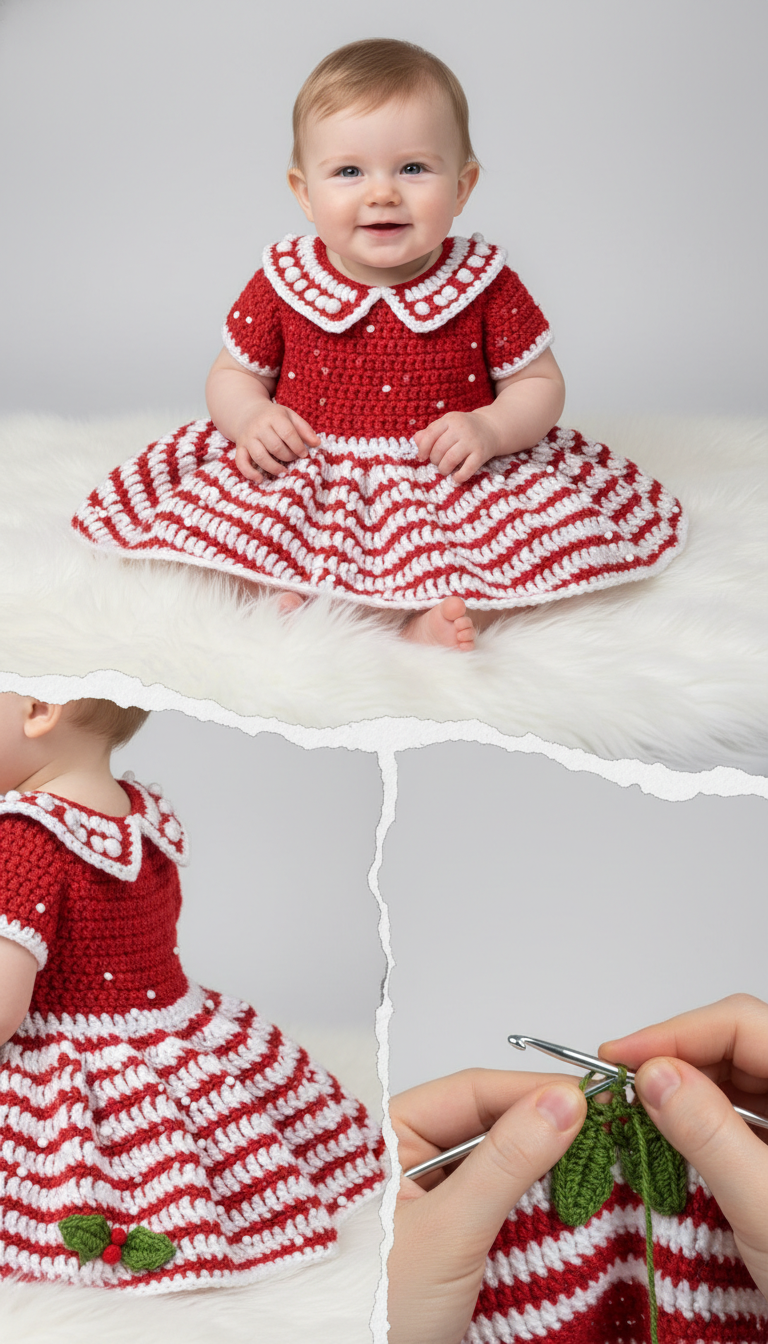
Get ready to spread holiday cheer with this adorable crochet Christmas baby dress! Perfectly designed in festive red and white, this charming outfit features a classic ripple skirt, a cute bobble-detailed collar, and a sweet holly appliqué. It’s the ideal project for creating precious memories and capturing beautiful holiday photos of your little one.
Handmade Joy for Your Little Sprout
Crafting this beautiful dress by hand infuses it with love and warmth, making it more than just clothing—it’s a cherished keepsake. Imagine the joy of dressing your baby in a unique, handmade garment for family gatherings or as a thoughtful gift. This pattern guides you to create a truly special piece that celebrates the magic of the season.
Crochet Pattern: Festive Red & White Crochet Christmas Baby Dress Pattern
Materials
- DK Weight Yarn in Red (main color)
- DK Weight Yarn in White (contrast color)
- DK Weight Yarn in Green (for holly)
- Small amount of DK Weight Yarn in Red (for berries)
- Crochet Hook 4.0mm (G/6)
- Tapestry Needle
- Scissors
- Stitch Markers
- 3-4 small buttons (for back closure)
Abbreviations
- ch: chain
- sl st: slip stitch
- sc: single crochet
- hdc: half double crochet
- dc: double crochet
- inc: increase (2 sts in same st)
- dc2tog: double crochet 2 together (decrease)
- dc3tog: double crochet 3 together (decrease)
- st(s): stitch(es)
- Rnd: Round
- Row: Row
- BO: Bobble Stitch (yarn over, insert hook into st, yo, pull up loop, yo, pull through 2 loops) 5 times in the same stitch, yo, pull through all 6 loops on hook. Ch 1 to secure.
Instructions
Gauge: 18 dc x 10 rows = 4″ (10 cm) (Adjust hook size if necessary to obtain gauge)
Note: This pattern is written for a baby size (approx. 6-12 months). Adjust hook size and/or stitch counts for different sizes.
Bodice (Red Yarn)
Back Opening: The bodice is worked in rows from the neck down to allow for a back button placket.
- Row 1: Ch 65 (or desired neck circumference). Sc in 2nd ch from hook and in each ch across. (64 sc)
- Rows 2-4: Ch 2 (does not count as st), hdc in each st across. Turn.
- Row 5 (Bobble Row): Ch 2, hdc in first 3 sts, *BO in next st, hdc in next 5 sts*. Repeat from * across, ending with hdc in remaining sts. (Place bobbles sporadically as seen in image, not necessarily every 5th st). Turn.
- Rows 6-10: Ch 2, hdc in each st across. Turn. (Continue adding bobbles sporadically on a few more rows if desired.)
- Yoke Shaping (Increases): Evenly increase stitches over the next few rows to create a flat yoke. For example, add 8-12 increases per row until you have a desired width for the chest/shoulders. Work in hdc or dc.
- Divide for Armholes: After reaching desired yoke depth (e.g., 5-6 inches from neck), divide stitches for front, back, and armholes. Mark front, back, and armhole sections. Connect the front and back sections, skipping the armhole stitches.
- Body (Below Armholes): Continue working the body in rows or join to work in rounds (if no back opening) in hdc/dc until desired bodice length is reached before the skirt.
Sleeves (Red Yarn, then White)
- Join red yarn at an armhole.
- Rnd 1: Work sc or hdc evenly around the armhole opening. Join with sl st.
- Rnd 2-3: Ch 2, hdc in each st around. Join with sl st.
- Rnd 4 (White Trim): Switch to white yarn. Ch 1, sc in each st around. Join with sl st. Fasten off.
- Repeat for the second sleeve.
Collar (White Yarn)
- Join white yarn at one corner of the neck opening.
- Row 1: Ch 1, sc evenly around the neck opening, working 3 sc in each corner to create a curve. Turn.
- Row 2: Ch 1, sc in each st, working 3 sc in the center of the curves. Turn.
- Row 3 (Bobble Row): Ch 1, sc in first 3 sts, *BO in next st, sc in next 5 sts*. Repeat from * across, adjusting spacing for bobbles as seen in image. Turn.
- Row 4: Ch 1, sc in each st across. Fasten off.
Skirt (Red and White Yarn)
Note: The skirt uses a ripple stitch pattern, alternating colors every two rows.
- Join red yarn to the bottom edge of the bodice. Ensure your stitch count is a multiple of 12 (or the chosen ripple repeat). You may need to adjust the number of stitches from the last bodice row with even increases or decreases.
- Starting Ripple Base: If your bodice edge is not a multiple of 12, sc evenly around the bodice edge, increasing or decreasing as needed to achieve a multiple of 12 stitches. Join with sl st.
- Rnd 1 (Red): Ch 3 (counts as first dc). Dc in next st, *dc in next 4 sts, dc3tog (over next 3 sts), dc in next 4 sts, 3dc in next st*. Repeat from * around. Join with sl st to top of ch 3.
- Rnd 2 (Red): Ch 3, dc in next st, *dc in next 4 sts, dc3tog, dc in next 4 sts, 3dc in next st*. Repeat from * around. Join with sl st.
- Rnd 3 (White): Switch to white yarn. Ch 3, dc in next st, *dc in next 4 sts, dc3tog, dc in next 4 sts, 3dc in next st*. Repeat from * around. Join with sl st.
- Rnd 4 (White): Ch 3, dc in next st, *dc in next 4 sts, dc3tog, dc in next 4 sts, 3dc in next st*. Repeat from * around. Join with sl st.
- Repeat Rnds 1-4: Continue alternating 2 rounds of Red and 2 rounds of White until the skirt reaches the desired length.
- Skirt Bobbles: On some of the red stripe rounds, sporadically place white BO stitches as seen in the image. Integrate them into the dc stitches of the red rows.
- Fasten off and weave in ends.
Holly and Berries Appliqué (Green and Red Yarn)
Holly Leaves (Make 2, Green Yarn)
- Leaf 1: Ch 6. Sl st in 2nd ch from hook, sc in next ch, hdc in next 2 ch, (sc, ch 2, sc) in last ch (corner). Working up other side of chain: hdc in next 2 ch, sc in next ch, sl st in last ch. Fasten off, leaving long tail for sewing.
- Leaf 2: Repeat for second leaf.
Berries (Make 3, Red Yarn)
- Berry: Ch 2. 5 sc in 2nd ch from hook. Sl st to first sc to form a small circle. Fasten off, leaving long tail. (Alternatively, make tiny BO stitches).
Finishing
- Sew the back seam of the bodice if you worked in rows without a button placket, leaving an opening at the top for buttons.
- Sew buttons onto one side of the back opening and create loop buttonholes on the opposite side.
- Arrange the two holly leaves and three berries at the back of the skirt, as shown in the image, and sew them securely in place using tapestry needle.
- Weave in all remaining loose ends.