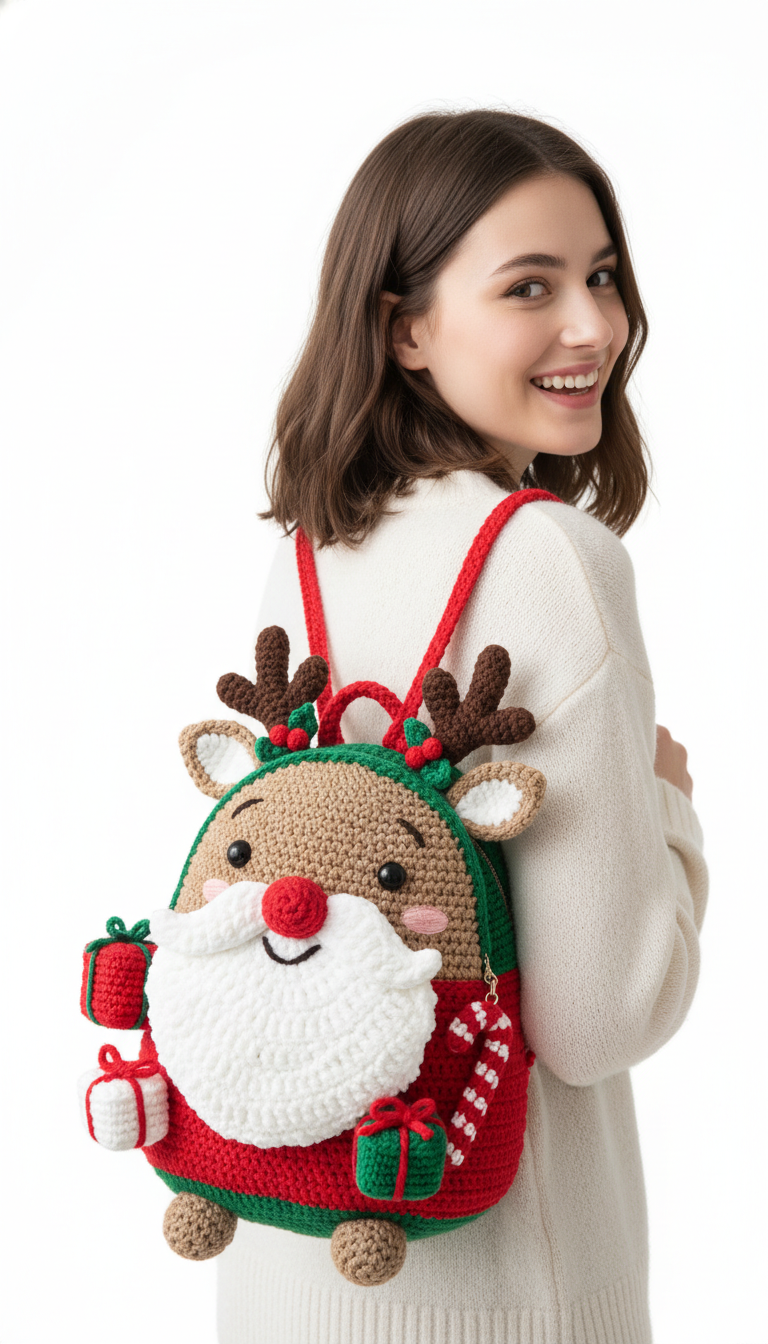
Get ready for the most wonderful time of the year with this enchanting Festive Reindeer Santa Crochet Backpack! Combining the charm of a reindeer with the jolly spirit of Santa, this unique amigurumi-style accessory is perfect for spreading holiday cheer. It’s not just a cute decoration, but a functional and delightful bag for children and adults alike, ready to carry your festive essentials.
Craft Your Own Magical Holiday Companion
Imagine the joy of creating a personalized backpack that captures the essence of Christmas! This pattern offers a rewarding experience, allowing you to handcraft a truly special item. Whether as a thoughtful gift or a playful addition to your own festive wardrobe, this Reindeer Santa backpack is sure to bring smiles and compliments wherever it goes, making your holidays even brighter.
Crochet Pattern: Festive Reindeer Santa Crochet Backpack Pattern – Jolly Holiday Amigurumi
Materials
- Worsted weight yarn in: Tan (face), Red (body, nose, straps, presents, berries), Green (trim, stripe, presents, holly), White (beard, ear inner, candy cane, presents), Dark Brown (antlers, feet), Light Pink (cheeks)
- 3.5mm crochet hook (or size to obtain desired fabric density)
- Stuffing (fiberfill)
- 6mm black safety eyes
- Yarn needle
- Stitch markers
- Green zipper (approx. 14-16 inches)
- Small key rings (for zipper pull and straps – optional)
Abbreviations
- ch: chain
- sc: single crochet
- hdc: half double crochet
- dc: double crochet
- sl st: slip stitch
- inc: increase (2 sc in one stitch)
- dec: decrease (sc 2 together)
- MR: magic ring
- FO: fasten off
- st(s): stitch(es)
- Rnd: Round
- Bobble St: Bobble Stitch (yarn over, insert hook into st, pull up a loop, yarn over, pull through 2 loops) 5 times in the same stitch, yarn over, pull through all 6 loops on hook.
Instructions
This pattern is worked in US crochet terms. We will start by creating the main front and back panels, then add all the festive details.
Main Panels (Make 2 – Front & Back)
Front Panel (Reindeer Face – Tan & Green)
- Start with Tan yarn.
- Rnd 1: Ch 18. Sc in 2nd ch from hook and next 15 ch, 3 sc in last ch. Turn to work along the other side of the chain. Sc in next 16 sts. (36 sts)
- Rnd 2: Inc, sc in next 15 sts, 3 sc in next st, sc in next 15 sts, 2 sc in last st. (40 sts)
- Rnd 3-15: Sc in each st around, working in continuous rounds to form an oval shape. Adjust increases/decreases as needed in initial rounds to maintain flat oval.
- Switch to Green yarn.
- Rnd 16: Sc in each st around. Sl st to first sc, FO.
Back Panel (Red & Green)
- Start with Red yarn.
- Rnd 1-15: Repeat Rnd 1-15 of the Front Panel instructions.
- Switch to Green yarn.
- Rnd 16: Sc in each st around. Sl st to first sc, FO.
Facial Features & Embellishments
Red Nose (Make 1)
- With Red yarn.
- Rnd 1: 6 sc in MR. (6 sts)
- Rnd 2: Inc in each st around. (12 sts)
- Rnd 3: (Sc, inc) x 6. (18 sts)
- Rnd 4-5: Sc in each st around. (18 sts)
- Rnd 6: (Sc, dec) x 6. (12 sts)
- Stuff lightly.
- Rnd 7: Dec x 6. (6 sts) FO, leaving a long tail for sewing.
Light Pink Cheeks (Make 2)
- With Light Pink yarn.
- Rnd 1: 6 sc in MR. Sl st to first sc, FO, leaving a long tail for sewing.
White Santa Beard (Make 1)
- With White yarn.
- Ch 16.
- Row 1: Sc in 2nd ch from hook and next 14 ch. Ch 1, turn. (15 sts)
- Row 2: Sc in each st across. Ch 1, turn.
- Row 3: Sc in first st, (Bobble St in next st, sc in next st) x 7. Ch 1, turn. (15 sts)
- Row 4: Sc in each st across. Ch 1, turn.
- Row 5: (Sc in next st, Bobble St in next st) x 7, sc in last st. Ch 1, turn. (15 sts)
- Repeat Rows 2-5 until beard reaches desired length (approx. 5-7 rows of bobbles). FO, leaving a long tail for sewing.
Tan & White Ears (Make 2)
- Start with Tan yarn.
- Rnd 1: 6 sc in MR. (6 sts)
- Rnd 2: (Sc, inc) x 3. (9 sts)
- Rnd 3: (Sc in next 2 sts, inc) x 3. (12 sts)
- Rnd 4-6: Sc in each st around. (12 sts)
- Flatten the ear and sc through both layers to close. FO.
- Inner Ear (White): Ch 6. Sc in 2nd ch from hook and next 4 ch. Sl st to attach to tan ear. FO.
Dark Brown Antlers (Make 2 – forked)
- With Dark Brown yarn.
- Main Antler Branch: Ch 10. Sc in 2nd ch from hook and next 8 ch. (9 sts)
- Branch 1: Ch 5. Sc in 2nd ch from hook and next 3 ch. Sl st into 4th sc of main branch.
- Branch 2: Ch 4. Sc in 2nd ch from hook and next 2 ch. Sl st into 7th sc of main branch. FO, leaving a long tail for sewing.
- Holly Leaves (Green, Make 4 small): Ch 4, (sl st, ch 2, sl st) in 2nd ch from hook, sl st in next ch. FO.
- Red Berries (Red, Make 6 small): 4 sc in MR. FO.
Dark Brown Feet (Make 2)
- With Dark Brown yarn.
- Rnd 1: 6 sc in MR. (6 sts)
- Rnd 2: Inc in each st around. (12 sts)
- Rnd 3: (Sc, inc) x 6. (18 sts)
- Rnd 4-5: Sc in each st around. (18 sts)
- Stuff lightly.
- Rnd 6: (Sc, dec) x 6. (12 sts)
- Rnd 7: Dec x 6. (6 sts) FO, leaving a long tail for sewing.
Red Straps (Make 2)
- With Red yarn.
- Ch 60-70 (or desired length for straps). Sc in 2nd ch from hook and each ch across.
- Row 2: Ch 1, turn. Sc in each st across. FO, leaving a long tail for sewing.
Presents (Make 4-5 small cubes in various colors: red/green, green/red, white/red)
- With main color yarn (e.g., Red).
- Ch 5. Sc in 2nd ch from hook and next 3 ch. Ch 1, turn. (4 sts)
- Rows 2-4: Sc in each st across. Ch 1, turn.
- You now have a square. Continue working sc rows to create 6 sides of the cube, or work each side separately and seam. Stuff lightly before closing.
- Ribbon (e.g., Green): Using surface slip stitch or a thin strip of ch sts, create a cross pattern on the present.
Candy Cane Zipper Pull (Red & White)
- With Red yarn.
- Rnd 1: 6 sc in MR. (6 sts)
- Rnd 2-3: Sc in each st around.
- Switch to White yarn.
- Rnd 4-5: Sc in each st around.
- Continue alternating Red and White yarn every 2 rounds for approx. 12-14 rounds or until desired length.
- Bend into a candy cane shape and lightly stuff. Attach to a small key ring. FO.
Assembly
- 1. Attach Facial Features: On the Tan front panel, attach the safety eyes (approx. 4-5 rounds above the center and 5 sts apart). Embroider small eyelashes and eyebrows with black yarn. Sew the Red Nose just below the eyes. Sew the Light Pink Cheeks on either side of the nose.
- 2. Attach Antlers & Ears: Sew the Dark Brown Antlers to the top-sides of the head. Attach the small Green Holly Leaves and Red Berries to the antlers as seen in the image. Fold the Tan & White Ears and sew them below the antlers.
- 3. Attach Beard: Sew the White Santa Beard to the lower half of the face, centered under the nose. Stuff the face and beard lightly for dimension.
- 4. Join Panels: Position the Green zipper along the curved edge of the front panel. Using a yarn needle and matching yarn, carefully sew the zipper into place. Repeat with the back panel.
- 5. Finish Seaming: With a yarn needle and matching green yarn, seam the remaining open edges of the front and back green borders together, creating the bottom of the backpack.
- 6. Attach Straps: Sew the Red Straps securely to the top-back and bottom-back of the backpack. Ensure they are evenly spaced.
- 7. Add Feet: Sew the Dark Brown Feet to the bottom edge of the backpack.
- 8. Attach Embellishments: Strategically sew the finished Presents onto the red body of the backpack. Attach the Candy Cane zipper pull to the zipper tab using a key ring if desired.
Your Festive Reindeer Santa Backpack is now complete! Enjoy your cheerful holiday companion!