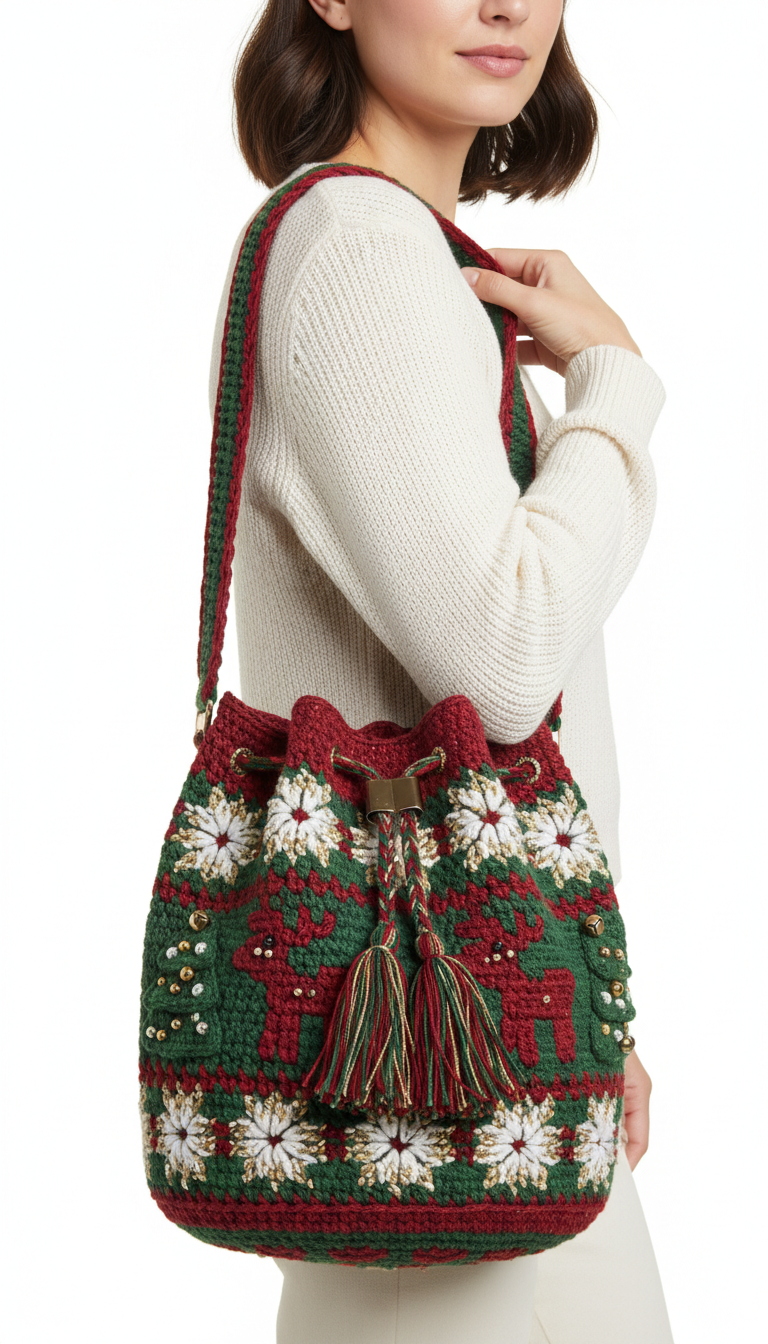
Embrace the holiday spirit with our enchanting Festive Crochet Christmas Bucket Bag! This pattern guides you through creating a stunning accessory featuring intricate tapestry crochet reindeer and delicate snowflakes. Perfect for gifting or adding a touch of festive cheer to your own wardrobe, this bag is a wonderful project for intermediate crocheters looking to expand their skills in colorwork and embellishment.
Crafting Holiday Magic: Your Next Festive Crochet Project
This Christmas bucket bag isn’t just an accessory; it’s a celebration of handmade charm and holiday joy. Imagine carrying your essentials in a unique, festive bag that sparks conversations and spreads smiles wherever you go. The detailed tapestry crochet and thoughtful embellishments make this a truly special piece, perfect for holiday gatherings or as a treasured gift.
Crochet Pattern: Festive Tapestry Crochet Christmas Bucket Bag: Reindeer & Snowflake Pattern
Materials
- Worsted weight yarn in Deep Red (A)
- Worsted weight yarn in Forest Green (B)
- Worsted weight yarn in White (C)
- Worsted weight yarn in Gold/Cream (D)
- 4.0mm (G/6) crochet hook
- Yarn needle
- Scissors
- Small gold beads
- Sewing needle and thread (for beads)
- Optional: Fabric for lining
- Optional: Metal drawstring slider
Abbreviations
- MR: Magic Ring
- ch: chain
- sl st: slip stitch
- sc: single crochet
- hdc: half double crochet
- dc: double crochet
- inc: increase (2 sc in one stitch)
- st(s): stitch(es)
- BLO: back loop only
- FO: fasten off
- **: repeat instructions between asterisks
Instructions
Gauge: 18 sc and 20 rows = 4 inches (10 cm) (adjust hook size if necessary to obtain gauge)
Notes: This pattern uses tapestry crochet for color changes. Carry unused yarn colors loosely behind your work, crocheting over them as you go to ensure even tension and a neat finish. Change color on the last yarn over of the previous stitch.
Bag Base (with Color A – Deep Red)
- Round 1: Start with MR, ch 1, 8 sc in MR. Join with sl st to first sc (8 sts).
- Round 2: Ch 1, *inc* around. Join with sl st (16 sts).
- Round 3: Ch 1, *sc in next st, inc* around. Join with sl st (24 sts).
- Round 4: Ch 1, *sc in next 2 sts, inc* around. Join with sl st (32 sts).
- Continue increasing evenly in each round, adding one more sc between increases, until the base reaches approximately 8-10 inches in diameter (or desired base size). End with a round of sc.
- Last Base Round: Ch 1, sc in BLO around. Join with sl st. This creates a defined edge for the bag body.
Bag Body (Tapestry Crochet)
Begin working in continuous rounds, not joining, for a seamless look. Use a stitch marker to mark the beginning of each round.
- Round 1 (Color A): With Color A, ch 1, sc in each st around (e.g., 96 sts for an 8-inch base).
- Round 2-3 (Color A): Sc in each st around.
- Round 4 (Color B): Switch to Color B. Sc in each st around.
- Round 5-7 (Color B): Sc in each st around.
- Pattern Repeat Section: This section alternates between rows of red stripes, reindeer motifs, and snowflake motifs. Each motif section is approximately 8-10 rows high.
- Red Stripe Section (Example):
- Round 1 (Color B): Sc in each st around.
- Round 2 (Color A): Sc in each st around.
- Round 3 (Color B): Sc in each st around.
- Reindeer Motif Section (Example – adjust stitch counts for your base circumference):
- Rounds (Color B with Color A for reindeer): Work sc in Color B, switching to Color A for sections that form the reindeer design. Carry Color A when not in use. Reference the image for placement and shape. The reindeer are generally 10-12 sts wide and 5-7 rows tall. Space them evenly around the bag. (e.g., *sc 12 B, sc 10 A, sc 12 B, sc 10 A…* This is a simplified example; actual stitch counts will vary based on your base circumference and desired reindeer size/spacing).
- Bead Placement: As you work the green sections, sew on gold beads randomly or in small clusters as seen in the image.
- Snowflake Motif Section (Example – Color B background, Color C and D for snowflake):
- Rounds (Color B with Color C & D for snowflakes): Work sc in Color B. For each snowflake, create a small central cluster (e.g., 3-dc popcorn or puff stitch) in Color C, surrounded by small sc stitches in Color D for the inner star shape, then sc stitches in Color C for the petals. Each snowflake is approximately 8-10 sts wide. Space them evenly between reindeer or other snowflakes.
- Continue alternating Red Stripe, Reindeer Motif, and Snowflake Motif sections until the bag body reaches desired height (e.g., 10-12 inches from base). End with a Red Stripe section and a few rounds of Color B.
Drawstring Casing (with Color A – Deep Red)
- Round 1: Switch to Color A. Sc in each st around.
- Round 2: Ch 2, *dc in next 3 sts, ch 2, skip 2 sts* around. Join with sl st to first dc. (This creates holes for the drawstring).
- Round 3: Ch 1, sc in each dc and ch-2 space around. Join with sl st.
- Round 4: Ch 1, sc in each st around. FO.
Strap (with Color A & B)
Work in rows for a sturdy, striped strap.
- Row 1: With Color B, ch 8 (or desired width). Sc in 2nd ch from hook and in each ch across (7 sc). Ch 1, turn.
- Row 2: Sc in each st across. Ch 1, turn.
- Row 3: Switch to Color A. Sc in each st across. Ch 1, turn.
- Row 4: Sc in each st across. Ch 1, turn.
- Repeat Rows 1-4, alternating 2 rows of Color B and 2 rows of Color A, until the strap reaches desired length (e.g., 40-50 inches). FO, leaving a long tail for sewing.
- Assembly: Attach the strap securely to opposite sides of the bag’s top edge using the long tails and a yarn needle.
Drawstring & Tassels
- Drawstring: Cut several long strands (e.g., 4 strands of Color A, 4 strands of Color B, 2 strands of Color D), each about 60 inches long. Braid or twist them tightly together to form a cord. Knot the ends.
- Tassels (Make 2): Wrap Color A, B, and D yarn around a piece of cardboard (e.g., 4 inches wide) about 30-40 times. Slip a piece of yarn under the top loops and tie tightly. Remove from cardboard. Wrap another piece of yarn tightly around the top section (about 1 inch down) to form the tassel head. Trim the bottom loops to even out the tassel.
- Assembly: Attach one tassel to each end of the braided drawstring. Weave the drawstring through the dc holes of the drawstring casing. If using a metal slider, thread both ends through the slider before attaching tassels.
Finishing
- Weave in all remaining loose ends.
- If not already done, sew on additional gold beads as desired, following the image.
- Optional: Cut and sew a fabric lining for your bag to give it structure and protect contents.