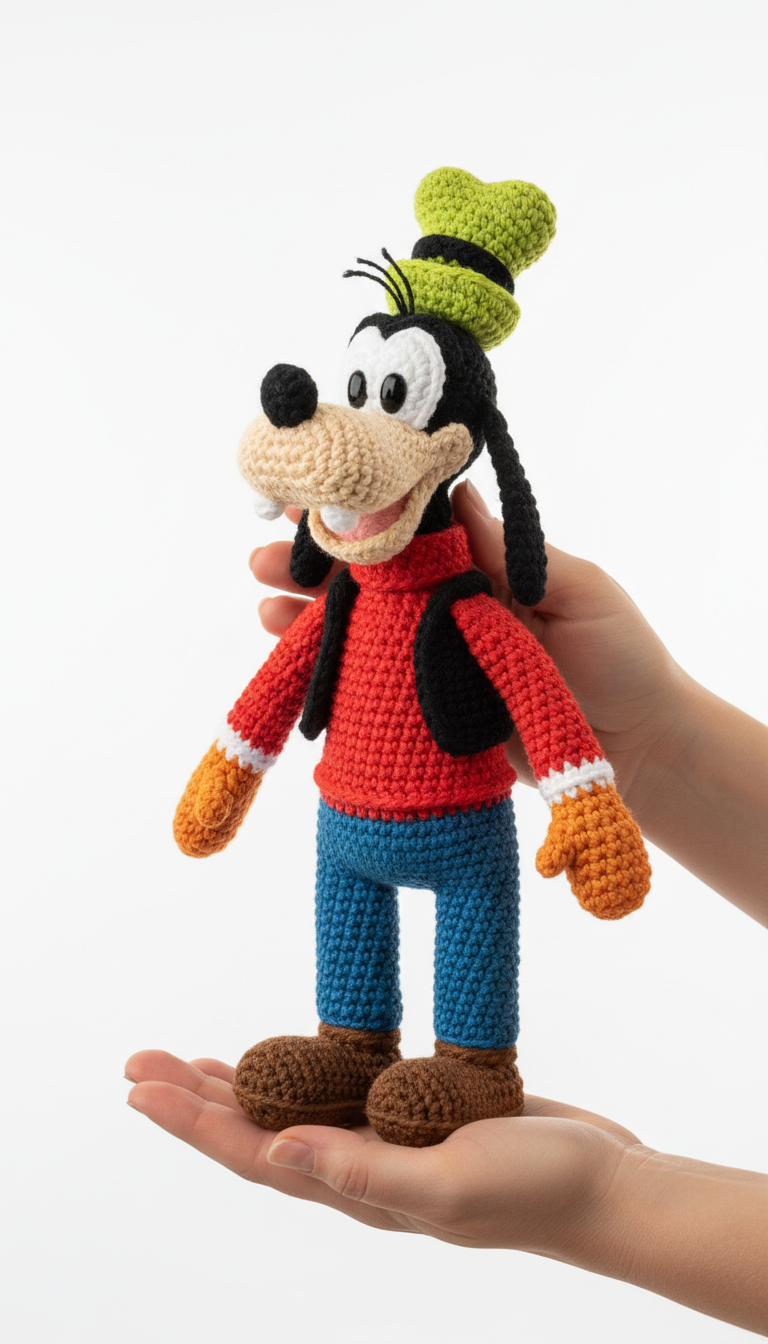
Bring the laughter and charm of Disney’s classic character, Goofy, right into your home with this delightful amigurumi crochet pattern! Perfect for Disney fans and crocheters alike, this detailed guide will help you craft a lovable, huggable Goofy. Get ready to add a touch of whimsy and nostalgia to your collection or create a special gift for someone who adores this iconic pal.
Unleash Your Inner Disney Magic with This Iconic Character
Crocheting Goofy is more than just making a doll; it’s about recreating a piece of cherished childhood. This pattern is designed to be enjoyable for intermediate crocheters, offering clear instructions to capture Goofy’s unique features, from his famous hat and floppy ears to his cheerful smile and oversized shoes. It’s a wonderful way to personalize your space or surprise a Disney enthusiast with a handmade treasure.
Crochet Pattern: Gawrsh! Create Your Own Beloved Goofy Amigurumi Crochet Pattern
Materials
- Worsted weight yarn in: Black, Tan (skin tone), White, Bright Green, Red, Royal Blue, Orange, Brown, Pink (small amount for tongue)
- 2.75mm or 3.0mm crochet hook (or size suitable for your yarn to achieve tight stitches)
- Safety eyes (10-12mm, or black yarn for embroidered eyes)
- Polyester fiberfill for stuffing
- Tapestry needle
- Stitch markers
- Black embroidery floss (for eyebrows, mouth details, hair)
Abbreviations
- MR: Magic Ring
- ch: chain
- sc: single crochet
- inc: increase (2 sc in next stitch)
- dec: decrease (sc 2 together)
- sl st: slip stitch
- BLO: back loop only
- FLO: front loop only
- FO: fasten off
- st(s): stitch(es)
- rnd(s): round(s)
- […] x N: Repeat instructions in brackets N times
- (…): Total number of stitches in the round
Instructions
This pattern is worked in continuous rounds unless otherwise specified. Use a stitch marker to keep track of the beginning of each round. Stuff firmly as you go.
- Part 1: Top of Head (Black)
- Rnd 1: MR 6 sc (6)
- Rnd 2: 6 inc (12)
- Rnd 3: [1 sc, inc] x 6 (18)
- Rnd 4: [2 sc, inc] x 6 (24)
- Rnd 5: [3 sc, inc] x 6 (30)
- Rnd 6: [4 sc, inc] x 6 (36)
- Rnd 7-10: Sc in each st around (36)
- Change to Tan yarn.
- Rnd 11-14: Sc in each st around (36)
- Rnd 15: [4 sc, dec] x 6 (30)
- Rnd 16: Sc in each st around (30)
- Rnd 17: [3 sc, dec] x 6 (24)
- Rnd 18: Sc in each st around (24)
- Start stuffing firmly. Insert safety eyes between Rnd 11-12, about 7-8 sts apart.
- Rnd 19: [2 sc, dec] x 6 (18)
- Rnd 20: [1 sc, dec] x 6 (12)
- Rnd 21: 6 dec (6)
- FO, weave in tail and close hole.
- 2. Snout (Tan)
- Rnd 1: MR 6 sc (6)
- Rnd 2: 6 inc (12)
- Rnd 3: [1 sc, inc] x 6 (18)
- Rnd 4: [2 sc, inc] x 6 (24)
- Rnd 5-8: Sc in each st around (24)
- Rnd 9: [2 sc, dec] x 6 (18)
- Stuff lightly. FO, leaving a long tail for sewing.
- Sew snout to the face, centered below the eyes, slightly below Rnd 12-16 of the head.
- 3. Nose (Black)
- Rnd 1: MR 6 sc (6)
- Rnd 2: [1 sc, inc] x 3 (9)
- Rnd 3: Sc in each st around (9)
- Lightly stuff. FO, leaving a long tail for sewing.
- Sew nose to the top of the snout.
- 4. Ears (Make 2 – Black)
- Rnd 1: MR 6 sc (6)
- Rnd 2: 6 inc (12)
- Rnd 3: [1 sc, inc] x 6 (18)
- Rnd 4-7: Sc in each st around (18)
- Rnd 8: [1 sc, dec] x 6 (12)
- Rnd 9-10: Sc in each st around (12)
- Flatten the ear and sc through both layers across the opening (6 sc).
- FO, leaving a long tail for sewing.
- Sew ears to the sides of the head, slightly below the black/tan color change.
- 5. Hat (Green and Black)
- Hat Base (Green):
- Rnd 1: MR 6 sc (6)
- Rnd 2: 6 inc (12)
- Rnd 3: [1 sc, inc] x 6 (18)
- Rnd 4: [2 sc, inc] x 6 (24)
- Rnd 5: [3 sc, inc] x 6 (30)
- Rnd 6: [4 sc, inc] x 6 (36)
- Rnd 7-10: Sc in each st around (36)
- Rnd 11: [4 sc, dec] x 6 (30)
- Rnd 12: [3 sc, dec] x 6 (24)
- Rnd 13: BLO sc in each st around (24)
- Rnd 14-15: Sc in each st around (24)
- Stuff lightly, shaping the tip.
- Hat Brim (Black):
- Join black yarn to the FLO of Rnd 12.
- Rnd 1: Ch 1, sc in each FLO st around (24)
- Rnd 2: [3 sc, inc] x 6 (30)
- Rnd 3: [4 sc, inc] x 6 (36)
- Rnd 4: Sc in each st around (36)
- Sl st, FO.
- Sew hat to the top of Goofy’s head.
- 6. Body (Red)
- Rnd 1: MR 6 sc (6)
- Rnd 2: 6 inc (12)
- Rnd 3: [1 sc, inc] x 6 (18)
- Rnd 4: [2 sc, inc] x 6 (24)
- Rnd 5: [3 sc, inc] x 6 (30)
- Rnd 6: [4 sc, inc] x 6 (36)
- Rnd 7: [5 sc, inc] x 6 (42)
- Rnd 8-15: Sc in each st around (42)
- Rnd 16: [5 sc, dec] x 6 (36)
- Rnd 17-20: Sc in each st around (36)
- Start stuffing.
- Rnd 21: [4 sc, dec] x 6 (30)
- Rnd 22-23: Sc in each st around (30)
- FO, leaving a long tail for sewing to the head. Stuff firmly.
- 7. Vest (Black – Make 2 panels)
- Front Panel:
- Ch 11.
- Row 1: Sc in 2nd ch from hook and next 9 ch (10)
- Row 2-10: Ch 1, turn, sc in each st across (10)
- FO.
- Back Panel:
- Ch 11.
- Row 1: Sc in 2nd ch from hook and next 9 ch (10)
- Row 2-10: Ch 1, turn, sc in each st across (10)
- FO.
- Sew one front panel to each side of the red body, resembling a vest opening in the front.
- 8. Arms (Make 2 – Red, White, Orange)
- Start with Red:
- Rnd 1: MR 6 sc (6)
- Rnd 2: 6 inc (12)
- Rnd 3-10: Sc in each st around (12)
- Change to White yarn.
- Rnd 11-12: Sc in each st around (12)
- Change to Orange yarn.
- Rnd 13-16: Sc in each st around (12)
- Rnd 17: [2 sc, dec] x 3 (9)
- Stuff arm lightly. FO, leaving a long tail for sewing.
- Flatten the top and sew arms to the sides of the body at the shoulder, around Rnd 22 of the body.
- 9. Legs (Make 2 – Blue)
- Rnd 1: MR 6 sc (6)
- Rnd 2: 6 inc (12)
- Rnd 3: [1 sc, inc] x 6 (18)
- Rnd 4-15: Sc in each st around (18)
- Stuff firmly. FO, leaving a long tail for sewing.
- Sew legs to the bottom of the body.
- 10. Shoes (Make 2 – Brown)
- Ch 6.
- Rnd 1: Sc in 2nd ch from hook, 3 sc, 3 sc in last ch. Working on other side of chain: 4 sc, 2 sc in last st (13)
- Rnd 2: Inc, 3 sc, 3 inc, 3 sc, 2 inc (19)
- Rnd 3: Sc in each st around (19)
- Rnd 4: FLO sc in each st around (19)
- Rnd 5-8: Sc in each st around (19)
- Rnd 9: 5 sc, 4 dec, 6 sc (15)
- Rnd 10: 3 sc, 4 dec, 4 sc (11)
- Stuff firmly. FO, leaving a long tail. Weave in and close.
- Sew shoes to the bottom of the legs.
- 11. Assembly and Details:
- Sew head to body.
- Sew legs and arms to body.
- Sew snout, nose, and ears to head.
- Sew hat to head.
- Embroider the mouth with black embroidery floss, creating Goofy’s characteristic wide smile and his two white teeth (can be small white felt or embroidered).
- Embroider eyebrows with black floss.
- Add small strands of black floss for his hair on top of his head near the hat.
- Embroider a pink tongue inside the mouth.