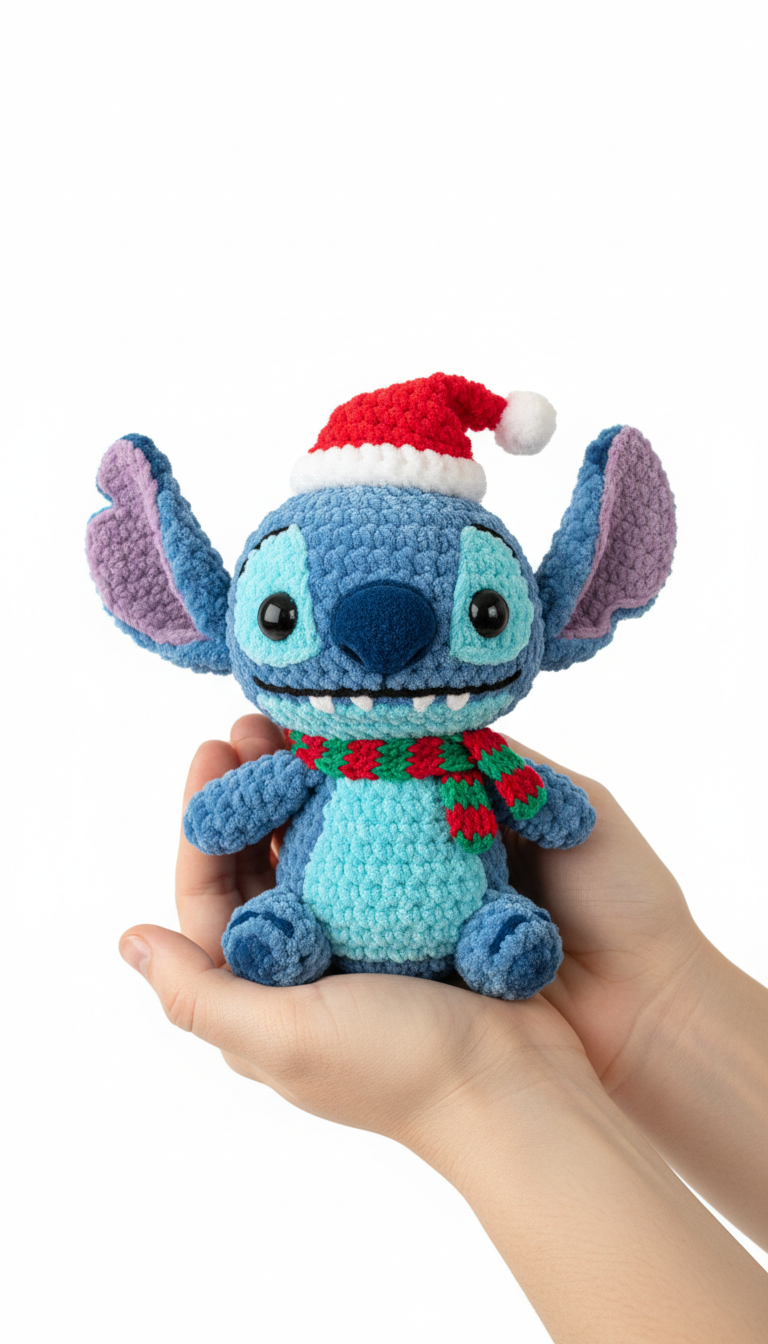
Bring a touch of intergalactic holiday cheer to your home with this charming Crochet Christmas Stitch Amigurumi! Perfect for fans of Disney’s Lilo & Stitch, this pattern guides you through creating your very own festive alien companion. Adorned with a classic Santa hat and a cozy striped scarf, this little guy is ready to spread joy and mischief all season long. Craft a unique handmade gift or a delightful decoration!
Spread Holiday Aloha with a Handmade Stitch
There’s nothing quite like the warmth of a handmade gift, and this Christmas Stitch amigurumi is sure to melt hearts. Whether nestled under the Christmas tree, perched on a shelf, or gifted to a beloved Stitch enthusiast, this adorable creation embodies the spirit of giving and handcrafted charm. Enjoy the meditative process of crocheting and create a memorable piece that will be treasured for years to come.
Crochet Pattern: Get Festive with Our Adorable Crochet Christmas Stitch Amigurumi Pattern
Materials
- Plush Chenille Yarn: Medium Blue (main body), Light Blue/Turquoise (belly, inner ears, eye patches), Lavender/Purple (outer ear details), Navy Blue (nose), Bright Red (hat, scarf), Emerald Green (scarf), White (hat brim, pom-pom, teeth details)
- Worsted Weight Yarn: Black (mouth embroidery, eye outlines)
- Crochet Hook: 3.5mm (or size to achieve tight stitches)
- Safety Eyes: 12mm, black
- Polyester fiberfill stuffing
- Yarn needle
- Stitch markers
- Scissors
Abbreviations
- MR: Magic Ring
- ch: chain
- sc: single crochet
- inc: increase (2 sc in one stitch)
- dec: decrease (sc two stitches together)
- BLO: back loop only
- FLO: front loop only
- st/sts: stitch/stitches
- sl st: slip stitch
- FO: Fasten off
- Rnd: Round
Instructions
General Notes: Work in continuous rounds unless otherwise specified. Use a stitch marker to mark the first stitch of each round. Stuff firmly as you go.
Head (Medium Blue)
- Rnd 1: 6 sc in MR (6)
- Rnd 2: (inc) x6 (12)
- Rnd 3: (1 sc, inc) x6 (18)
- Rnd 4: (2 sc, inc) x6 (24)
- Rnd 5: (3 sc, inc) x6 (30)
- Rnd 6: (4 sc, inc) x6 (36)
- Rnd 7: (5 sc, inc) x6 (42)
- Rnd 8-15: Sc in each st around (42) – 8 rounds
- Rnd 16: (5 sc, dec) x6 (36)
- Rnd 17: (4 sc, dec) x6 (30)
- Rnd 18: (3 sc, dec) x6 (24)
- Insert safety eyes between Rnd 13 and 14, about 9 stitches apart. Stuff firmly.
- Rnd 19: (2 sc, dec) x6 (18)
- Rnd 20: (1 sc, dec) x6 (12)
- FO, leave a long tail for sewing.
Body (Medium Blue)
- Rnd 1: 6 sc in MR (6)
- Rnd 2: (inc) x6 (12)
- Rnd 3: (1 sc, inc) x6 (18)
- Rnd 4: (2 sc, inc) x6 (24)
- Rnd 5: (3 sc, inc) x6 (30)
- Rnd 6-10: Sc in each st around (30) – 5 rounds
- Rnd 11: (3 sc, dec) x6 (24)
- Rnd 12: Sc in each st around (24)
- Rnd 13: (2 sc, dec) x6 (18)
- Rnd 14: Sc in each st around (18)
- Stuff firmly. FO, leave a long tail for sewing.
Belly Patch (Light Blue/Turquoise)
- Ch 7
- Rnd 1: Sc in 2nd ch from hook, sc in next 4 ch, 3 sc in last ch. Continue on other side of chain: sc in next 4 ch, 2 sc in last ch (14)
- Rnd 2: Inc, 4 sc, inc x3, 4 sc, inc x2 (20)
- Sl st to first sc. FO, leave a long tail for sewing.
Nose (Navy Blue)
- Rnd 1: 6 sc in MR (6)
- Rnd 2: (1 sc, inc) x3 (9)
- Rnd 3: Sc in each st around (9)
- FO, leave a long tail for sewing.
Ears (Make 2 of each)
Outer Ear (Medium Blue)
- Ch 9
- Rnd 1: Sc in 2nd ch from hook, sc in next 6 ch, 3 sc in last ch. Continue on other side of chain: sc in next 6 ch, 2 sc in last ch (18)
- Rnd 2: Inc, 6 sc, inc x3, 6 sc, inc x2 (24)
- FO, leave a long tail for sewing.
Inner Ear (Light Blue/Turquoise)
- Ch 7
- Rnd 1: Sc in 2nd ch from hook, sc in next 4 ch, 3 sc in last ch. Continue on other side of chain: sc in next 4 ch, 2 sc in last ch (14)
- Rnd 2: Inc, 4 sc, inc x3, 4 sc, inc x2 (20)
- FO.
Ear Backing (Lavender/Purple)
- Ch 7
- Rnd 1: Sc in 2nd ch from hook, sc in next 4 ch, 3 sc in last ch. Continue on other side of chain: sc in next 4 ch, 2 sc in last ch (14)
- Rnd 2: Inc, 4 sc, inc x3, 4 sc, inc x2 (20)
- FO.
Assembly of Ears: Place a Light Blue/Turquoise inner ear on top of a Lavender/Purple backing, then place both on top of a Medium Blue outer ear. Sew all three layers together using the tail from the outer ear.
Arms (Make 2 – Medium Blue)
- Rnd 1: 6 sc in MR (6)
- Rnd 2: (1 sc, inc) x3 (9)
- Rnd 3-7: Sc in each st around (9) – 5 rounds
- Stuff lightly. Sl st to close opening. FO, leave a long tail for sewing.
Legs (Make 2 – Medium Blue)
- Rnd 1: 6 sc in MR (6)
- Rnd 2: (inc) x6 (12)
- Rnd 3-6: Sc in each st around (12) – 4 rounds
- Stuff lightly. Sl st to close opening. FO, leave a long tail for sewing.
Santa Hat (Red and White)
Hat Base (Red)
- Rnd 1: 6 sc in MR (6)
- Rnd 2: Sc in each st around (6)
- Rnd 3: (1 sc, inc) x3 (9)
- Rnd 4: Sc in each st around (9)
- Rnd 5: (2 sc, inc) x3 (12)
- Rnd 6: Sc in each st around (12)
- Rnd 7: (3 sc, inc) x3 (15)
- Rnd 8: Sc in each st around (15)
- Rnd 9: (4 sc, inc) x3 (18)
- Rnd 10: Sc in each st around (18)
- Rnd 11: (5 sc, inc) x3 (21)
- Rnd 12: Sc in each st around (21)
- Rnd 13: (6 sc, inc) x3 (24)
- Rnd 14: Sc in each st around (24)
- Sl st, FO.
Hat Brim (White)
- Attach white yarn to the bottom edge of the hat base.
- Rnd 1: Ch 1, (inc) x24 in BLO around (48). Sl st to first sc.
- Rnd 2: Ch 1, sc in each st around (48). Sl st to first sc.
- FO, weave in ends.
Pom-Pom (White)
- Using white yarn, make a small pom-pom (approx. 1.5 cm diameter) and sew it to the tip of the red hat.
Christmas Scarf (Red and Green)
- Using Red yarn, Ch 45 (or desired length for scarf to wrap around neck).
- Row 1: Sc in 2nd ch from hook and in each ch across (44). Turn.
- Row 2: Ch 1, sc in each st across (44). Turn.
- Change to Green yarn.
- Row 3-4: Ch 1, sc in each st across (44). Turn.
- Change to Red yarn.
- Row 5-6: Ch 1, sc in each st across (44). Turn.
- Repeat (2 rows Green, 2 rows Red) until scarf reaches desired width (approx. 4-6 rows total, so 3 red, 3 green sections for 6 rows total shown in image).
- FO, weave in ends.
Assembly
- 1. Sew the head to the body.
- 2. Sew the belly patch onto the front of the body.
- 3. Position and sew the nose onto the center of the face, just above the space between the eyes.
- 4. Embroider the mouth with black worsted weight yarn, creating a wide smile below the nose. Add small white stitches for teeth.
- 5. Embroider thin lines around the eyes with black worsted weight yarn to create Stitch’s eye patches.
- 6. Sew the ears onto the top sides of the head, slightly back from the eyes.
- 7. Sew the arms to the sides of the body, just below the neck.
- 8. Sew the legs to the bottom front of the body.
- 9. Place the Santa hat on Stitch’s head and sew a few stitches to secure it.
- 10. Wrap the striped scarf around Stitch’s neck and tie it or secure it with a few stitches.