Introducing the adorable crochet Magneto keychain, a perfect blend of fandom and craftsmanship. This charming amigurumi figure brings the iconic X-Men villain to life in a soft, portable form. Ideal for fans of comic books and unique handmade accessories, it adds a touch of mutant power to your everyday items. Discover the appeal of owning such a meticulously crafted item.
Why Choose a Crochet Magneto Keychain for Your Collection?
Beyond its cute appearance, this crochet Magneto keychain showcases the incredible skill involved in amigurumi art. Each stitch contributes to creating a recognizable and beloved character, making it more than just a simple accessory. It serves as a fantastic conversation starter and a subtle nod to your favorite Marvel universe. Elevate your keyring or bag with this distinctive and durable piece of fan art.
Here is a detailed, professional crochet pattern to replicate the Magneto amigurumi keychain from the image.
**Magneto Amigurumi Keychain Pattern**
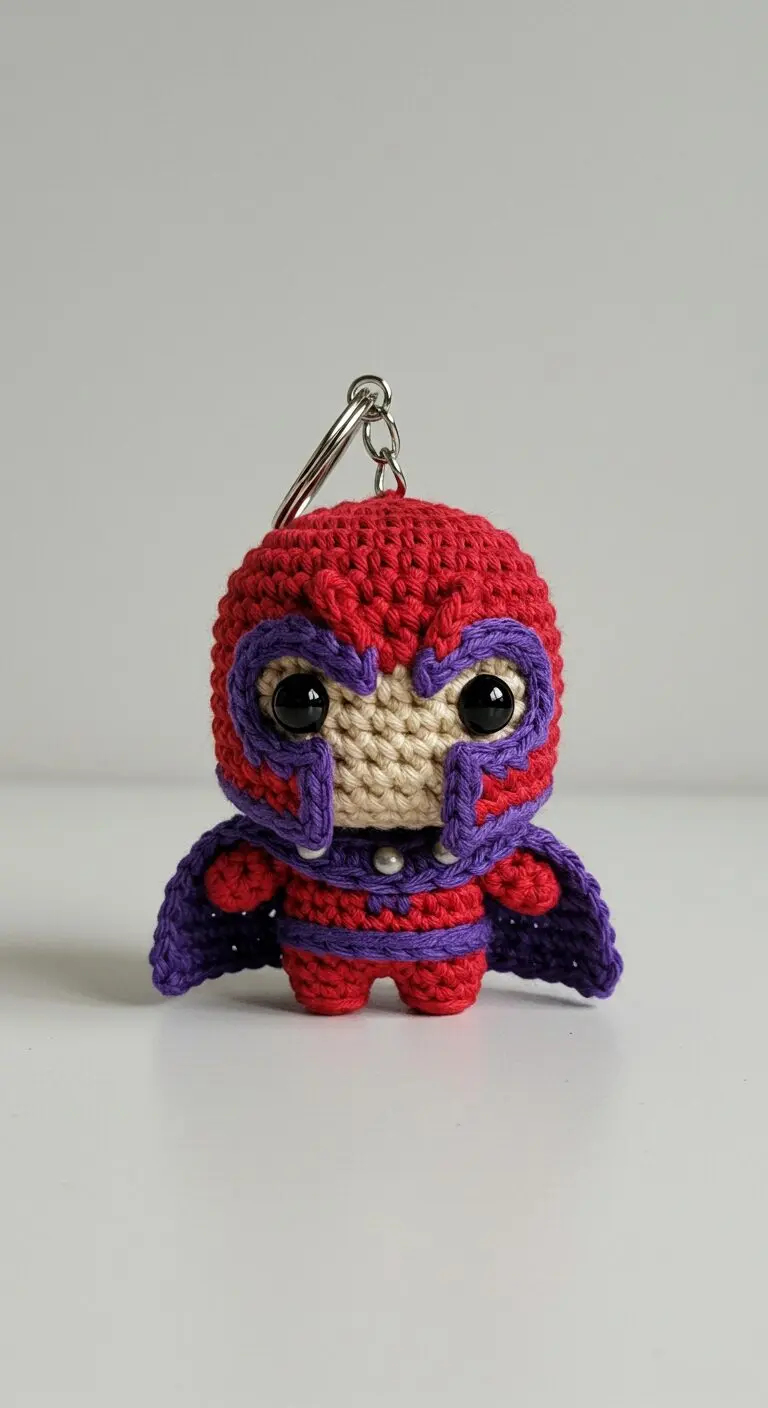
This pattern creates a cute, chibi-style amigurumi of Magneto, the iconic X-Men villain, perfect for a keychain or display. The design focuses on the character's recognizable helmet, cape, and color scheme in an adorable amigurumi form.
**Finished Size:** Approximately 3-4 inches (7.5-10 cm) tall (excluding the keychain ring), depending on yarn and hook size.
**Skill Level:** Intermediate
**Materials:**
* **Yarn:** Worsted weight (or DK weight for a slightly smaller amigurumi)
* Red (approximately 30-40 yards) - Main color for helmet, body, arms.
* Purple (approximately 15-20 yards) - For helmet details, cape, and belt.
* Light Tan/Beige (approximately 10 yards) - For the face.
* **Crochet Hook:** 3.0mm or 3.5mm (or size appropriate for your chosen yarn weight)
* **Safety Eyes:** 6mm or 8mm black safety eyes (2)
* **Stuffing:** Polyester fiberfill
* **Keychain Ring:** 1 metal split ring with a short chain attachment
* **Accent Bead:** 1 small silver or white bead (approx. 4mm) for the chest
* **Tapesty Needle:** For weaving in ends and sewing pieces together
* **Stitch Marker:** To mark the beginning of rounds
* **Scissors**
**Abbreviations:**
* **MR:** Magic Ring (or adjustable ring)
* **ch:** Chain
* **sc:** Single Crochet
* **inc:** Increase (2 sc in the same stitch)
* **dec:** Decrease (single crochet 2 together, using the invisible decrease method for a neater finish)
* **sl st:** Slip Stitch
* **FO:** Fasten Off
* **st(s):** Stitch(es)
* **( )**: Repeat instructions within parentheses the specified number of times
* **[ ]**: Total number of stitches at the end of the round
**Notes:**
* Work in continuous rounds unless otherwise specified. Use a stitch marker to keep track of the beginning of each round.
* Stuff your amigurumi firmly as you go, especially the head and body.
* When changing colors, complete the last yarn over of the stitch before the color change with the new color to ensure a cleaner transition.
* The purple helmet details are crocheted separately as strips and then sewn onto the head to create the raised, distinct lines seen in the image.
---
**Pattern Instructions:**
**1. Head/Helmet** (Start with Red yarn)
* **Round 1:** In MR, sc 6 [6]
* **Round 2:** (inc) x 6 [12]
* **Round 3:** (sc 1, inc) x 6 [18]
* **Round 4:** (sc 2, inc) x 6 [24]
* **Round 5:** (sc 3, inc) x 6 [30]
* **Round 6:** (sc 4, inc) x 6 [36]
* **Rounds 7-10:** sc in each st around (4 rounds) [36]
* **Change to Light Tan/Beige yarn.**
* **Round 11:** sc in each st around [36]
* **Round 12:** (sc 5, inc) x 6 [42]
* **Rounds 13-16:** sc in each st around (4 rounds) [42]
* *Insert safety eyes between Rounds 13 and 14, approximately 6-7 stitches apart, centered on the face area.*
* **Round 17:** (sc 5, dec) x 6 [36]
* **Change to Red yarn.**
* **Round 18:** sc in each st around [36]
* **Round 19:** (sc 4, dec) x 6 [30]
* **Round 20:** (sc 3, dec) x 6 [24]
* *Start stuffing the head firmly with fiberfill.*
* **Round 21:** (sc 2, dec) x 6 [18]
* **Round 22:** (sc 1, dec) x 6 [12]
* **Round 23:** (dec) x 6 [6]
* FO, leave a long tail for sewing to the body. Finish stuffing and use the tail and a tapestry needle to close the remaining hole. Weave in the end.
**2. Body** (Start with Red yarn)
* **Round 1:** In MR, sc 6 [6]
* **Round 2:** (inc) x 6 [12]
* **Round 3:** (sc 1, inc) x 6 [18]
* **Round 4:** (sc 2, inc) x 6 [24]
* **Rounds 5-7:** sc in each st around (3 rounds) [24]
* **Change to Purple yarn.**
* **Round 8:** sc in each st around [24] (This forms the belt)
* **Change to Red yarn.**
* **Rounds 9-11:** sc in each st around (3 rounds) [24]
* *Start stuffing the body firmly.*
* **Round 12:** (sc 2, dec) x 6 [18]
* **Round 13:** (sc 1, dec) x 6 [12]
* FO, leave a long tail for sewing to the head. Finish stuffing the body.
**3. Arms (Make 2)** (Start with Red yarn)
* **Round 1:** In MR, sc 6 [6]
* **Rounds 2-4:** sc in each st around (3 rounds) [6]
* *Do not stuff the arms.*
* Sl st to the next st to finish the round. FO, leave a long tail for sewing.
**4. Cape** (Purple yarn)
* **Row 1:** Ch 16. Sc in 2nd ch from hook, sc in next 14 chs [15]
* **Row 2:** Ch 1, turn. Sc in each st across [15]
* **Row 3:** Ch 1, turn. (sc 1, dec), sc in next 9 sts, (dec, sc 1) [13]
* **Row 4:** Ch 1, turn. Sc in each st across [13]
* **Row 5:** Ch 1, turn. (sc 1, dec), sc in next 7 sts, (dec, sc 1) [11]
* **Row 6:** Ch 1, turn. Sc in each st across [11]
* *Optional: For a neater edge, you can sc around the entire cape piece.*
* FO, leave a long tail for sewing.
**5. Helmet Details (Purple yarn)**
*These are the thin, raised purple lines on Magneto's helmet.*
* **Eye Frames (Make 2):**
* Ch 7. Sc in 2nd ch from hook, sc in next 5 chs. [6]
* FO, leave a long tail for sewing.
* **Forehead Crest:**
* Ch 5. Sc in 2nd ch from hook, sc in next 2 chs, sl st in last ch. [3 sc, 1 sl st]
* FO, leave a long tail for sewing.
---
**6. Assembly:**
1. **Attach Head to Body:** Using the long tail from the head, center the head on top of the body and sew them together firmly.
2. **Attach Arms:** Sew the two arms to the sides of the body, just below the neck-head join.
3. **Attach Cape:** Position the top edge of the cape on the back of the body, just below the neck/head join. Sew securely, ensuring it's centered.
4. **Attach Helmet Details:**
* Take the two **Eye Frames** and carefully sew them around the black safety eyes, curving them to follow the eye's shape. Refer to the image for placement.
* Sew the **Forehead Crest** piece in the center above the eye frames, positioning it to create the pointed, V-shaped arch of Magneto's helmet.
5. **Add Chest Accent:** Using a tapestry needle, attach the small silver or white bead to the center front of the body, just below the purple belt.
6. **Attach Keychain Ring:** Thread a small piece of red yarn through the very top center stitch of Magneto's head. Tie it securely to the small chain extension of your keychain ring. If your keychain ring has an integrated loop, you can sew the top of the head directly to it.
**Finishing:**
Weave in any remaining loose ends securely.
Your Magneto Amigurumi Keychain is now complete!