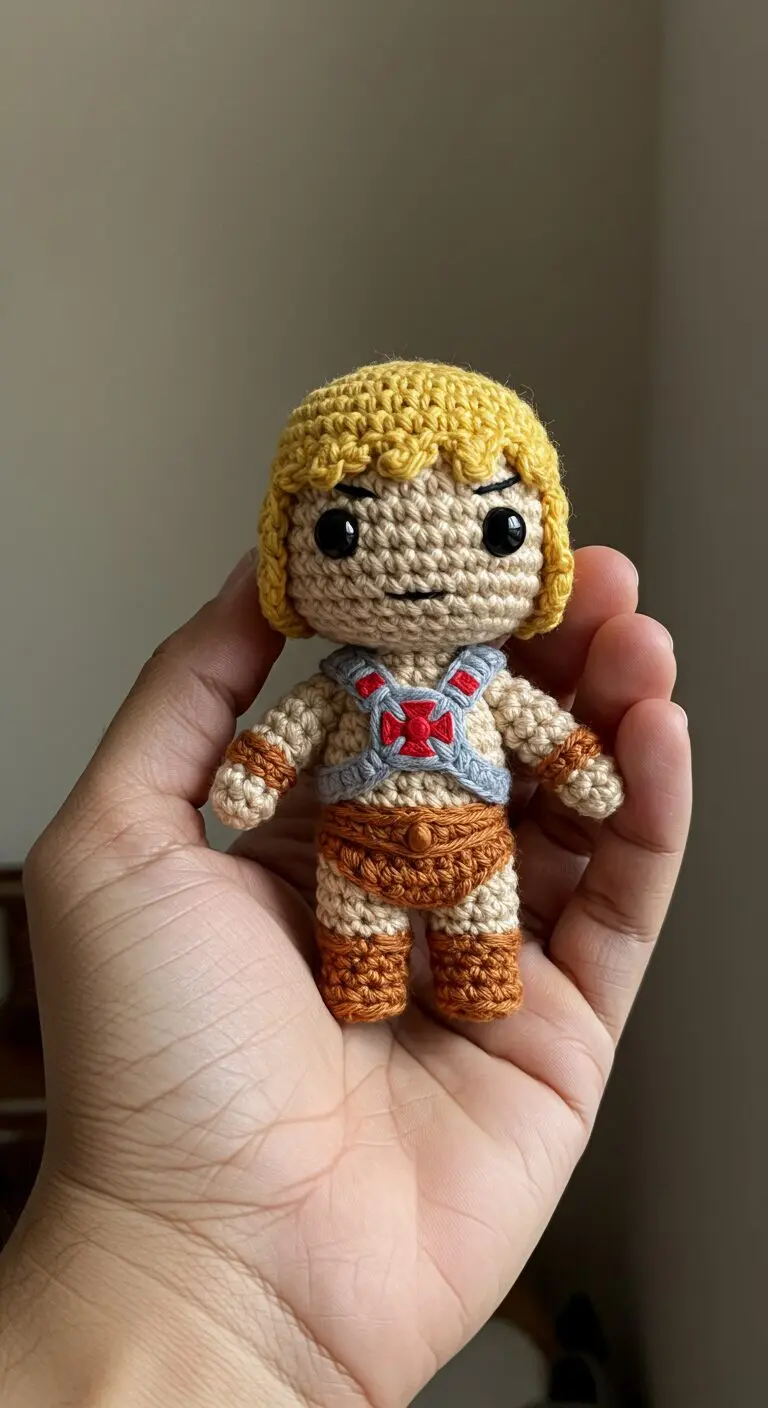
This pattern provides detailed instructions to create your own He-Man amigurumi, inspired by the iconic character. This project is suitable for crocheters with basic to intermediate skills, as it involves working in continuous rounds, color changes, and basic embroidery. The finished doll will be approximately 12 cm (4.7 inches) tall, making it a perfect collectible or a charming gift for fans of the Masters of the Universe.
This He-Man amigurumi is intricately crafted with a tiny sword and muscular armor, making it a perfect gift for fans of 80s cartoons and fantasy characters.
Materials
To complete this project, you will need the following materials:
•Yarn:
•Beige (skin color) – approximately 30g
•Yellow (hair) – approximately 15g
•Dark Orange (loincloth, boots, armbands) – approximately 20g
•Light Gray (harness) – approximately 10g
•Red (harness emblem) – small amount
•Black (eyebrows, mouth embroidery) – small amount
•Crochet Hook: 3.0 mm (or size appropriate for your yarn to achieve a tight fabric)
•Safety Eyes: 9 mm black safety eyes
•Stuffing: Polyester fiberfill
•Tapestry Needle: For sewing parts together and weaving in ends
•Embroidery Needle: For facial features
•Stitch Markers: To mark the beginning of rounds
•Pins: For positioning parts before sewing
•Scissors
Abbreviations (US Terms)
•MR: Magic Ring
•ch: chain
•sc: single crochet
•hdc: half double crochet
•inc: increase (2 sc in one stitch)
•dec: decrease (sc 2 together)
•slst: slip stitch
•BLO: back loops only
•FLO: front loops only
•[ ]: total number of stitches in the round
Notes
•The doll is worked in continuous rounds. Use a stitch marker to mark the beginning of each new round.
•All parts are worked in single crochet unless otherwise specified.
•Stuff the parts firmly as you go, ensuring a smooth and even shape.
•Color changes should be made on the last yarn over of the stitch before the new color is introduced.
Pattern Instructions
ARMS (Make 2)
Start with beige yarn.
•Round 1: 6 sc in a MR. [6]
•Round 2: (1 sc, inc) around. [9]
•Round 3-4: Sc around. [9]
Change to dark orange yarn.
•Round 5-6: Sc around. [9]
Change to beige yarn.
•Round 7: (1 sc, dec) around. [6]
•Round 8: Sc around. [6]
•Round 9: Fold the opening flat and close with 2 sc. [2]
Fasten off, leaving a long tail for sewing. Stuff lightly.
LEGS (Make 2)
Start with dark orange yarn. Leave a long tail at the beginning for sewing the button later.
•Round 1: 6 sc in a MR. [6]
•Round 2: Inc around. [12]
•Round 3: (1 sc, inc) around. [18]
•Round 4: Sc around in BLO. [18]
•Round 5: Sc around. [18]
•Round 6: (7 sc, dec) x 2. [16]
•Round 7: Sc around. [16]
Change to beige yarn.
•Round 8: (6 sc, dec) x 2. [14]
•Round 9: Sc around. [14]
•Round 10: (5 sc, dec) x 2. [12]
•Round 11: Sc around. [12]
Fasten off. Stuff the legs firmly. Sew a 2cm button inside the foot of each leg using the long tail left at the beginning. This will help the doll stand.
BODY
Using dark orange yarn, join both legs with a slip stitch or slipknot. Work around both legs, skipping the joining stitch.
•Round 12: 1 sc, 2 inc FLO, 1 sc, dec, 5 sc on the left leg; 5 sc, dec, 1 sc, 2 inc FLO, 1 sc on the right leg. [24]
•Round 13: 3 sc, inc, 1 sc, dec, 10 sc, dec, 1 sc, inc, 3 sc. [24]
•Round 14: Sc around. [24]
Change to dark orange yarn.
•Round 15: 3 sc, dec, 1 sc, dec, 9 sc, dec, 1 sc, dec, 2 sc. [20]
Stuff the legs firmly.
Change to beige yarn.
•Round 16: 4 sc, dec, 9 sc, dec, 3 sc. [18]
•Round 17: 4 sc, dec, 7 sc, dec, 3 sc. [16]
•Round 18: Sc around. [16]
•Round 19: 4 sc, dec, 6 sc, dec, 2 sc. [14]
In the next round, we will join the arms. Make sure they are aligned on the sides of the body. If necessary, adjust the starting stitches of the next round.
•Round 20: 3 sc, 2 sc joining the arm, 5 sc, 2 sc joining the arm, 2 sc. [14]
Do not cut the yarn. Continue to start the head. Stuff the body firmly.
HEAD
Continue with beige yarn from the body.
•Round 21: Inc around. [28]
•Round 22: (3 sc, inc) around. [35]
•Round 23: (4 sc, inc) around. [42]
•Round 24-30: Sc around. [42] (7 rounds)
Insert safety eyes between Rounds 26 and 27, approximately 7 stitches apart. Embroider eyebrows and mouth with black embroidery thread.
•Round 31: (5 sc, dec) around. [36]
•Round 32: (4 sc, dec) around. [30]
•Round 33: (3 sc, dec) around. [24]
•Round 34: (2 sc, dec) around. [18]
•Round 35: (1 sc, dec) around. [12]
•Round 36: Dec around. [6]
Fasten off, leaving a long tail. Close the opening with a tapestry needle and weave in the end. Stuff the head firmly as you go.
HAIR
Start with yellow yarn.
•Round 1: 6 sc in a MR. [6]
•Round 2: Inc around. [12]
•Round 3: (1 sc, inc) around. [18]
•Round 4: (2 sc, inc) around. [24]
•Round 5: (3 sc, inc) around. [30]
•Round 6: (4 sc, inc) around. [36]
•Round 7: (5 sc, inc) around. [42]
•Round 8-10: Sc around. [42]
For the bangs and sideburns, create individual strands by chaining and slip stitching back into the base. The exact number of chains and slip stitches will vary depending on the desired length and fullness. Refer to the image for guidance.
•Bangs: (ch 5, slst in 2nd ch from hook, slst in next 3 ch, skip 1 sc on head, slst in next sc on head) repeat 5-7 times across the front of the head.
•Sideburns: (ch 7, slst in 2nd ch from hook, slst in next 5 ch, skip 1 sc on head, slst in next sc on head) repeat 2 times on each side of the head.
Fasten off, leaving a long tail for sewing. Position the hair on the head and sew it securely.
HARNESS
Start with light gray yarn.
•Chain: Ch 20 (adjust as needed to fit around the body).
•Row 1: Sc in 2nd ch from hook and across. [19]
•Row 2-3: Ch 1, turn, sc across. [19]
Fasten off. This forms the main band of the harness. Create two smaller straps for the shoulders by chaining and slip stitching. Attach them to the main band and then to the body, crossing them in the front.
For the red cross emblem, embroider it directly onto the harness using red embroidery thread, or crochet a small cross and sew it on.
Assembly
1.Attach Arms: Sew the arms to the sides of the body, just below the neck, ensuring they are evenly spaced.
2.Attach Hair: Securely sew the hairpiece to the top of the head, aligning the bangs and sideburns as desired.
3.Attach Harness: Position the harness on the body, crossing the straps in the front. Sew it securely in place. Embroider the red cross emblem onto the center of the harness.
4.Final Touches: Weave in any remaining loose ends. Make sure all parts are securely attached and the doll is well-stuffed.
Your mini He-Man amigurumi is now complete! Enjoy your creation.