Embrace the holiday spirit with our enchanting Crochet Christmas Scarf! This pattern guides you through creating a cheerful accessory adorned with adorable appliqués and delightful hanging ornaments like miniature Santa hats, festive trees, and glittering snowflakes. Perfect for gifting or adding a touch of handmade charm to your winter wardrobe, this scarf is a joyful project for intermediate crocheters.
Deck the Halls with Handmade Charm: Why You’ll Love This Festive Scarf
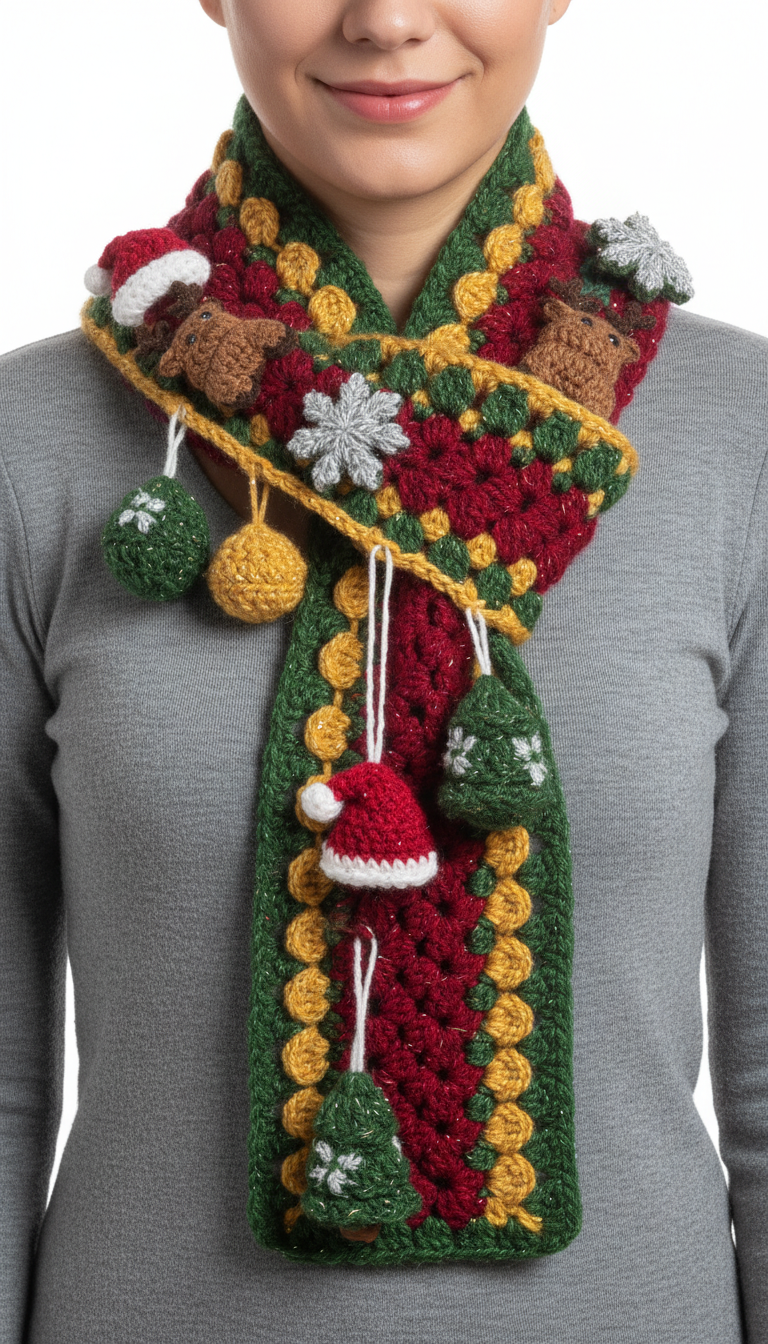
This festive granny square scarf isn’t just a cozy accessory; it’s a celebration of holiday cheer! Each hand-crocheted detail, from the whimsical reindeer and sparkly snowflakes to the charming dangling ornaments, brings a unique, personal touch. Imagine the smiles and compliments as you wear this unique piece, spreading warmth and holiday magic wherever you go. It’s truly a special way to showcase your crafting passion.
Crochet Pattern: Jingle All the Way: Crochet Your Own Festive Christmas Scarf Pattern
Materials
- Worsted weight yarn (with subtle metallic thread if desired) in: Deep Red, Forest Green, Mustard Yellow/Gold, Brown, White, Grey/Silver.
- Crochet Hook: 5.0mm (H) or size needed to obtain gauge.
- Fiberfill stuffing.
- Tapestry needle.
- Small black beads or embroidery floss for reindeer eyes.
- Scissors.
Abbreviations
- ch: chain
- sl st: slip stitch
- sc: single crochet
- hdc: half double crochet
- dc: double crochet
- tr: treble crochet
- st(s): stitch(es)
- sk: skip
- sp: space
- MR: magic ring
- inc: increase (2 sc in one st)
- dec: decrease (sc2tog)
- BLO: back loop only
- FO: finish off
Instructions
Gauge: Not critical for this project, but aim for a consistent tension. Each Festive Square should measure approximately 4×4 inches (10×10 cm) after 3 rounds.
Note: Yarn with a subtle metallic thread (like Red Heart Super Saver Metallic or Caron Simply Soft Party) can add a beautiful sparkle, as seen in the image.
Festive Square (Make 12-15, or to desired length)
- Start with Deep Red Yarn.
- Round 1: Ch 4, sl st to first ch to form a ring. Ch 3 (counts as 1 dc), 2 dc into ring, (ch 3, 3 dc) 3 times. Ch 3, join with sl st to top of beginning ch 3. (4 x 3-dc clusters, 4 ch-3 spaces) This forms the first square shape.
- Round 2: Sl st into next 2 dc and into ch-3 sp. Ch 3 (counts as 1 dc), (2 dc, ch 3, 3 dc) in same ch-3 sp (first corner made). *(3 dc, ch 3, 3 dc) in next ch-3 sp.* Repeat from * to * 2 more times. Join with sl st to top of beginning ch 3. (8 x 3-dc clusters, 4 ch-3 spaces) This expands the red square.
- Change to Forest Green Yarn.
- Round 3: Sl st into next 2 dc and into ch-3 sp. Ch 3 (counts as 1 dc), (2 dc, ch 3, 3 dc) in same ch-3 sp (first corner made). *3 dc in space between next two 3-dc clusters. (3 dc, ch 3, 3 dc) in next ch-3 sp (corner).* Repeat from * to * 2 more times. 3 dc in space between next two 3-dc clusters. Join with sl st to top of beginning ch 3. (12 x 3-dc clusters, 4 ch-3 spaces)
- Change to Mustard Yellow/Gold Yarn.
- Round 4: Sl st into next 2 dc and into ch-3 sp. Ch 3 (counts as 1 dc), (2 dc, ch 3, 3 dc) in same ch-3 sp (first corner made). *3 dc in space between next two 3-dc clusters. 3 dc in next space between 3-dc clusters. (3 dc, ch 3, 3 dc) in next ch-3 sp (corner).* Repeat from * to * 2 more times. 3 dc in space between next two 3-dc clusters. 3 dc in next space between 3-dc clusters. Join with sl st to top of beginning ch 3. FO.
Scarf Assembly
- Lay out your Festive Squares in a long strip, ensuring consistent orientation.
- Using Forest Green yarn and a tapestry needle or crochet hook, whip stitch or sl st join the squares along one edge to form a long rectangle.
Scarf Border
- Using Forest Green Yarn.
- Round 1 (Edging): Starting in a corner space, ch 3 (counts as dc), (2 dc, ch 2, 3 dc) in same corner space. Work 3 dc in each space between clusters along the side of the scarf. When you reach a joining seam, work a dc into the seam or a sl st to secure, then continue with 3 dc in the next cluster space. In each corner space, work (3 dc, ch 2, 3 dc). Repeat around the entire scarf. Join with sl st to top of beginning ch 3.
- Round 2 (Optional, for thickness): Ch 1, sc in each dc around, and (sc, ch 1, sc) in each ch-2 corner space. Join with sl st to first sc. FO.
Reindeer Appliqué (Make 2-3)
- With Brown Yarn.
- Head: MR, 6 sc. (6)
- Round 1: Inc in each st around. (12)
- Round 2: (Sc, inc) 6 times. (18)
- Round 3: Sc in each st around. (18)
- Ears/Antlers (Small bumps): Ch 3, sl st in 2nd ch from hook, sl st in next ch. Sl st into next sc on head. Repeat for second ear/antler a few sts away.
- FO, leaving a long tail for sewing. Embroider tiny black eyes or sew on beads.
Snowflake Appliqué (Make 3-4)
- With Grey/Silver Yarn.
- Round 1: Ch 5, sl st to first ch to form a ring. Ch 1, 12 sc into ring. Join with sl st to first sc. (12 sc)
- Round 2: *Ch 4, sl st into 2nd ch from hook, sc in next ch, hdc in last ch (this forms a point). Sk next sc on ring, sl st into next sc.* Repeat from * to * 5 more times. Join with sl st to base of first point. (6 points)
- FO, leaving a long tail for sewing.
Santa Hat Appliqué (Make 2-3)
- With Deep Red Yarn.
- Cone: Ch 10, sl st in 2nd ch from hook, sc in next 2 ch, hdc in next 2 ch, dc in next 2 ch, tr in next 2 ch. FO.
- Brim: Join White yarn to the straight edge of the cone. Ch 1, 9 sc evenly across the straight edge. FO.
- Pom-pom: With White yarn, ch 3, sl st into first ch to form a small loop. Make 5-6 dc into the loop. Cinch tight. Sl st to close.
- Sew pom-pom to tip of red cone. Leave tail for sewing.
Hanging Ball Ornament (Make 2-3: 1-2 Green, 1 Yellow)
- With Green or Yellow Yarn.
- Round 1: MR, 6 sc. (6)
- Round 2: Inc in each st around. (12)
- Round 3: (Sc, inc) 6 times. (18)
- Rounds 4-5: Sc in each st around. (18)
- Round 6: (Sc, dec) 6 times. (12)
- Stuff firmly with fiberfill.
- Round 7: Dec 6 times. (6)
- FO, weave tail through remaining 6 sts and pull tight to close.
- For Green balls, embroider a small white snowflake on one side using White yarn and tapestry needle.
- Attach a white yarn loop (approx. 4-5 inches long) for hanging.
Hanging Christmas Tree Ornament (Make 1-2)
- With Forest Green Yarn.
- Cone (Tree Body):
- Round 1: MR, 4 sc. (4)
- Round 2: (Sc, inc) 2 times. (6)
- Round 3: Sc in each st around. (6)
- Round 4: (2 sc, inc) 2 times. (8)
- Round 5: Sc in each st around. (8)
- Round 6: (3 sc, inc) 2 times. (10)
- Round 7: Sc in each st around. (10)
- Round 8: (4 sc, inc) 2 times. (12)
- Stuff lightly as you go.
- Round 9: Sc in each st around. (12)
- Trunk (Brown Yarn): Ch 3. Work 3 dc in 2nd ch from hook. Sl st into last ch. FO. Sew to bottom of tree.
- Embroider a small white snowflake on the tree using White yarn.
- Attach a white yarn loop (approx. 4-5 inches long) for hanging.
Hanging Stuffed Santa Hat Ornament (Make 1)
- With Deep Red Yarn.
- Cone (Hat Body):
- Round 1: MR, 4 sc. (4)
- Round 2: (Sc, inc) 2 times. (6)
- Round 3: Sc in each st around. (6)
- Round 4: (2 sc, inc) 2 times. (8)
- Round 5: Sc in each st around. (8)
- Round 6: (3 sc, inc) 2 times. (10)
- Round 7: Sc in each st around. (10)
- Stuff lightly as you go.
- Brim (White Yarn, working in BLO for crisp edge):
- Round 8: Ch 1, 2 sc in BLO of each st around. (20)
- Round 9: Sc in each st around. (20)
- FO, leaving a tail.
- Pom-pom (White Yarn): Ch 3, sl st to first ch to form ring. Make 5-6 dc into ring. Cinch tight. Sl st to close. Sew to top of hat.
- Attach a white yarn loop (approx. 4-5 inches long) for hanging.
Finishing
- Using Deep Red, Forest Green, and Mustard Yellow yarn, strategically sew the Reindeer, Snowflake, and Santa Hat appliqués onto various Festive Squares on your scarf. Refer to the image for placement inspiration.
- Attach the hanging ornaments to the scarf by tying their white yarn loops to the granny cluster spaces along the bottom edge of the scarf. Vary their placement and length as desired to create a whimsical effect.
- Weave in all remaining ends securely.