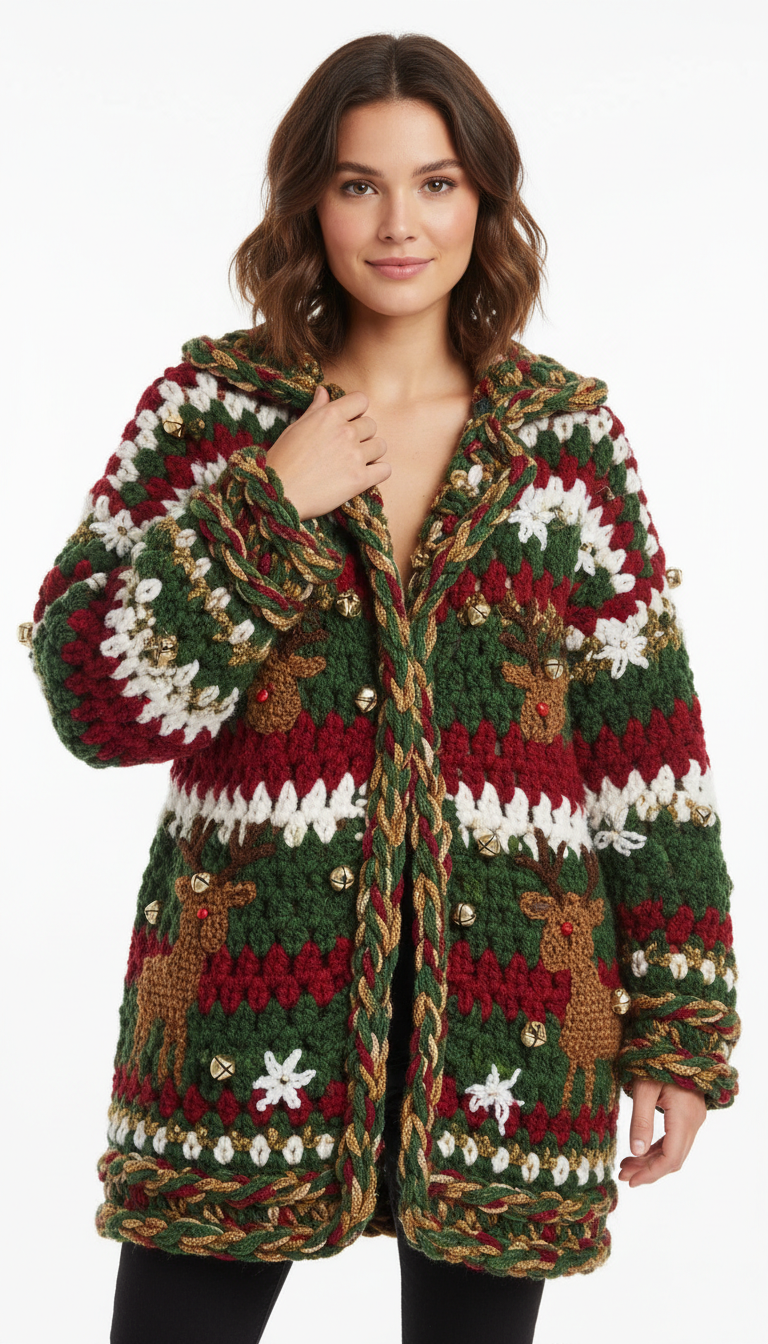
Embrace the spirit of the holidays with our charming Jingle Bells Crochet Cardigan! This festive garment, adorned with playful reindeer and delicate snowflakes, is the perfect handmade addition to your winter wardrobe. Imagine cozy evenings by the fire or cheerful holiday gatherings, all while sporting your unique, handcrafted piece. Get ready to crochet your way to a merry Christmas!
Unleash Your Inner Elf: Why This Cardigan is a Must-Make!
This isn’t just a cardigan; it’s a wearable celebration of the season, bringing warmth and smiles wherever you go. Its unique design, featuring vibrant colors and delightful appliqués, makes it a conversation starter and a true labor of love. Perfect for gifting or simply treating yourself, this project will fill your crafting hours with joy and leave you with a cherished garment that embodies holiday cheer.
Crochet Pattern: Jingle Bells Crochet Cardigan Pattern: Craft Your Festive Holiday Look!
Materials
- Aran/Worsted Weight Yarn (approx. 500g Forest Green, 300g Cranberry Red, 200g Cream/Off-White, 100g Tan/Light Brown, 50g Dark Brown, small amount of Bright Red)
- Crochet Hook size 6.0mm (J/10)
- Tapestry Needle
- Scissors
- Measuring Tape
- Stitch Markers (optional)
- Small Gold Jingle Bells (approx. 20-30)
- Red beads (for reindeer noses, optional)
Abbreviations
- ch – chain
- st(s) – stitch(es)
- sl st – slip stitch
- sc – single crochet
- hdc – half double crochet
- dc – double crochet
- tr – treble crochet
- rnd – round
- FO – fasten off
- rep – repeat
- sk – skip
- inc – increase
- dec – decrease
- ch-sp – chain space
- 3-dc cl – 3 double crochet cluster (3dc in same st/sp)
Instructions
Gauge: 13 dc and 8 rows = 4 inches (10 cm). Adjust hook size if necessary.
Note: Cardigan is worked in panels from the bottom up. Join new colors at the beginning of rows with a sl st and ch3 (counts as 1st dc) or with a standing dc. Carry yarn loosely up the side or cut and re-attach as needed.
Main Color Sequence: (approx. 4 rows Green, 2 rows Cream, 4 rows Red, 2 rows Cream) – Repeat throughout body panels and sleeves. Adjust as desired.
Back Panel
- Foundation: With Forest Green, ch 80 (or desired width for your size).
- Row 1: Dc in 4th ch from hook (counts as 2 dc), dc in next ch, *sk 2 ch, 3-dc cl in next ch. Rep from * across, ending with 2 dc in last ch if preferred for a cleaner edge, or simply 3-dc cl. Ch3, turn.
- Row 2: Dc in first st, *sk 3-dc cl, 3-dc cl in next ch-sp. Rep from * across, ending with 2 dc in top of turning ch. Ch3, turn.
- Rows 3-6: Rep Row 2, following the main color sequence. Continue until panel measures approx. 25-30 inches (or desired length to shoulder), ending on a Green stripe. FO.
Front Panels (Make 2)
- Foundation: With Forest Green, ch 40 (or desired width).
- Row 1: Dc in 4th ch from hook, dc in next ch, *sk 2 ch, 3-dc cl in next ch. Rep from * across, ending with 2 dc in last ch. Ch3, turn. (Approx. 12-15 3-dc clusters per row).
- Rows 2-End: Rep Row 2 of Back Panel, following the main color sequence. Continue until front panel matches the length of the back panel, ending on a Green stripe. FO.
Sleeves (Make 2)
- Foundation: With Forest Green, ch 36 (or desired cuff circumference). Join with sl st to first ch to form a ring.
- Rnd 1: Ch3, dc in next 2 ch, *sk 2 ch, 3-dc cl in next ch. Rep from * around. Join with sl st to top of ch3. (Approx. 9 3-dc clusters).
- Rnds 2-End: Ch3, dc in first st, *sk 3-dc cl, 3-dc cl in next ch-sp. Rep from * around. Join with sl st to top of ch3. Follow main color sequence. Increase by adding one extra 3-dc cl every 4-5 rounds as needed to widen the sleeve for the upper arm (e.g., in a ch-sp work (3-dc cl, ch1, 3-dc cl)). Continue until sleeve measures approx. 18-20 inches (or desired length), ending on a Green stripe. FO.
Assembly
- Seam Shoulders: Lay front panels over back panel, right sides together. Sl st or sc along shoulder seams for approx. 5-7 inches from outer edge, leaving a neckline opening.
- Attach Sleeves: Align the center of the sleeve top with the shoulder seam. Sl st or sc the sleeve seam to the armhole opening of the body panels.
- Seam Sides and Sleeves: Fold cardigan in half, right sides together. Sl st or sc along side seams from underarm to hem, and then continue down the sleeve seams to the cuff. Turn right side out.
Shawl Collar/Lapel
With Cranberry Red yarn (or desired color for collar trim):
- Row 1: Join yarn at the bottom front corner. Sc evenly all around the front opening, up along the neckline, and down the other front opening. Turn.
- Row 2: Ch2 (does not count as st), hdc in each sc across. Turn.
- Rows 3-6: Rep Row 2, working a few extra hdc stitches in the corner curves of the lapel/collar area to encourage it to lie flat and curve outward slightly. FO.
Braided Trim (Make several lengths)
Cut multiple strands of Forest Green, Cranberry Red, and Gold/Mustard yarn (approx. 3-4 strands of each color per braid). Braid them tightly together. Make long lengths to cover the front opening, collar, bottom hem, and cuffs. Secure ends by knotting or weaving in.
Reindeer Appliqués (Make 4-6)
- Body (Tan/Light Brown): Ch 10.
- Row 1: Sc in 2nd ch from hook and next 8 ch. (9 sc). Ch1, turn.
- Row 2-5: Sc in each st across. Ch1, turn.
- Head: Sl st in next st, ch1, sc in next 3 sts, ch1, turn. Sc in 3 sts for 2 rows. FO.
- Legs: Join yarn to bottom of body, ch5, sc in 2nd ch from hook and next 3 ch. Sl st to body. Repeat for 3 more legs.
- Antlers (Dark Brown): Embroider small antlers onto the head using a tapestry needle.
- Nose: Attach a small red bead or embroider a small red sc for the nose.
- Assembly: Sew the reindeer appliqués onto the cardigan evenly spaced on the front panels.
Snowflake Appliqués (Make 6-8)
- With Cream/Off-White yarn, make a magic ring.
- Rnd 1: Ch2 (counts as hdc), hdc in ring. Ch3, (2 hdc in ring, ch3) 5 times. Join with sl st to top of ch2. (6 ch3 spaces).
- Rnd 2: Sl st into ch3-sp, (ch3, dc, ch3, dc, ch3, sl st) in each ch3-sp around. FO.
- Assembly: Sew the snowflake appliqués onto the cardigan, filling in gaps between the reindeer.
Finishing Touches
- Sew the braided trim along the entire front opening, around the collar, along the bottom hem, and around the cuffs of the sleeves using a tapestry needle and matching yarn.
- Strategically sew the gold jingle bells onto the cardigan, especially along the braided trim on the front opening and random spots on the body and sleeves, to create that festive jingle.
- Weave in all remaining ends securely.