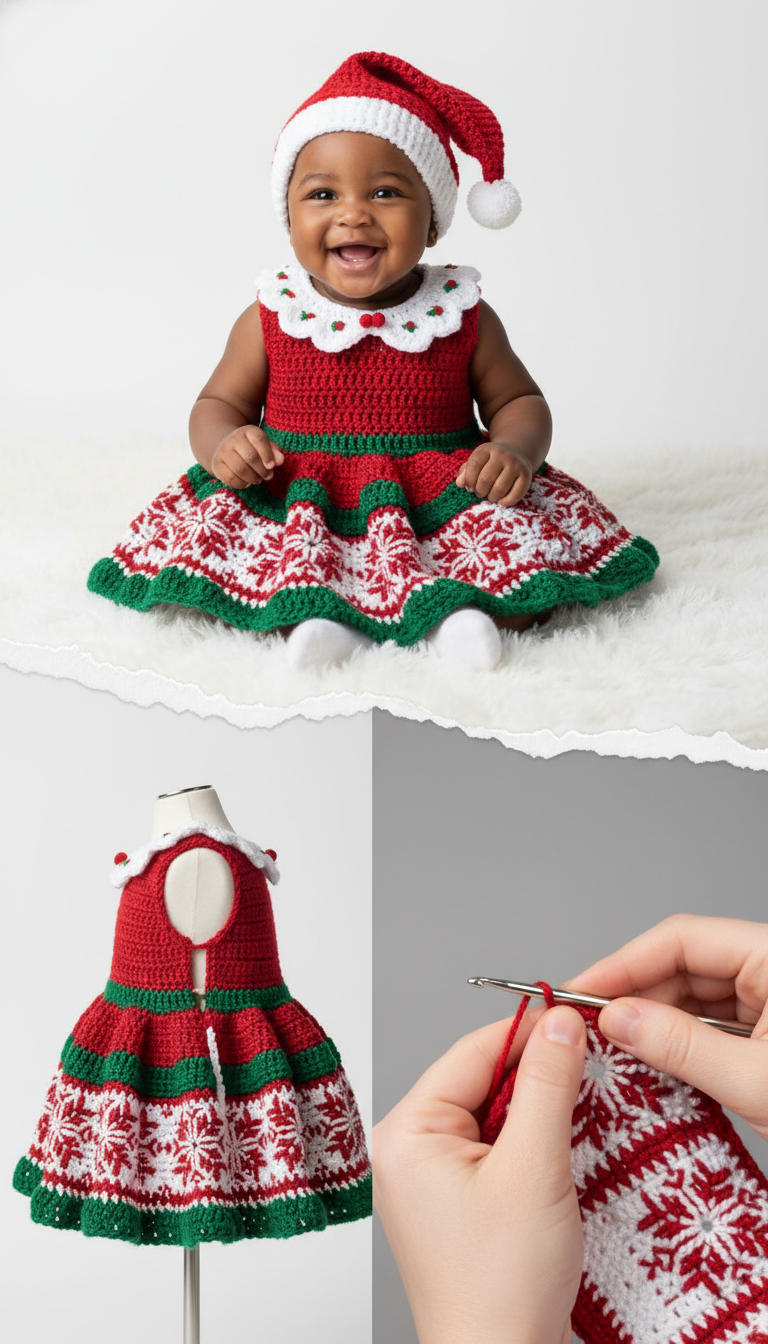
Get ready for the most wonderful time of the year with this adorable Crochet Baby Christmas Dress and Santa Hat set! Perfect for festive photoshoots or holiday gatherings, this pattern creates a charming outfit that will make any little one look like the star of the season. Featuring classic red, white, and green with a delightful snowflake skirt, it’s designed to bring pure joy.
Craft a Magical Christmas Outfit for Your Little Star
Imagine the smiles as your baby sparkles in this handmade ensemble! This crochet pattern offers the opportunity to create a treasured heirloom. The detailed instructions ensure a rewarding crafting experience, resulting in a beautiful, comfortable, and festive outfit that celebrates the spirit of Christmas. It’s a gift of love, stitched with warmth and holiday cheer.
Crochet Pattern: Jolly Holiday Cheer: Crochet Baby Christmas Dress & Santa Hat Pattern
Materials
- Worsted Weight Yarn in Red (MC)
- Worsted Weight Yarn in White (CC1)
- Worsted Weight Yarn in Green (CC2)
- 4.0mm (G/6) Crochet Hook
- Yarn Needle
- Scissors
- Stitch Markers
- Two small buttons (for dress back)
- Pom-pom maker (optional, for Santa hat)
Abbreviations
- ch: chain
- sl st: slip stitch
- sc: single crochet
- hdc: half double crochet
- dc: double crochet
- inc: increase (2 stitches in one)
- dec: decrease (sc2tog or dc2tog)
- BLO: back loop only
- FLO: front loop only
- MC: Main Color (Red)
- CC1: Contrasting Color 1 (White)
- CC2: Contrasting Color 2 (Green)
- R: Round/Row
- st(s): stitch(es)
- rep: repeat
Instructions
Gauge: 16 dc x 10 rows = 4 inches (10 cm) with 4.0mm hook, or hook needed to obtain gauge.
Note: This pattern is for a 0-6 month size. Adjust hook size or yarn weight for different sizes. When working colorwork for the skirt, carry the unused yarn loosely across the back of your work.
Dress
Yoke (MC – Red)
Ch 56 (adjust for desired neckline circumference).
- R1 (RS): Dc in 4th ch from hook (counts as 1st dc), dc in next 6 ch, (2 dc, ch 2, 2 dc) in next ch (corner), dc in next 12 ch, (2 dc, ch 2, 2 dc) in next ch (corner), dc in next 12 ch, (2 dc, ch 2, 2 dc) in next ch (corner), dc in next 7 ch, (2 dc, ch 2, 2 dc) in next ch (corner), dc in last 7 ch. Ch 3, turn. (59 dc + 4 ch-2 spaces)
- R2-5: Work 1 dc in each st and (2 dc, ch 2, 2 dc) in each ch-2 space around. Ch 3, turn. (Increases will occur in corner ch-2 spaces each row).
- R6 (Armhole Separation): Work dc to first ch-2 space, 1 dc in ch-2 space, ch 3, skip to next ch-2 space, 1 dc in ch-2 space, work dc to next ch-2 space, 1 dc in ch-2 space, ch 3, skip to next ch-2 space, 1 dc in ch-2 space, work dc to end. Ch 3, turn. (This forms the armholes)
- R7: Dc in each st and in each ch of armhole chains. Join with sl st to first dc. Ch 3. From now on, work in continuous rounds.
- R8-12: Dc in each st around. Join with sl st to first dc. Fasten off MC.
Waistband (CC2 – Green)
- R1: Join CC2 in any st. Ch 2 (does not count as st), hdc in BLO of each st around. Join with sl st. Ch 2.
- R2: Hdc in each st around. Join with sl st. Fasten off CC2.
Skirt Base (MC – Red)
- R1: Join MC. Ch 3 (counts as dc). 2 dc in same st. *Dc in next 2 sts, 3 dc in next st*. Rep from * around. Join with sl st. Ch 3.
- R2-3: Dc in each st around. Join with sl st. Fasten off MC.
Snowflake Skirt (CC1 – White & MC – Red)
The snowflake pattern is worked in tapestry crochet, carrying the unused yarn.
- R1 (CC2 – Green): Join CC2. Ch 3. Dc in each st around. Join with sl st. Ch 3. (This provides a base border for the pattern.)
- R2 (CC1 – White): Ch 3. Dc in each st around. Join with sl st. Ch 3.
- R3 (Snowflake Pattern – CC1 & MC): Follow the basic snowflake motif. *Work 5 dc in CC1, 1 dc in MC, 2 dc in CC1, 1 dc in MC, 5 dc in CC1*. Rep from * around. Join with sl st. Ch 3. (Adjust stitch counts to create a repeating snowflake motif. A common snowflake pattern repeats over 12-16 stitches. The image shows approximately a 12-stitch repeat per snowflake.)
- R4-10: Continue building the snowflake pattern using CC1 as background and MC for the snowflake design. Each snowflake is about 7-8 rows tall. Ensure symmetry and even spacing.
- R11 (CC1 – White): Dc in each st around. Join with sl st. Ch 3.
- R12 (CC2 – Green): Ch 3. Dc in each st around. Join with sl st. Fasten off CC1 and MC.
Skirt Bottom Edging (CC2 – Green)
- R1: Join CC2. Ch 1. Sc in first st, skip 2 sts, (2 dc, ch 2, 2 dc) in next st, skip 2 sts. Rep from * around, ending with sc in last st. Join with sl st. Fasten off.
Collar (CC1 – White)
Working around the neckline of the dress:
- R1: Join CC1 to back opening of neckline. Ch 1. Sc evenly around neckline. Join with sl st. Ch 1.
- R2: Work (sc, dc, sc) in first st, skip 1 st. Rep from * around. Join with sl st.
- R3: Using MC, embroider small ‘berry’ bobbles or French knots evenly along the collar edge for decoration. Fasten off.
Finishing Dress
Sew two small buttons on one side of the back opening and create corresponding loops on the other side using ch sts or sewing loops with yarn.
Santa Hat
Hat Body (MC – Red)
Make an adjustable ring.
- R1: 6 sc in ring. Pull tight. (6 sc)
- R2: 1 sc in each st around. (6 sc)
- R3: *Sc in next st, inc in next st*. Rep from * around. (9 sc)
- R4-5: 1 sc in each st around. (9 sc)
- R6: *Sc in next 2 sts, inc in next st*. Rep from * around. (12 sc)
Continue increasing 3 stitches every 3rd round (or adjust as needed for desired hat slope) until the hat reaches the desired circumference (e.g., around 48-52 sc for 0-6 months). Work without increases for about 2-3 rounds.
Brim (CC1 – White)
- R1: Join CC1 to the last round of the hat. Ch 1. Hdc in each st around. Join with sl st. Ch 2.
- R2-4: Hdc in each st around (or work in BLO for a ribbed effect). Join with sl st. Fasten off.
Pom-Pom (CC1 – White)
Create a small white pom-pom using a pom-pom maker or by hand. Securely attach it to the tip of the Santa hat.
Finishing
Weave in all loose ends. Steam block if desired to even out stitches and flatten colorwork.